What to Pack for Your First Mountain Without Overspending on Gear
Your first mountain should not require a second mortgage, a garage full of gear, or an expedition kit built for Everest. A safe beginner summit depends on a few smart essentials: footwear that works, layers that protect you, enough food and water, basic navigation, and emergency margin. This guide shows what to pack, what to borrow, what to rent, and what to skip until your goals actually require it.
that actually matter
if you borrow smart
for first summit days
needed for easy peaks
The biggest beginner gear mistake is not underbuying. It is buying the wrong things too early. New climbers often spend money on technical gear, oversized packs, heavy boots, premium jackets, or gadgets before they know what kind of mountains they will actually climb. For your first nontechnical mountain, the goal is not to own everything. The goal is to carry the right things for the route, weather, season, and your body.
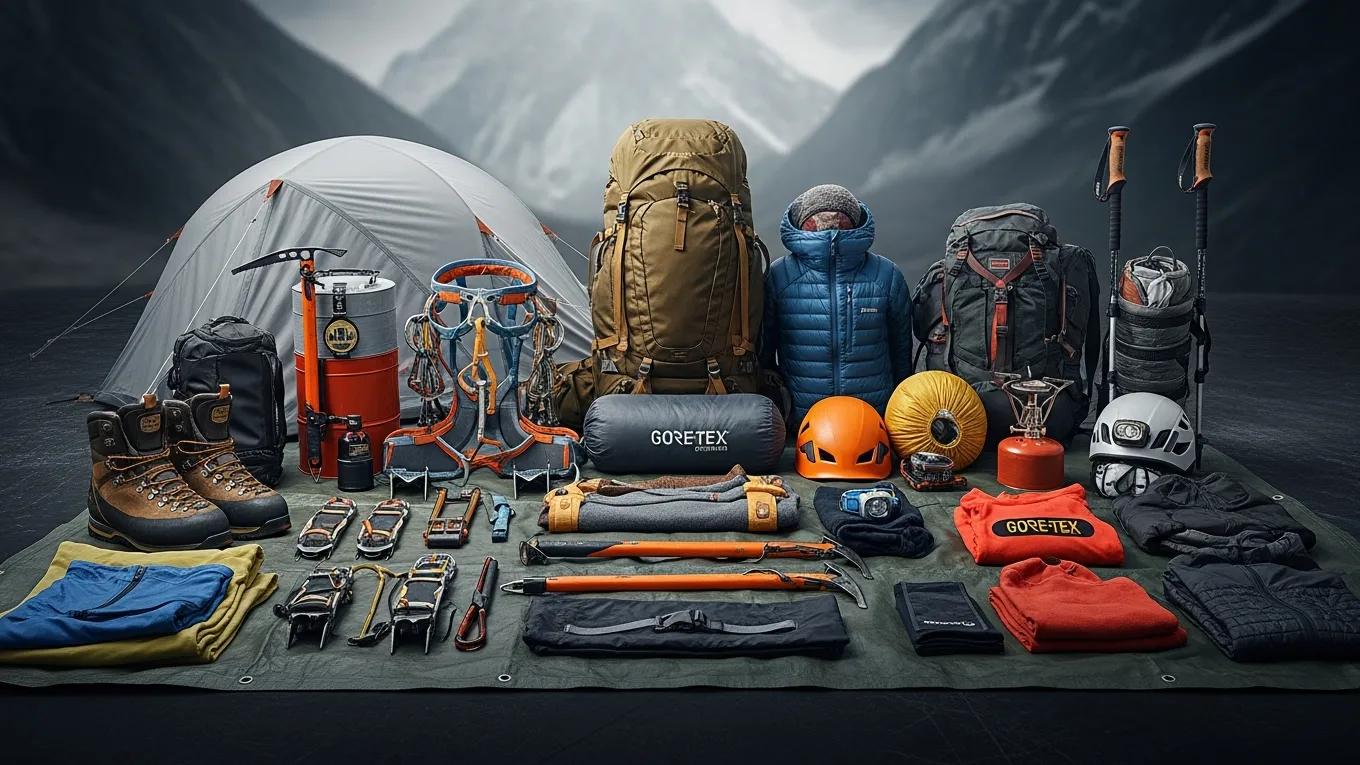
For a first beginner mountain, pack a comfortable daypack, broken-in shoes, moisture-managing clothing, rain shell, warm layer, food, water, sun protection, offline navigation, headlamp, small first-aid kit, and a simple emergency layer. Buy footwear and personal comfort items carefully; borrow or rent specialty gear; skip ropes, crampons, ice axes, expedition boots, and mountaineering tents until a trained objective requires them.
The beginner gear philosophy: buy less, choose better
Gear companies sell possibility. That is part of the fun. A new jacket feels like a new identity. A technical pack feels like permission to become a climber. But your first mountain does not care how much you spent. It cares whether you stayed warm, hydrated, fueled, oriented, and safe enough to descend.
The best beginner setup is simple and route-specific. If your first mountain is a clear Class 1 or easy Class 2 summer summit, you do not need glacier gear, a four-season tent, or mountaineering boots. You need the same practical systems that make any mountain day safer: shoes that do not blister, layers that handle wind and rain, enough calories and water, navigation that works without cell service, and a way to handle delays.
Think of gear in three categories: must own, can borrow, and should skip for now. Must-own gear includes personal-fit items and safety basics you will use repeatedly. Borrowable gear includes items that are expensive but not personal, or things you only need once or twice. Skip-for-now gear includes technical items that require training or belong to objectives beyond your first summit.
The five gear categories that actually matter on your first mountain
Instead of thinking in terms of brands, think in terms of jobs. Every item in your pack should solve a problem. If you cannot explain what job the item performs, it may not belong on your first summit day.
Footwear and pack comfort
Your feet and pack decide whether the day feels manageable or miserable. The right footwear is not always the most expensive boot. It is the shoe or boot that fits your feet, works for the trail, and has been tested before summit day.
- Broken-in trail runners or hiking boots
- Moisture-managing socks
- Comfortable 20–30L daypack
- Optional trekking poles for steep descents
Layers for the summit, not the parking lot
The trailhead can feel warm while the summit is cold, windy, or stormy. Beginners often dress for the first 10 minutes instead of the hardest conditions of the day. Your clothing system should protect you when you stop moving.
- Base layer or breathable hiking shirt
- Warm fleece or light insulated layer
- Rain shell or wind shell
- Hat and light gloves when elevation/weather requires them
Food, water, and pacing support
Food and water are gear. They keep your decision-making intact. A first summit day is not the time to test how little you can carry or how long you can go without eating.
- Water bottles or hydration bladder
- Electrolytes for hot or long days
- Simple snacks every 60–90 minutes
- One real lunch or larger summit snack
Finding the route and getting back down
Many beginners think navigation is only for remote expeditions. But wrong turns, fading trails, snow patches, and descent confusion can happen on popular beginner routes too.
- Downloaded offline map
- Charged phone and small power bank
- Route notes or screenshot of key turns
- Optional paper map if the route is complex
Small items that solve big problems
The safety items you carry may never come out of your pack. That is fine. Their job is not daily convenience; it is giving you margin when the day runs longer, colder, darker, or harder than expected.
- Headlamp, even for day hikes
- Small first-aid kit and blister care
- Emergency blanket or bivy
- Sun protection: sunglasses, sunscreen, hat
Spend where fit and safety matter
The best first gear budget protects your feet, weather margin, hydration, and navigation. Do not overspend on technical gear before your objectives demand it.
- Spend carefully: shoes, socks, pack fit, shell
- Borrow easily: poles, extra layers, headlamp
- Delay: ropes, crampons, ice axe, expedition clothing
The first mountain packing list
This list assumes a nontechnical beginner mountain in a reasonable season: no glacier travel, no rope requirement, no planned snow climbing, no overnight camp, and no advanced mountaineering terrain. Adjust for your specific route, forecast, temperature, and season.
| Category | Pack this | Budget note |
|---|---|---|
| Footwear | Trail runners or hiking boots that are already tested; hiking socks; optional backup blister tape. | Do not buy new shoes the night before. Fit beats price. |
| Pack | 20–30L daypack with room for water, food, layers, and essentials. | Borrow first if needed. Comfort matters more than premium features. |
| Clothing | Breathable hiking shirt, hiking pants/shorts, warm layer, rain or wind shell. | Use what you own if it manages moisture and dries reasonably well. |
| Food | Breakfast, snacks every 60–90 minutes, salty food, and one larger lunch/summit snack. | Simple grocery-store food works: bars, trail mix, sandwiches, fruit, jerky, crackers. |
| Water | Enough water for the route and weather; electrolytes if hot, long, or high effort. | Reusable bottles are fine. You do not need an expensive hydration system. |
| Navigation | Offline map, route notes, charged phone, power bank, optional paper backup. | A power bank is usually cheaper than a bad descent. |
| Safety | Headlamp, small first-aid kit, blister care, emergency blanket, whistle. | These are low-cost items with high value when the day goes sideways. |
| Sun/weather | Sunglasses, sunscreen, hat, gloves or beanie if high/cold/windy. | Sunburn and wind chill ruin beginner summit days quickly. |
If you would be uncomfortable waiting 30–45 minutes near the summit in wind, cold, or light rain, you are probably underpacked. Your gear should protect you when you stop moving, not just when you are warm from climbing uphill.
Own, borrow, rent, or skip?
This is where beginners save the most money. You do not need to own every outdoor item before your first summit. You need reliable access to the correct items for the specific day. Some items should be yours because fit and comfort are personal. Others are easy to borrow or rent. Some should wait entirely.
| Gear item | Best beginner decision | Why |
|---|---|---|
| Hiking shoes or trail runners | Own | Footwear fit is personal. Blisters can ruin the day. |
| Socks | Own | Good socks are inexpensive compared with foot pain. |
| Daypack | Own or borrow | Buy if you will hike often; borrow if this is your first test. |
| Rain shell | Own or borrow | Essential for weather margin, but entry-level shells are fine. |
| Trekking poles | Borrow first | Useful for descents, but not everyone loves them. Test before buying. |
| Headlamp | Own | Low-cost safety essential. Your phone flashlight is not enough. |
| Satellite communicator | Optional / rent | Valuable in remote areas, unnecessary for many popular beginner trails with good access. |
| Crampons or ice axe | Skip for first route | If your first mountain needs these, choose a different route or take a course. |
| Rope and harness | Skip | Technical gear requires training and belongs to more advanced objectives. |
| Expedition boots or down suit | Skip | Not relevant for first nontechnical mountains. |
Three realistic budget tiers for your first mountain
Your actual cost depends on what you already own. Many beginners already have athletic clothing, a backpack, water bottles, snacks, and a phone. If you borrow a shell, trekking poles, or a pack, the first summit can be very affordable. Spend first on the gaps that affect safety and comfort.
Best if you already hike
Use existing athletic clothing, borrow a pack or shell, buy socks, blister care, snacks, sunscreen, and a headlamp if you do not own one.
Best for most new climbers
Buy shoes if needed, socks, headlamp, water system, simple shell or fleece, blister care, and basic safety items. Borrow optional extras.
Best if you will continue
Add a better-fitting daypack, quality shell, trekking poles, more durable layers, and upgraded navigation/safety tools.
Most beginners get more value from good socks, tested footwear, a headlamp, food they will actually eat, and a reliable rain shell than from expensive technical pieces they will not use. Buy the boring essentials first. Fancy gear can wait until your objectives become more specific.
Where not to save money
Budget-conscious does not mean careless. There are a few places where cheaping out can ruin the day or increase risk. You do not need the most expensive version, but you do need something that works.
Footwear fit
Bad footwear creates blisters, hot spots, toe pain, and poor descent control. Buy or use shoes that fit your feet and match the trail. Test them before summit day.
Weather protection
A light shell can be the difference between uncomfortable and unsafe. Wind and rain at elevation feel colder than beginners expect.
Navigation and power
Offline maps and battery backup are inexpensive compared with being off-route late in the day. A phone is useful only while it still works.
Food and water
Under-fueling makes beginners slower, colder, more emotional, and worse at decisions. Carry more than the bare minimum.
What to skip until year two
The easiest way to overspend is to buy gear for mountains you are not climbing yet. Technical gear is exciting, but it is also expensive, specialized, and sometimes dangerous without training. If your first mountain requires ropes, crampons, an ice axe, avalanche gear, or glacier equipment, the better beginner decision is usually to choose a different mountain or hire a qualified guide.
| Skip for now | Why beginners buy it too early | Better first-season decision |
|---|---|---|
| Ice axe | It looks like a symbol of mountaineering. | Take a snow-travel course before carrying one as safety equipment. |
| Crampons | Beginners think they make snow safe automatically. | Avoid snow routes until trained; microspikes may be enough for mild trail ice if appropriate. |
| Rope and harness | They feel like “real climbing” gear. | Learn rope systems with instruction before relying on them outdoors. |
| Mountaineering boots | They look durable and serious. | For summer beginner peaks, trail runners or hiking boots usually work better. |
| Four-season tent | People imagine future expeditions. | Rent or borrow if an overnight objective actually requires it later. |
| High-altitude down clothing | It appears in expedition photos. | Not needed for first nontechnical day summits. |
If you are buying technical gear because your first mountain suddenly looks intimidating, pause. The safer beginner move may be choosing a different route, different season, lower peak, or guided course. Equipment without training can create false confidence.
A simple packing system for the night before
Beginners often forget gear because they pack by memory. Use a system instead. Lay everything out by category, check the weather, match each item to a job, then pack in the order you will need things during the day.
First mountain packing checklist
- Start with the route. Confirm mileage, elevation gain, terrain class, season, and expected time.
- Check summit weather, not just town weather. Wind and temperature change quickly with elevation.
- Lay out footwear and socks. Add blister care if the route is long, hot, or steep.
- Build your clothing system. Hiking layer, warm layer, shell, sun hat, and cold/wind accessories if needed.
- Pack food by time, not vibes. Plan snacks every 60–90 minutes plus one larger meal/snack.
- Pack water and backup plan. Know whether water exists on route and whether you can filter it.
- Confirm navigation. Download maps, save route screenshots, charge phone, and add power bank.
- Add safety essentials. Headlamp, first aid, blister care, emergency blanket, whistle, and personal medications.
- Remove fear items. Do not pack heavy gear you do not know how to use just because you are nervous.
- Weigh the pack mentally. If it feels overloaded, remove nonessential extras — not water, layers, food, or safety basics.
Frequently Asked Questions
What should I pack for my first mountain?
For a first nontechnical mountain, pack tested footwear, hiking socks, a comfortable daypack, water, food, rain or wind shell, warm layer, sun protection, offline navigation, headlamp, first-aid kit, blister care, and an emergency blanket. Adjust for the route, season, weather, altitude, and length of the day.
Do I need expensive hiking gear for a beginner mountain?
No. You need functional gear, not expensive gear. Spend carefully on footwear, socks, weather protection, food, water, and navigation. Borrow or rent items you are unsure about. Do not buy technical gear until your objectives and training require it.
Should beginners wear trail runners or hiking boots?
Either can work. Trail runners are lighter and often more comfortable on clear trails. Hiking boots may offer more support and protection on rougher terrain. The best choice is the one that fits your feet, matches the route, and has been tested before summit day.
Should I rent gear for my first mountain?
For a simple first mountain, you may not need to rent anything. Borrowing a pack, trekking poles, or extra layer can be enough. Renting becomes more useful when you need expensive specialty gear for a specific objective, especially if you are not sure you will use that item repeatedly.
What gear should I avoid buying before my first mountain?
Most beginners should avoid buying ropes, harnesses, crampons, ice axes, mountaineering boots, four-season tents, avalanche gear, and high-altitude clothing before their first nontechnical summit. Those items belong to more advanced routes or trained objectives.
How much should my first mountain pack weigh?
Many first-summit daypacks fall around 10–20 pounds depending on water, food, layers, and weather. Hot, dry, cold, remote, or longer routes may require more. The goal is not the lightest possible pack; it is the lightest safe pack for the route.
Your first mountain does not require expensive gear. It requires appropriate gear. Buy less, choose better, and match every item to the day you are actually planning. Own the personal essentials, borrow what you can, rent specialty items when a real objective demands them, and skip technical gear until you have training. The goal is not to look like a mountaineer at the trailhead. The goal is to stay warm, fueled, oriented, and safe all the way back down.
Use these Global Summit Guide pages next
Use the Beginner Gear Guide before spending money.
The full gear guide breaks down what you actually need, what to skip, and how to build a beginner mountain kit without wasting money on technical gear too early.
Editorial notes
This supplemental article supports the existing Global Summit Guide beginner gear system. It is intentionally written as a budget-first packing article rather than a replacement for the dedicated Beginner Gear Guide or Renting vs. Buying Gear page.
- For the full beginner kit breakdown, use the Beginner Gear Guide.
- For deciding what to rent, borrow, or buy, use the Renting vs. Buying Gear guide.
- For choosing the right objective before packing, use the Beginner Mountain Climbing Guide and Pick Your Mountain tool.
Published May 9, 2026 · Category Gear · Supplemental Blog 04 in the beginner support cluster