
Glacier Travel Gear Essentials: Safety & Crevasse Rescue
Glacier travel presents unique challenges that require specialized gear and safety techniques to ensure a successful and safe expedition. This comprehensive guide delves into the essential components of glacier travel gear, including harnesses, ropes, prusik knots, carabiners, and crevasse rescue methods. Readers will learn about the critical safety measures necessary for navigating glaciers, the specific gear required, and the techniques that can save lives in emergencies. As many adventurers face the risks associated with glacier travel, understanding the right equipment and safety protocols is vital. This article will cover the essential gear components, the benefits of each item, and the best practices for ensuring safety during glacier expeditions.
What Are the Essential Glacier Travel Safety Gear Components?
When embarking on glacier travel, having the right safety gear is crucial. Essential components include harnesses, ropes, prusik knots, carabiners, and crevasse rescue equipment. Each item plays a significant role in ensuring safety and efficiency during glacier navigation.
- Harnesses: These secure the climber to the rope system, providing stability and safety during ascents and descents.
- Ropes: Essential for roped travel, they connect climbers and allow for safe movement across crevasses and other hazards.
- Prusik Knots: These knots are used for ascending and descending ropes, providing a means of self-rescue in emergencies.
- Carabiners: These metal loops with spring-loaded gates are used to connect components of the climbing system securely.
- Crevasse Rescue Equipment: This includes items like pulleys and rescue sleds, which are vital for safely retrieving a climber who has fallen into a crevasse.
For those looking to equip themselves with high-quality glacier travel gear, Information Hub offers a range of products designed for safety and performance.
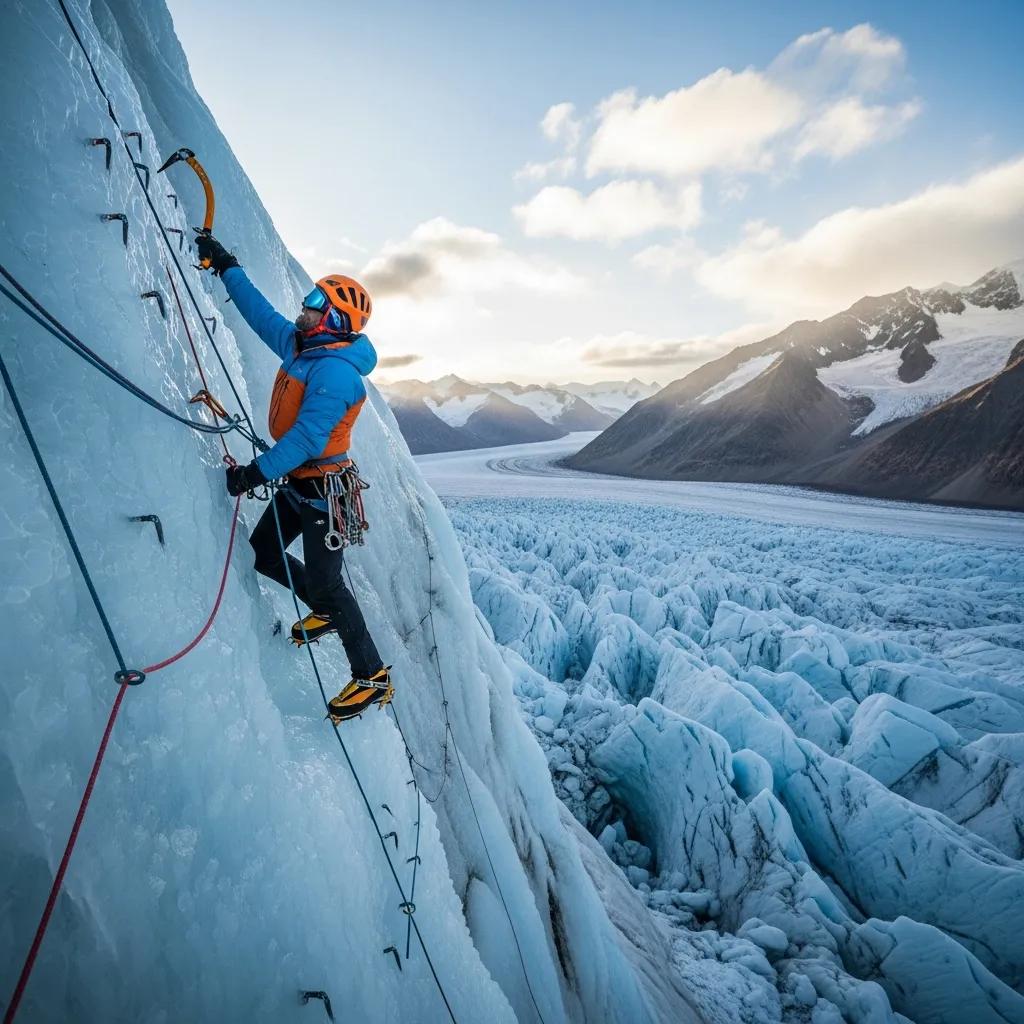
How Do Harnesses Enhance Safety in Glacier Travel?
Harnesses are a fundamental component of glacier travel safety gear. They provide a secure attachment point for the climber, ensuring that they remain connected to the rope system at all times. This connection is crucial during traverses over crevasses or steep ice slopes, where a fall could be fatal.
The stability and control offered by harnesses allow climbers to navigate challenging terrain with confidence. Additionally, in the event of a fall, a harness can distribute the force of the fall across the body, reducing the risk of injury. Properly fitted harnesses also facilitate quick and efficient crevasse rescue operations, making them indispensable for any glacier expedition.
What Are the Key Features of Glacier Travel Ropes?
Glacier travel ropes are designed to withstand the unique stresses of climbing on ice and snow. Key features to consider when selecting ropes include material types, length, diameter, and whether they are dynamic or static.
Dynamic ropes are designed to stretch under load, which helps absorb the energy of a fall, while static ropes are used for hauling and rescue operations where minimal stretch is desired. Understanding these features is essential for selecting the right rope for specific glacier travel needs.
How Are Prusik Knots Used in Glacier Travel and Rescue?
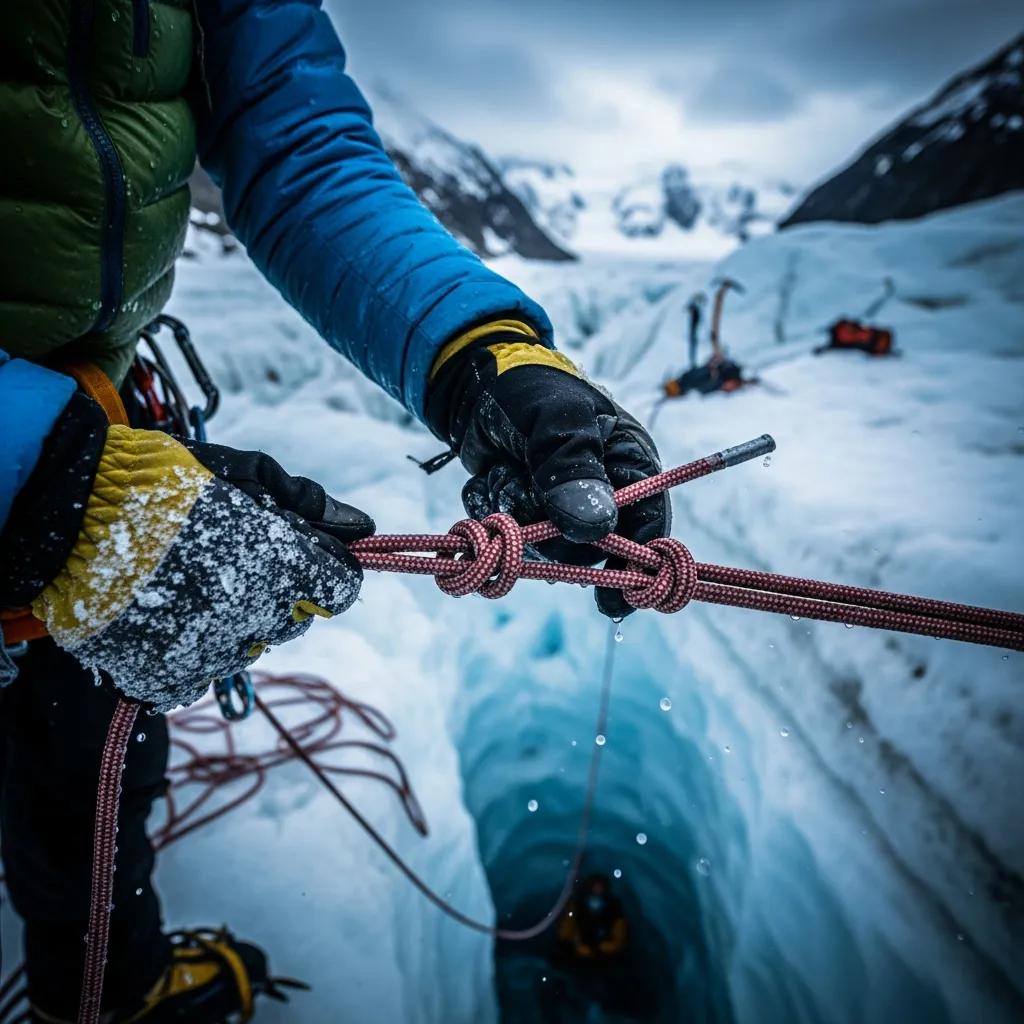
Prusik knots are a vital tool in glacier travel, primarily used for ascending and descending ropes. These knots grip the rope when weight is applied, allowing climbers to move up or down safely. In rescue situations, prusik knots can be employed to create a self-rescue system, enabling a climber to ascend back to safety after a fall.
Training in the proper use of prusik knots is essential for all climbers, as improper technique can lead to dangerous situations. Understanding when and how to use these knots can significantly enhance a climber’s safety and effectiveness in glacier environments.
What Are the Step-by-Step Methods to Tie Effective Prusik Knots?
Tying a prusik knot correctly is crucial for its effectiveness. Here are the steps to tie a basic prusik knot:
- Select the Rope: Choose a rope that is compatible with the prusik knot, typically a smaller diameter rope than the main climbing rope.
- Wrap the Rope: Take the prusik loop and wrap it around the main rope three times.
- Thread the End: Pass the end of the prusik loop through the loop created by the wraps.
- Tighten the Knot: Pull on both ends of the prusik loop to tighten the knot against the main rope.
- Test the Knot: Ensure the knot grips the main rope securely before relying on it.
Practicing this knot in a safe environment is essential to ensure proficiency before heading into the field.
In What Situations Are Prusik Knots Most Critical for Self-Rescue?
Prusik knots are most critical in situations where a climber has fallen and needs to ascend back to safety. This can occur during glacier travel when a climber slips into a crevasse or when they need to ascend a rope after a fall.
Training in the use of prusik knots is vital, as it prepares climbers for emergencies. Additionally, understanding the limitations of prusik knots, such as their effectiveness on icy or wet ropes, is crucial for ensuring safety during glacier expeditions.
Which Carabiner Types Are Best Suited for Glacier Climbing and Safety?
Carabiners are essential components of any climbing system, and selecting the right type is crucial for safety. The best carabiners for glacier climbing typically include locking mechanisms, which prevent accidental opening and ensure a secure connection.
- Screw-Lock Carabiners: These feature a screw mechanism that locks the gate in place, providing added security.
- Auto-Lock Carabiners: These automatically lock when closed, offering convenience and safety.
- Non-Locking Carabiners: While lighter, these should only be used in situations where locking is not critical.
How Do Locking Mechanisms Affect Carabiner Safety and Performance?
Locking mechanisms significantly enhance the safety and performance of carabiners. They prevent accidental openings, which can lead to dangerous situations during climbing.
- Screw-Lock Mechanisms: Require manual locking, which can be forgotten if not checked regularly.
- Auto-Lock Mechanisms: Provide a more reliable option, as they engage automatically when closed, reducing the risk of human error.
Understanding the differences between these mechanisms is essential for climbers to make informed choices about their gear.
What Strength Ratings Should You Consider When Choosing Carabiners?
When selecting carabiners for glacier travel, strength ratings are a critical factor. Carabiners are rated for their strength in kilonewtons (kN), and climbers should choose carabiners that meet or exceed the following ratings:
- General Use: Minimum of 20 kN for climbing applications.
- Rescue Operations: Minimum of 25 kN for added safety during rescue scenarios.
- Lightweight Options: While lighter carabiners may have lower ratings, they should still meet safety standards for the intended use.
Understanding these ratings helps climbers select the appropriate gear for their specific needs.
What Are the Proven Procedures for Crevasse Rescue on Glaciers?
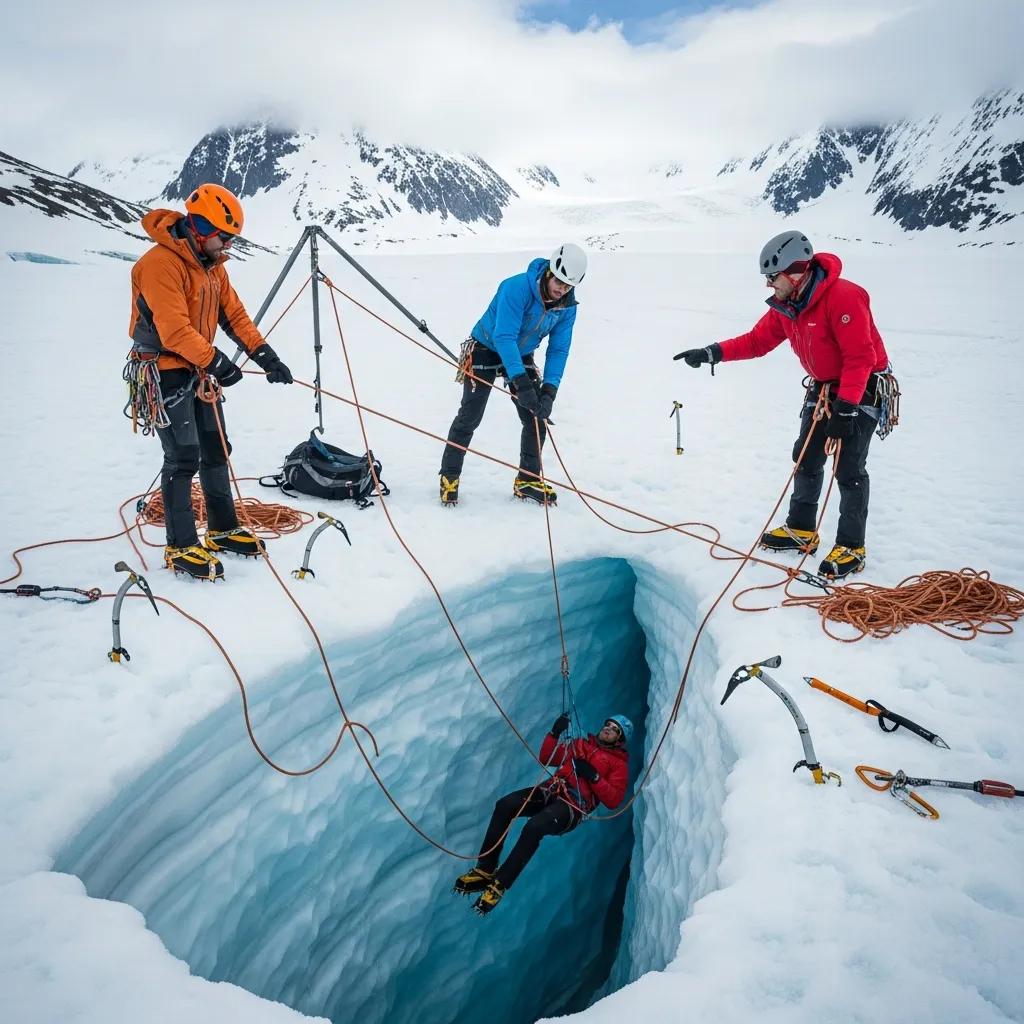
Crevasse rescue procedures are critical for ensuring the safety of climbers who may fall into a crevasse. The following steps outline the proven methods for conducting a successful crevasse rescue:
- Assess the Situation: Determine the location of the fallen climber and the safety of the surrounding area.
- Secure the Area: Ensure that the remaining team members are secure and anchored before attempting a rescue.
- Deploy Rescue Equipment: Use pulleys and ropes to create a system for lifting the fallen climber out of the crevasse.
- Communicate Clearly: Maintain clear communication among team members throughout the rescue process.
- Practice Regularly: Conduct regular training exercises to ensure all team members are familiar with rescue procedures.
These procedures are essential for minimizing risks and ensuring a successful rescue operation.
Which Equipment Is Essential for Effective Crevasse Rescue?
Effective crevasse rescue requires specific equipment to ensure the safety of both the rescuer and the victim. Essential items include:
- Ropes: Strong, dynamic ropes for lifting and securing the climber.
- Pulleys: To create mechanical advantage during the rescue.
- Harnesses: For both the rescuer and the victim to ensure secure attachment to the rope system.
- Snow Anchors: To secure the rescue system in place.
- Rescue Sleds: For transporting the victim safely once they are out of the crevasse.
Having the right equipment readily available can make a significant difference in the success of a rescue operation.
How Does Team Coordination Enhance Crevasse Rescue Success?
Team coordination is vital for the success of any crevasse rescue operation. Effective communication and clear role assignments can significantly improve the efficiency and safety of the rescue process.
- Communication Strategies: Establishing clear signals and commands can help maintain order during a rescue.
- Role Assignments: Designating specific roles, such as anchor person, rescuer, and communicator, ensures that everyone knows their responsibilities.
- Training Importance: Regular training exercises help team members become familiar with their roles and improve overall coordination.
By fostering a culture of teamwork and communication, climbing teams can enhance their chances of a successful rescue.
How Can You Plan Glacier Travel to Minimize Risks and Ensure Safety?
Planning is essential for minimizing risks during glacier travel. Key strategies include:
- Route Selection: Choose routes that avoid known hazards, such as crevasses and unstable ice.
- Emergency Preparedness: Carry essential safety gear and ensure all team members are trained in rescue procedures.
- Weather Monitoring: Stay informed about weather conditions, as changes can significantly impact safety.
By implementing these strategies, climbers can enhance their safety and reduce the likelihood of accidents during glacier travel.
What Safety Protocols Should Be Followed During Glacier Expeditions?
Safety protocols are critical for ensuring the well-being of climbers during glacier expeditions. Key protocols include:
- Layered Clothing: Dress in layers to adapt to changing weather conditions and maintain body temperature.
- Emergency Readiness: Always carry a first aid kit and know how to use it.
- Navigation Tools: Use GPS devices and maps to navigate safely across glaciers.
Following these protocols can help climbers stay safe and prepared for any situation that may arise.
How Does Climate Change Impact Glacier Travel Safety?
Climate change has a profound impact on glacier travel safety. As temperatures rise, glaciers are melting at an alarming rate, leading to increased hazards such as crevasses and unstable ice.
- Changing Conditions: Climbers must adapt to rapidly changing glacier conditions, which can affect route planning and safety.
- Increased Risks: The likelihood of falling into crevasses or encountering avalanches is heightened as glaciers become less stable.
- Adaptation Strategies: Climbers should stay informed about climate trends and adjust their travel plans accordingly to minimize risks.
Understanding these impacts is essential for ensuring safety during glacier travel in a changing climate.
What Are the Latest Innovations in Glacier Travel Gear and Safety Technology?
Recent advancements in glacier travel gear and safety technology have significantly improved climber safety. Innovations include:
- Lightweight Materials: New materials reduce the weight of gear without compromising strength.
- Smart Devices: GPS and avalanche beacons enhance navigation and safety during expeditions.
- Improved Insulation: Advanced insulation technologies keep climbers warm and dry in extreme conditions.
These innovations contribute to safer and more efficient glacier travel experiences.
How Are GPS and Avalanche Beacons Integrated into Glacier Safety?
GPS devices and avalanche beacons play a crucial role in enhancing safety during glacier travel.
- Navigation Assistance: GPS devices help climbers navigate challenging terrain and avoid hazards.
- Rescue Operations: Avalanche beacons allow for quick location of buried climbers in the event of an avalanche, significantly improving rescue times.
- Survival Chances: The integration of these technologies increases the chances of survival in emergency situations.
By utilizing these tools, climbers can enhance their safety and preparedness during glacier expeditions.
What Are the 2026 Safety Statistics and Their Implications for Mountaineers?
As of 2023, safety statistics indicate a concerning trend in glacier travel accidents. Recent data shows an increase in incidents related to crevasse falls and avalanches, highlighting the need for improved safety measures and training.
- Recent Trends: The rise in accidents underscores the importance of adhering to safety protocols and using appropriate gear.
- Safety Improvements: Ongoing education and training can help mitigate risks and improve overall safety for climbers.
- Future Considerations: As conditions continue to change, climbers must remain vigilant and adapt their practices to ensure safety.
Understanding these statistics is essential for climbers to make informed decisions about their safety practices.
How Do You Maintain and Inspect Glacier Travel Gear for Optimal Safety?
Regular maintenance and inspection of glacier travel gear are crucial for ensuring optimal safety. Key practices include:
- Regular Inspections: Check harnesses, ropes, and carabiners for wear and damage before each expedition.
- Cleaning Practices: Clean gear after use to remove dirt and salt that can degrade materials.
- Repair Strategies: Address any damage promptly to prevent gear failure during use.
By following these maintenance practices, climbers can ensure their gear remains safe and effective.
What Are the Recommended Practices for Rope and Harness Maintenance?
Maintaining ropes and harnesses is essential for ensuring their longevity and safety. Recommended practices include:
- Inspection Routines: Regularly check for frays, cuts, or other signs of wear.
- Cleaning Methods: Wash ropes and harnesses according to manufacturer guidelines to remove contaminants.
- Storage Guidelines: Store gear in a cool, dry place away from direct sunlight to prevent degradation.
Implementing these practices can help extend the life of essential climbing gear.
How Should Carabiners and Prusik Knots Be Regularly Checked?
Regular checks of carabiners and prusik knots are vital for maintaining safety. Key practices include:
- Inspection Techniques: Examine carabiners for signs of wear, such as cracks or bent gates.
- Cleaning Practices: Clean carabiners to remove dirt and debris that can affect performance.
- Repair Protocols: Replace any damaged carabiners or prusik loops immediately to ensure safety.
By adhering to these practices, climbers can maintain the integrity of their gear and enhance safety during glacier travel.
What Frequently Asked Questions Address Common Glacier Travel Safety Concerns?
Many climbers have questions regarding glacier travel safety. Here are some common concerns:
- What gear is essential for glacier travel?: Essential gear includes harnesses, ropes, prusik knots, carabiners, and crevasse rescue equipment.
- How can I prepare for a crevasse rescue?: Training in rescue techniques and having the right equipment is crucial for effective preparation.
- What should I do if I encounter a crevasse?: Assess the situation, secure your team, and use proper rescue techniques if someone falls in.
Addressing these questions can help climbers feel more prepared and informed about their safety during glacier travel.
How Do You Perform a Basic Crevasse Rescue?
Performing a basic crevasse rescue involves several critical steps:
- Assess the Situation: Determine the location of the fallen climber and ensure the safety of the remaining team.
- Set Up a Rescue System: Use ropes and pulleys to create a mechanical advantage for lifting the climber out.
- Communicate Clearly: Maintain clear communication throughout the rescue process to ensure coordination.
- Practice Regularly: Conduct training exercises to ensure all team members are familiar with rescue procedures.
By following these steps, climbers can effectively respond to crevasse falls and enhance safety during glacier travel.
What Is the Best Rope Type for Glacier Travel?
The best rope type for glacier travel depends on the specific needs of the climber. Generally, dynamic ropes are preferred for climbing due to their ability to absorb falls, while static ropes are used for hauling and rescue operations.
- Dynamic Ropes: Ideal for climbing, as they stretch under load and reduce the impact of falls.
- Static Ropes: Best for rescue scenarios where minimal stretch is required.
Choosing the right rope type is essential for ensuring safety and effectiveness during glacier travel.
For more detailed information on planning your next adventure, visit Global Summit Guide, your comprehensive resource for mountaineering and glacier travel.