
Trekking poles guide: how to choose & use them
Trekking poles are the most underrated piece of mountaineering gear. Ask a veteran guide which single item transformed their long-term knee health and pace on multi-day expeditions, and most will name the poles in their hands rather than the boots on their feet. Done right, poles reduce knee compressive force by 25% on descents, add 5-10% uphill pace, and stabilize every water crossing, scree traverse, and loose-step moraine on the route. Done wrong — too long, too rigid, wrong grip, wrong technique — and they become tripping hazards that teach climbers to hate what should be their most useful tool. This guide fixes that. It’s part of our comprehensive mountaineering reference.
Why trekking poles actually work
The biomechanics research on trekking poles is consistent: multiple peer-reviewed studies have measured reductions in knee compressive force of 15-25% during descents when poles are used correctly. The mechanism is straightforward — poles transfer a portion of your body weight through the arms to the pole tips before your lead foot lands, reducing the impact absorbed by the knee joint. On a full expedition descent of 4,000-5,000 vertical meters over several days, this compound savings is the difference between walking pain-free and limping off the mountain. See our Kilimanjaro guide for a specific look at why pole use matters on peaks with long scree descents.
The benefits extend beyond knees:
- Uphill propulsion. Arms contribute 5-10% of forward drive when poles are planted and pushed backward, reducing quad fatigue on long ascents.
- Balance insurance. Four points of contact (two feet + two poles) stabilize river crossings, snow slopes, talus fields, and the loose scree approaches common on every 7-Summits peak.
- Cadence discipline. Synchronizing pole plants with footsteps forces a steady rhythm — a meaningful aerobic efficiency gain on long days.
- Load transfer at altitude. On altitude-impaired days, engaging arm muscles distributes oxygen demand rather than letting legs shoulder all the work.
The tradeoff: poles engage your arms in locomotion, so cardiovascular load rises slightly. For most climbers, this is more than compensated by reduced leg fatigue.
Three mechanism types: fixed, telescoping, folding
Trekking poles split into three construction families defined by how (or whether) they collapse. Each has a home.
Fixed-length
No adjustment mechanism, no locking system, no pack-down. The lightest and strongest option because there’s nothing to break. Favored by trail runners, fastpackers, and racers who never stow their poles and don’t need length changes for terrain.
Telescoping
The versatile default. Sections slide inside each other and clamp via external lever locks (preferred) or internal twist locks (older design, prone to slipping under load). Adjustable on the fly from roughly 60cm to 140cm, packing to about two-thirds of full length.
Folding (Z-pole)
Tent-pole construction — sections fold into a zig-zag using an internal shock cord, collapsing to 35-40cm. Most models have a single length-adjustment range (5-15cm) at the top section. The clear winner when pack stowability matters — fastpacking, alpine climbing, commuting.
Older internal twist-lock mechanisms (common on cheap poles) become slippery when wet, freeze in cold conditions, and collapse unexpectedly under body weight on descents. Every modern quality pole uses external lever locks (also called flick-locks, quick-locks, or speed-locks). If you’re shopping for 7-Summits use, reject twist-lock construction outright.
Carbon vs aluminum shafts
Carbon fiber shafts save 20-30% weight and absorb vibration better, but they fail catastrophically when lateral-loaded beyond their design limits — a pole wedged sideways in a rock crack can shatter. Aluminum shafts are heavier but bend before breaking, giving you a warning you can recover from. For high-consequence terrain where losing a pole mid-route means bailing, aluminum wins on reliability. For fastpacking and hiking where weight matters most, carbon is standard. Hybrid shafts (carbon upper, aluminum lower) split the difference and have become the default on premium expedition poles. For a complete overview of how pole choice interacts with the rest of your expedition kit, see our complete mountain climbing gear list and the broader master mountaineering guide.
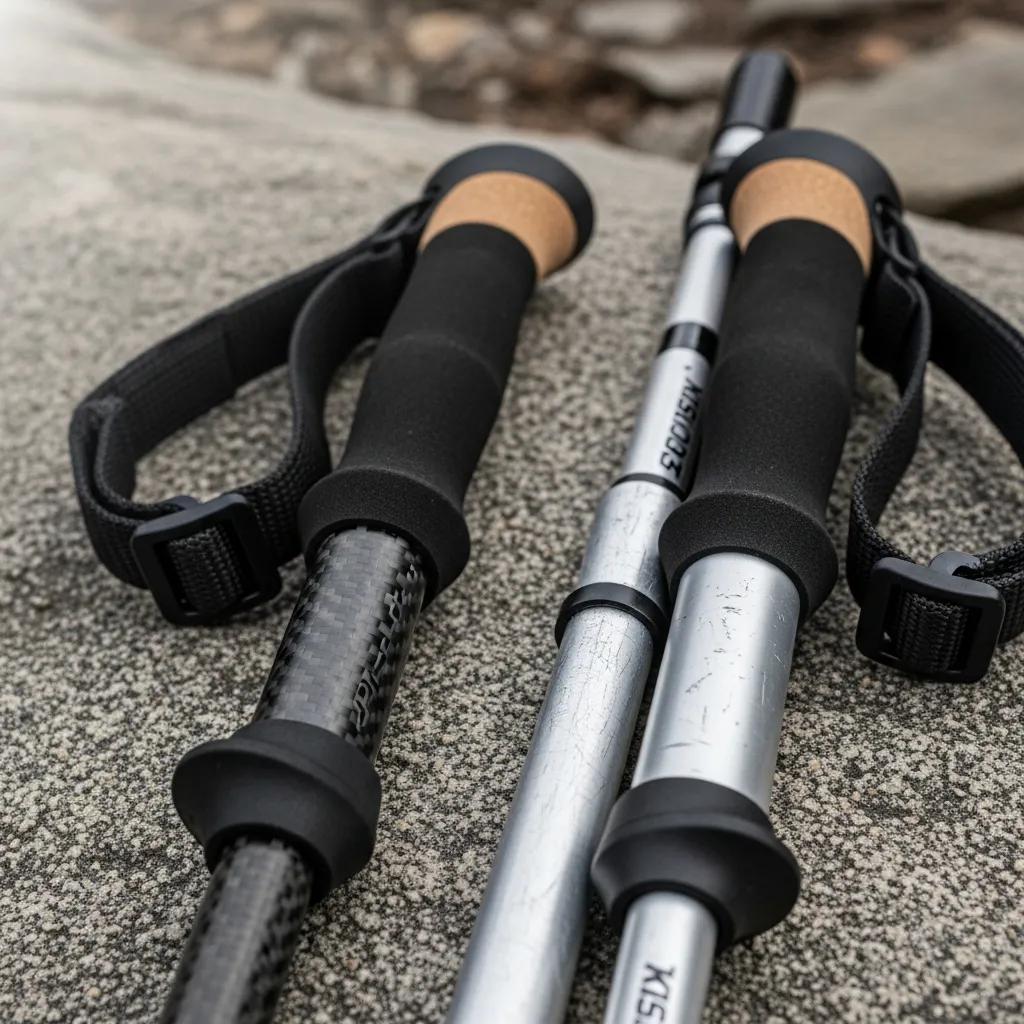
Grip material: cork, foam, rubber, EVA
The grip is where your hand lives for eight to twelve hours per climbing day, so material choice has outsized consequences for comfort and injury prevention. Four options dominate the market, each with a genuine best-use case.
Cork
- Absorbs sweat
- Molds to hand shape
- Naturally antimicrobial
- Excellent all-day comfort
- Cold to hold in winter
- Can crumble after years
- Heavier than foam
- Slippery when soaking wet
Foam (EVA closed-cell)
- Lightest grip material
- Warmer than cork
- Quick-drying
- Cushions vibration
- Compresses over time
- Slippery when sweaty
- Less durable than cork
- Shows wear quickly
Rubber
- Best grip with gloves
- Resists ice buildup
- Insulates against cold
- Very durable
- Can cause blisters bare-handed
- Heavier than foam
- Hot in summer heat
- Doesn’t absorb sweat
EVA (open-cell)
- Softer than cork
- Moderate warmth
- Good vibration damping
- Mid-range durability
- Middling at everything
- Compresses with use
- Can tear at edges
- No standout strength
Strap design matters more than you think
Cheap pole straps are simple loops that let the pole swing when you release the grip — which means your hand clenches the grip constantly and gets tired. Quality straps (Leki Aergon, Black Diamond Dual-Density, LockJaw) form a supportive cradle that transfers downward force through the wrist, letting you grip lightly. Proper technique: thread your hand up through the strap from below, then grip the pole — the strap catches your palm heel when you apply downward force. Properly-used straps do 60% of the load-bearing work and keep your hand relaxed for hours. The right glove choice from our layering systems guide also affects how well straps work — fat insulated gloves interact differently with strap geometry than thin liners.
Sizing poles: the 90-degree rule
The universal sizing principle for trekking poles is the 90-degree rule: when you plant the pole tip on flat ground next to your foot and grip the pole normally, your elbow should bend at a right angle with your forearm parallel to the ground. This position puts your shoulder and tricep at their mechanically optimal position for sustained downward force transfer.
| Climber Height | Starting Pole Length | Ascent Setting | Descent Setting |
|---|---|---|---|
| Under 5’3″ | 100cm | 90-95cm | 105-110cm |
| 5’3″ – 5’7″ | 110cm | 100-105cm | 115-120cm |
| 5’7″ – 5’11” | 120cm | 110-115cm | 125-130cm |
| 6’0″ – 6’4″ | 130cm | 120-125cm | 135-140cm |
| Over 6’4″ | 135-140cm | 125-130cm | 140-145cm |
Fixed-length poles are sized once to your flat-ground setting and live there permanently. Adjustable poles get shifted dynamically throughout the day as terrain changes. This dynamic sizing principle is foundational to the full mountaineering system we cover across every peak-specific guide.
Dynamic length adjustment by terrain
The single most valuable skill in pole use is adjusting length as the ground tilts. Most hikers set their poles once at the trailhead and never touch them again — leaving 90% of the benefit on the table.
On rolling terrain with constant up-down changes, most experienced hikers split the difference and leave poles 2-3cm longer than their baseline setting. The descent work is where poles save knees, so slightly overlong is better than slightly underlong across a full day.
Four essential pole techniques
Alternating plant pattern
On flat to moderate terrain, plant the left pole with the right foot and vice versa — a natural counter-rotation that mirrors your arm swing. Keep the plant ahead of your lead foot and angled slightly backward so the tip drives you forward. Don’t plant straight down; you’ll waste energy pushing vertically when you want horizontal propulsion.
Double-plant on steep descents
On steep downhill (grades above 25%), switch to simultaneous parallel plants of both poles together, ahead of your body. Plant, step down between the poles, lift and replant. This is slower than alternating plants but dramatically reduces impact on each descending step and keeps you centered over a stable base.
Load the strap, not the grip
Thread your hand up through the strap from below, then close around the grip. When you push down on the pole, the strap cradles your palm heel and absorbs 60% of the load — your fingers only hold direction, not force. This is the single biggest technique fix for climbers whose hands go numb after a few hours of pole use.
Stash without stopping
On alpine routes you’ll repeatedly need to stow poles to pick up an ice axe or climb a steep pitch. Folding poles collapse in two seconds and tuck into a pack side pocket or under a compression strap. Telescoping poles take longer — run compression straps across your pack specifically to hold poles in 2-3 seconds without full removal. Practice both transitions at home before game-day.
Integrating poles with your pack and gear
Every good expedition pack has dedicated pole attachments — usually a tip loop at the bottom of the side pocket and a compression strap higher up. For longer carries where you’ve switched to axe-in-hand (glacier travel, steep snow), you need to stow poles cleanly in under 10 seconds or you’ll stop using them. We cover pack selection and attachment systems in our dedicated expedition pack selection guide, which is the next piece in this series.
The other integration point is with your mountaineering boots and crampons. When crampons go on, poles typically come off — you’re on terrain where an ice axe is the correct tool. The transition from pole-hiking to axe-in-hand glacier travel is a choreographed moment in every 7-Summits expedition, usually at the terminal moraine where the trail meets the ice.
Basket selection and tip care
The small plastic disc near the tip of your pole is called the basket, and it does more than you think. Baskets prevent the pole from sinking into soft ground — mud, deep snow, forest duff — and stabilize the plant. Most poles ship with a small 35-50mm summer basket plus an option to swap to a 90-100mm snow basket for winter use.
- Summer (trekking) basket: 35-50mm disc, keeps the tip from grabbing roots and rocks, adds minimal weight.
- Winter (snow) basket: 90-100mm disc, prevents the pole from penetrating soft snow to the handle on every plant. Essential for ski touring, mountaineering approaches, and glacier travel.
- Mud basket (offered by some brands): perforated mid-size disc that sheds mud rather than holding it.
The carbide tip at the bottom of your pole is a wear item. On rocky trails it blunts in 300-500km of use; on dirt it lasts much longer. A visibly rounded tip slips on rock and reduces plant confidence — replacement tips are available from every manufacturer for $15-25 a pair and swap in with a standard allen wrench. Replace at the first sign of rounding. Most manufacturers also sell rubber tip covers (removable booties) for urban walking and indoor storage, which extend carbide life considerably.
Model recommendations: what to actually buy
Black Diamond Alpine FLZ
The benchmark mountaineering pole. Aluminum lower with carbon upper, lever FlickLock Pro, Z-folding construction, rubber + foam combined grip, interchangeable baskets. Reliable under load, packs to 40cm, and survives 7-Summits expedition abuse year after year.
Leki Makalu Lite Cor-Tec
Telescoping aluminum with Cor-Tec cork grip (Leki’s cork-rubber composite), Aergon strap system, and SpeedLock 2 external levers. The multi-day hiker’s favorite for its grip comfort and bomber strap design. Slightly heavier than carbon competitors but virtually indestructible.
Black Diamond Distance Carbon FLZ
Full carbon Z-fold with minimalist EVA foam grip and reduced hardware. The choice for fastpacking, trail running, and alpine scrambles where grams matter. Less durable under lateral load than hybrid shafts — choose aluminum if you regularly wedge poles into rock cracks.
Leki Cross Trail FX Superlite
Folding construction with Leki’s Aergon Air foam grip and SpeedLock adjustment. Lighter than the Makalu and more packable; slightly less expedition-rated. Good choice for mixed three-season hiking that includes occasional mountaineering approaches.
Leki Sherpa FX Carbon
Premium folding expedition pole with carbon-aluminum hybrid shaft, cork grip, and Leki’s expedition-rated SpeedLock 2. Used on Everest climbs for its cold-weather strap compatibility and rigorous load-tested construction. A true workhorse.
Cascade Mountain Tech Carbon 3K
Full carbon telescoping pole at roughly half the price of premium European brands. Quick-flip external locks, cork grip, multiple basket options. The specs match $180 poles; the long-term durability is slightly lower. Excellent entry point or backup pair.
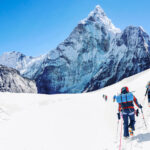
Peak-specific pole use
Pole strategy shifts meaningfully between peaks. On non-technical trek peaks like Kilimanjaro and Elbrus, poles stay in hand from trailhead to summit and back. On technical mountaineering objectives like Denali and Everest, there’s a handoff moment where poles get stowed and axes come out. See our complete 7-Summits guide for a peak-by-peak overview of expedition logistics.
| Peak / Route | Pole Strategy | Notes |
|---|---|---|
| Kilimanjaro | Poles throughout | Essential for 4,000m of descent on loose scree — rent from outfitter if you don’t own them |
| Everest Base Camp Trek | Poles throughout | Khumbu valley is constant up-down on rocky trails — one of the hardest workouts for knees |
| Aconcagua | Poles to high camp | Switch to axe for Canaleta and summit day — poles stowed on pack |
| Denali | Poles on glacier approach | Axe takes over above 14,200′ camp — poles stay on sled to base camp |
| Vinson | Poles on lower glacier | Axe on fixed-line sections and summit pyramid |
| Everest | Poles to Base Camp and through Icefall approach | Axe and jumars take over on fixed lines above Camp 2 |
Continue your gear research
Trekking poles sit inside a full gear system — pack, boots, crampons, axes, and clothing layers all interact with how (and whether) you use poles on a given day. Our complete cluster walks you through each piece:
Every guide, one navigation point
Trekking poles are one part of a 67-guide mountaineering reference covering gear, training, altitude, routes, and peak-specific planning across all 7-Summits and beyond. Our master hub indexes every guide in one place.
Browse the Complete Guide →Frequently asked questions about trekking poles
What’s the right length for trekking poles?
The standard rule: with the pole tip on the ground next to your foot and the grip in your hand, your elbow should bend at 90 degrees. Height-based starting point: under 5’3″ use 100cm, 5’3″-5’7″ use 110cm, 5’7″-5’11” use 120cm, 6’0″-6’4″ use 130cm, over 6’4″ use 135-140cm. Adjustable poles should be set 5-10cm shorter for steep ascents and 5-10cm longer for descents.
Are cork, foam, or rubber grips best?
Cork grips are best for long multi-day hikes — they absorb sweat and mold to hand shape. Foam grips are best for cool/cold weather and lightweight setups. Rubber grips are best for cold-weather mountaineering and alpine use — best grip with gloves and resist icing. EVA grips split the difference. For 7-Summits expeditions, rubber or foam tops most climbers’ picks.
Should I get fixed, telescoping, or folding trekking poles?
Fixed poles are lightest and strongest but don’t collapse — best for racing. Telescoping poles adjust on the fly for changing terrain and pack small enough for most hikes — the versatile default. Folding poles (Z-pole design) collapse shortest for running and technical climbing. For general mountaineering, telescoping lever-lock poles are standard; for alpine climbing and fastpacking, folding wins.
Do trekking poles actually reduce knee impact?
Yes — studies consistently show trekking poles reduce knee compressive force by 15-25% during descents, most pronounced on steep downhill grades. Poles also reduce quad fatigue, increase uphill pace by 5-10%, and improve balance on loose terrain. The tradeoff is slightly higher cardiovascular load. For climbers with knee issues, poles are widely considered essential.
How do I use trekking poles on steep ascents and descents?
On steep ascents, shorten your poles 5-10cm — this keeps your arms at the correct 90-degree angle. Plant the poles ahead of your lead foot and push down-and-back. On descents, lengthen 5-10cm and plant ahead of your body to catch weight before your forward foot lands. Use both poles in parallel for balance on steep terrain; alternate pole-foot rhythm on moderate slopes.
Can I bring trekking poles on a plane?
Trekking poles cannot go in carry-on luggage per TSA and international aviation rules — they’re classified as sporting goods. You must check them in your baggage. Folding poles fit inside standard suitcases easily; telescoping poles often fit inside larger expedition duffels. For international expeditions, always pack poles inside your checked duffel rather than lashing them externally.
What are the best trekking poles for mountaineering?
For 7-Summits expeditions, Black Diamond Alpine FLZ is the benchmark — carbon-aluminum hybrid shaft, lever locks, folding Z-design. Leki Sherpa FX Carbon is similarly capable. For lighter use, Black Diamond Distance Carbon FLZ is the fastpacking favorite. Leki Makalu Lite Cor-Tec offers cork grips for multi-day comfort. Budget picks include Cascade Mountain Tech carbon poles at about half the premium price.
Do I need trekking poles for Kilimanjaro or Everest Base Camp?
Yes on both. For Kilimanjaro, poles are essential for the long Barranco, Karanga, and Mweka descents where 4,000m of downhill on loose scree punishes knees severely. Most climbers rent poles from outfitters if they don’t own them. For Everest Base Camp trek, poles help manage the repetitive up-and-down nature of the Khumbu valley approach. On technical peaks like Denali or Vinson, poles are used for approaches but stowed during roped travel.
Related posts:
 Everest Base Camp Trek: Complete Itinerary, and Cost Guide
 K2 Base Camp Trek: Complete Guide for Trekkers
 Top 50 Technical Mountaineering Objectives
 Everest 2026 Season: New Permit Fees, Crowd Limits & What’s Changed
 Seven Summits for Beginners: Which Peak Should You Climb First?
 The 10 Hardest Mountains to Climb in the World
Leave a Reply