We Summited Aconcagua in January: Here’s What No One Tells You (2026) | Global Summit Guide
Trip Reports / Aconcagua
We summited Aconcagua in January. Here’s what no one tells you.
Written byGlobal Summit Guide Editorial Team
PublishedApril 26, 2026
Reading time22 minutes
6,961m
Summit altitude
21 days
Expedition length
4 of 4
Team summit rate
Jan 2024
Climb date
★Part of the Master GuideThis trip report is part of our comprehensive mountaineering reference. Browse all guides from one hub.Visit the Hub →
Most Aconcagua trip reports skip the parts that actually matter. They tell you the days, the camps, the altitudes, and the summit photo. They don’t tell you how it felt to lie awake at 5,500m with a heart rate of 110 trying to catch your breath, or how the mules at Plaza de Mulas would walk through your tent vestibule at 4 a.m. looking for food, or how the Canaleta is one of the few places on a non-technical mountain where you genuinely think about whether you have the legs left to finish. This is a January 2024 expedition told the way it actually happened, with the parts most articles leave out. For the route comparison and broader 7-Summits decision context, our Aconcagua routes guide, our Seven Summits guide, and the master mountaineering hub set the broader frame.
Why January
The expedition booked for January 8-30, 2024. We picked January for the same reason most climbers do. December and January are the prime weather windows in the Argentine summer, and the upper-mountain temperatures are tolerable rather than vicious. The tradeoff is that you share Plaza de Mulas with 200 other climbers and the upper camps feel busy. We accepted that tradeoff. February is colder, March is essentially closed, and earlier than December the weather windows are unpredictable.
Our team was four climbers and two guides. Two of us had been on Kilimanjaro the previous year, one had climbed Mont Blanc, and one had done Rainier and Hood multiple times. Reasonable preparation, no Everest veterans. The full background context for picking the second 7-Summit lives in our Kilimanjaro vs Aconcagua comparison.
Mendoza, the permit, and the strange luxury before the climb
Mendoza in January feels nothing like a high-altitude staging town. The full Mendoza guide-economy backstory lives in our Aconcagua Mendoza guide economy story. It’s hot, wine country, sidewalk cafés open until midnight, lined with sycamore trees. We spent two days there picking up our climbing permits at the provincial office (a one-hour bureaucratic slog), eating ribeye and Malbec, and adjusting to the time zone. The permit cost in 2024 was around 800 USD for the high season, paid in cash and in pesos at official exchange rates. By 2026 the figure has shifted with Argentina’s currency adjustments. Anyone reading this should verify the current high-season rate at the Mendoza tourism office before flying. The full pre-departure planning framework lives in our master mountaineering hub.
The strange thing about Mendoza is that it lulls you. You forget you’re going to be cold for three weeks. You eat too much. You stay up too late. We had a guide who’d done Aconcagua 18 times tell us, on day two, to go home and sleep. He was right. That advice ranks among the most useful we got on the entire trip.
The approach: Penitentes to Plaza de Mulas
Day 03 · Approach
Penitentes to Confluencia (3,400m)
Start: 2,700mEnd: 3,400mDistance: 14 kmTime: 5 to 6 hr
The bus drops you at Punta de Vacas. You shoulder a daypack, hand your duffels to the mule team, and start walking up the Horcones Valley. The first day is gentle. Wide open valley, the Vacas River alongside the trail, occasional llamas grazing in the distance. We reached Confluencia camp by mid-afternoon and pitched tents in the operator’s allocated zone. There’s a permanent ranger station here. They check your permit, check your insurance, and ask how you’re feeling.
The acclimatization day at Confluencia is non-negotiable. We did the standard hike up to Plaza Francia (4,200m) the next morning, returning to Confluencia to sleep. This is climb-high-sleep-low protocol applied early, and it pays off three weeks later when summit night is the only night above 6,000m.
Day 05 · Approach
Confluencia to Plaza de Mulas (4,300m)
Start: 3,400mEnd: 4,300mDistance: 17 kmTime: 8 to 9 hr
The long approach day. You walk for nine hours through a barren, rocky, increasingly thin-aired landscape, climbing roughly 900m of net elevation across switchbacks and boulder fields. Most of it is exposed to direct sun and the Andean wind. You arrive at Plaza de Mulas tired, dusty, and slightly headachy. This is where the expedition starts in earnest.
Plaza de Mulas in season is essentially a small city. There are 8-12 operator camps, a permanent ranger station, a high-altitude medical post, communal dining tents, and at certain operators hot showers. The internet works most of the time. There is a small store where you can buy candy bars and Nesquik and lukewarm beer for prices that would horrify you at sea level. The mules walk freely through camp.
The acclimatization rotations: where most climbs are won
Day 06 · Rest at base
First rest day at Plaza de Mulas
Camp: Plaza de Mulas, 4,300mActivity: Rest, gear sort
You have to resist the urge to do something. The brain wants to climb higher, faster. The body needs to adjust. We slept 11 hours, drank water until our cheeks hurt, ate everything the dining tent put in front of us, and did almost nothing physical. By evening the headaches that some of us had on arrival had faded. Pulse oximeter readings ranged 78-86% across the team, which is normal at this altitude.
Day 07 · Acclim rotation 1
Carry to Camp Canada (5,050m), descend to base
Climb to: 5,050mSleep at: 4,300mLoad: 35 lb
The first carry day. You take a 35-pound load up to Camp Canada, leave it cached, and descend back to Plaza de Mulas to sleep. Carry-high, sleep-low again. The full physiology of why this protocol works is in our altitude acclimatization explainer. The altitude hits at Camp Canada in a way it didn’t at Plaza de Mulas. Your breathing is fast. Your heart rate is high even when you stop. You think about whether you really need everything you packed. Spoiler: you don’t, and shaving 5 lb off your high-camp kit between Plaza de Mulas and the actual carry days is something experienced climbers do quietly while their first-time partners pack everything.
Day 08 · Rest day
Second rest at Plaza de Mulas
You sleep, eat, and force water. The mules outside the tent are louder than you expect. The medical staff make their rounds and check pulse-ox readings. One person on our team had readings dropping into the low 70s and was placed on Diamox at higher dose. The medical infrastructure at Plaza de Mulas is genuinely good, run by experienced high-altitude doctors. Our altitude acclimatization explainer covers the physiology of why these rotation rest days matter so much.
Day 09 · Move up
Plaza de Mulas to Camp Canada (5,050m), sleep there
Up to Camp Canada with the rest of our gear. This is the first night above 5,000m for the trip. Sleep was rough. Heart rates stayed elevated, breathing was light and frequent, and several team members reported the strange dreams that come with altitude. By morning everyone was functional but no one felt rested.
Day 10 · Acclim rotation 2
Carry to Nido de Cóndores (5,560m), return to Camp Canada
Climb to: 5,560mSleep at: 5,050m
The second carry day. Climbing 500m above Camp Canada, dropping the load at Nido de Cóndores, then descending. The route is straightforward terrain but the altitude is doing things to your body that you can feel. Headaches return mid-afternoon. Appetite continues to fade. Two team members had mild AMS symptoms that evening and dosed extra hydration with Diamox unchanged. Standard protocol. Detailed symptom progression sits in our altitude sickness guide.
Day 11 · Move up
Camp Canada to Nido de Cóndores (5,560m)
Moving up with our remaining gear. We slept at Nido that night. The wind picked up around 6 p.m. and pushed past 50 mph by midnight. The tent walls hammered. Sleep was effectively zero. By 4 a.m. the wind dropped, and by 7 we were able to cook breakfast and reassess. Aconcagua weather doesn’t broadcast itself politely. It announces.
Day 12 · Rest day
Rest at Nido de Cóndores
A rest day at 5,560m is not really a rest day. Your body is working at maximum just to maintain itself. We ate, drank, slept in fits, and waited for the next weather forecast from base camp radio check. The forecast called for a possible summit window in 3 days, with a marginal day in 5. Our guides started talking about contingencies.
By day 12 you stop counting the days. You count the meters above sea level you can sleep at without your heart rate spiking. The mountain has become a series of breathing problems to solve.
Day 13 · Move up
Nido de Cóndores to Camp Cólera (5,970m)
The push to high camp. Camp Cólera sits just below 6,000m and is the staging point for summit night. The terrain is straightforward but the altitude is brutal. Each step requires a deliberate breath. We carried lighter loads up, having cached at Nido, but everyone arrived spent. The wind at Cólera was constant, the temperatures had dropped past freezing during the day, and the night ahead was the coldest we’d faced.
Day 14 · Rest before push
Resting at Camp Cólera, summit attempt tomorrow
The day before summit night. You can’t sleep, you can’t eat much, you can’t really do anything productive. You melt snow. You sort gear. You re-pack your summit pack four times. The forecast is now firmly green for tomorrow. Wind under 30 mph, temperatures of -25°C at the summit, light cloud expected by mid-afternoon. Our guides briefed us on the timeline and turn-around protocols. Wake up at 5 a.m., depart at 6, summit by 1-2 p.m., back at Cólera by 6 p.m. Anything outside that envelope and we descend.
Summit day
Day 15 · Summit attempt
Camp Cólera to Aconcagua summit (6,961m), and back
Start: 5,970mSummit: 6,961mTotal time: 12 hours
The 5 a.m. wake-up was rougher than expected. Sleep was maybe 90 minutes total. The vestibule of the tent was glazed in ice. The water bottle next to the sleeping bag had partially frozen overnight despite being inside the tent. We boiled water for instant oatmeal nobody really wanted, drank as much as we could force down, and were on the trail by 6:10 a.m.
The first three hours climb steady switchbacks above Cólera, gaining 400m to a feature called Independencia (6,400m), where there’s a wrecked emergency shelter. The wind here was around 25 mph, biting through every layer of the system covered in our layering systems for mountaineering guide. Hands cycled between cold and warm depending on whether they were buried in mittens or holding a trekking pole. We did not stop long. The traverse from Independencia to the base of the Canaleta is a long, rising, exposed slope above 6,500m. You can see the summit pyramid the entire time. It does not get visibly closer for what feels like an hour. Cold-injury risk at this altitude in this wind is real, and our frostbite prevention guide covers the specific signs to watch for.
And then the Canaleta. The final 200m up Aconcagua is a steep gully of loose scree and snow, frequently described as the hardest hour of any of the 7 Summits’ standard routes. You take three steps, you slide back one. Your lungs are operating at 40% of their normal effective oxygen. The slope is around 35-40 degrees and your body weight is fighting you the whole way. Two members of the team shifted to a step-and-rest pattern: 10 steps, then breathe for 15 seconds. The guides did not. They moved at a pace that seemed inhuman. They were not fitter than us. They were just acclimatized differently and had done this 18 times.
We summited at 1:42 p.m., behind schedule but inside the turn-around envelope. The summit itself is small. There’s a Catholic cross. There’s a worn metal box with summit register cards. The view across the Andes runs in every direction and is genuinely stunning, though by then the cognitive bandwidth to appreciate it is limited. We took photos. We hugged. We started down within 20 minutes because that’s the rule and because the team understood that the summit isn’t the goal. The descent is the goal.
The descent of the Canaleta was almost as difficult as the ascent. Loose scree under tired legs, fading cognition, the body just wants to sit down. By the time we reached Cólera at 6:30 p.m., we’d been moving for 12 hours straight at altitude. We ate, drank, and crawled into sleeping bags. Whether we slept or not, no one is sure.
The descent
You descend Aconcagua fast once the summit is done. We went Cólera to Plaza de Mulas the next day, a 1,700m drop in five hours. Your body recovers visibly with each elevation step down. By the evening at base camp you can eat real food again. Plaza de Mulas to Penitentes the day after is another long walk but at lower altitude, and the bus to Mendoza puts you back in restaurants and beds within 36 hours of the summit. The whiplash from 6,961m to a sidewalk café is psychologically strange.
What worked, what we’d change
Looking back, three things worked. The acclimatization rotation profile was conservative and paid off. Every team member who summited had used carry-high-sleep-low protocols across all three rotations. The gear was right. Double boots, a good parka, mittens with hand warmers, and a -20°F bag let us function in summit-night cold that would have ended a lighter kit. Our gear breakdown lives in the complete climbing gear list, with detailed boot guidance in the mountaineering boots guide. And the team had honest conversations about turn-around criteria before the summit attempt, which made the actual day calmer than it could have been.
What we’d change. Pack lighter for the upper mountain. We carried 5-7 lb more gear than necessary above Camp Canada and paid for it on summit day. The right pack-selection framework is laid out in our expedition pack guide, and our sleeping bags for altitude guide covers the bag rating tradeoffs that matter at Aconcagua high camps. Train more for the Canaleta specifically. The slog at the top was the section we were least prepared for, and the only training that simulates it is sustained uphill scree-work at altitude. And spend an extra rest day at Plaza de Mulas. We had a 2-day rest at base camp; we’d take 3 next time. The cumulative deficit of inadequate sleep at 4,300m amplified everything that came later. Detailed Aconcagua-specific training adjustments live in our high-altitude training program, and the master hub indexes related guides.
The honest summary
Aconcagua is the hardest non-technical climb most recreational mountaineers will ever do. It is not technically demanding the way Everest or Denali are. It is logistically demanding, weather-dependent, cold, and long. The summit success rate of 30-40% is not an accident. It reflects what the mountain actually requires. Anyone walking into an Aconcagua expedition expecting it to be a bigger Kilimanjaro is going to find themselves at Camp Cólera wondering what they got themselves into.
That said, it is summittable. The single most common failure point for first-time Aconcagua climbers is detailed in our Camp 2 mistake guide, with cost reality in our Aconcagua cost breakdown. With the right preparation, the right operator, the right gear, and a willingness to turn around when conditions don’t cooperate, the success rate climbs to 50-60%. Our January 2024 expedition put 4 of 4 climbers on the summit. The mountain doesn’t owe you that, but the preparation puts the odds in the right place. The complete operator-selection and expedition-planning framework lives in the master mountaineering hub, with peak-specific costs in our complete mountain climbing costs reference.
★ Master Resource
Plan your Aconcagua expedition with the full guide
The complete reference covers operator selection, training timelines, gear lists, permit logistics, and the full 7-Summits progression framework all in one hub.
January is the second-best month behind December. Days are long, temperatures at high camps run -10°C to -20°C rather than the -30°C of November or February shoulder weeks, and summit windows tend to come every 4-6 days. The tradeoff is crowding. Plaza de Mulas runs at full capacity in January, permit costs are at peak season rates, and the upper camps can feel busy. Climbers seeking quieter conditions go in late February, accepting colder weather and fewer summit windows.
How long does an Aconcagua expedition take?
A standard Normal Route expedition runs 18-21 days door-to-door. The breakdown looks like 2 days approach trek to Plaza de Mulas, 6-9 days of acclimatization rotations, 2-4 day weather window for the summit attempt, and 2 days descent and exit. Add 2-3 days on each side for Mendoza logistics and recovery. The trip rarely runs short. It often runs long when weather windows close.
What’s the success rate on Aconcagua?
Aconcagua’s overall summit success rate runs 30-40% across all climbers. Quality guided expeditions push that to 50-60%. Independent climbers without local support and previous high-altitude experience often see rates below 25%. The mountain’s success rate is a function of altitude exposure, weather windows, and the willingness to turn around when conditions don’t cooperate.
What was the hardest part of the climb?
Summit night, by a wide margin. The day starts around 5 a.m. at Camp Cólera (5,970m), runs roughly 9-12 hours of climbing in temperatures of -20°C to -30°C with wind, includes the steep Canaleta scree gully in the final 200m, and ends with a long descent in oxygen-starved exhaustion. The Canaleta itself is the section most climbers describe as the hardest single hour of any 7-Summits climb.
Did you carry your own gear?
Yes, above Plaza de Mulas. The mules carry duffels to base camp at 4,300m. Above that, climbers carry their own loads of 35-50 lb between camps in coordinated team rotations. Most climbers cache gear at Camp 1 or Camp 2 on a carry day, descend to a lower camp for an extra acclimatization night, then return to the higher camp the next day with the next load.
What was the food like?
At Plaza de Mulas, the operator dining tent serves three hot meals a day cooked by base camp staff. Pasta, rice, soups, fresh meat, vegetables, fresh bread. The food is a real morale boost. Above base camp, the food shifts to dehydrated meals, oatmeal, soups, instant noodles, candy bars, and whatever each climber packed for snacks. Appetite collapses above 5,500m.
What gear made the biggest difference?
Three items stood out. The double mountaineering boots (La Sportiva G2 Evo in our case) kept feet warm through summit night when single boots would have frozen. The expedition mittens with hand warmers were the only thing that prevented cold-injury risk on the Canaleta. The -20°F sleeping bag made the difference between sleeping at high camps and shivering through nights.
Should I climb Aconcagua before or after Kilimanjaro?
After. Kilimanjaro is the introduction to high-altitude climbing. Aconcagua is the test of whether your body works at expedition altitudes for 3 weeks at a time. Climbers who do Kilimanjaro first arrive at Aconcagua with the altitude tolerance already proven and the camp craft skills already developed.
We Summited Aconcagua in January — Here’s What No One Tells You About 19 Days on the Roof of the Americas
Generally, guidebooks describe Aconcagua as a “non-technical trek to 6,962m” — and that description, while accurate, hides the brutal reality of 19 days at altitude. Specifically, this first-person trip report covers what marketing material omits. First, the Mendoza heat that drains you before approach begins. Then the truth about Plaza de Mulas mule logistics. Also why Camp 1 looks nothing like the photos. Plus how most teams turn around at Portezuelo del Viento. Additionally what the soul-destroying Canaleta scree gully actually feels like. Finally, what descending feels like with 8,000+ feet to lose. Notably, the report includes several specific elements. January 2026 conditions are covered. Gear that genuinely mattered versus gear we wished we’d left behind appears throughout. The mistakes we made before and on the mountain get detailed treatment. Finally, what we’d do differently next time fills the lessons section. Written for climbers seriously planning Aconcagua attempts who want unvarnished insider perspective beyond operator marketing.
19 days
Total Expedition
6,962m
Summit Elevation
January
Climb Window
Normal Route
Route Climbed
First-Person Trip Report · 2026 Conditions Verified · Normal Route via Plaza de Mulas · Aconcagua Complete Guide →
Last updated May 25, 2026 — verified current 2026 climbing permit costs (USD), Plaza de Mulas mule logistics pricing, current operator pricing tiers, and 2026 entry process at Horcones
Most Aconcagua trip reports follow a predictable arc. The standard story includes arrival in Mendoza, drive to Penitentes, trek to Plaza de Mulas base camp. Then acclimatization rotations. After that the summit push and descent. Finally celebration in Mendoza with steak and Malbec. Specifically, that arc is accurate — but it omits the actual texture of the experience. Generally, what makes Aconcagua brutal isn’t the altitude (Kilimanjaro climbers know altitude), the cold (Denali climbers know cold), or the technical difficulty (there isn’t any). What makes Aconcagua brutal is the duration. Notably, 19 days of progressive degradation breaks climbers. Sleep quality declines. Appetite disappears. Hygiene collapses. Mental focus narrows. Combined with the physical demands of carrying loads between camps, these create cumulative exhaustion that no training fully prepares you for.
The trip report covers what we wish someone had told us before our climb. Specifically, the topics include several reality checks. First, what Mendoza feels like before approach — hot, dry, exhausting. Then what the Horcones entry process actually involves in 2026 — longer than expected. Also how Plaza de Mulas base camp differs from photos — more crowded, less organized. Plus what Camp 1 Plaza Canada looks like in reality — rocky, exposed, windy. Additionally why most teams lose climbers at Portezuelo del Viento — the wind tunnel effect. Then what the Canaleta scree gully feels like to climb — worse than described. Finally what summit-day descent involves — harder than ascent, more dangerous. Notably, we’ll also cover what we did right (slow acclimatization, conservative gear choices, accepting weather windows) and what we did wrong (Mendoza nutrition mistakes, sleep prep failures, summit-day pacing errors).
The bottom line, up front
If you’re considering Aconcagua, here’s what no one told us clearly enough: the mountain doesn’t kill you with altitude or weather — it kills you with attrition. Generally, the climbers who summit aren’t the strongest, fastest, or most experienced — they’re the ones who handle 19 days of progressive degradation without breaking psychologically. Notably, summit success on Aconcagua correlates more with mental endurance than physical fitness above a basic threshold. Specifically, fit climbers who can’t tolerate slow progress, poor sleep, repetitive food, and prolonged discomfort fail at higher rates than less-fit climbers with better psychological resilience.
The Setup — Before the Mountain
Climb planning began approximately 11 months before our January summit. Generally, the standard planning timeline involves multiple phases. First, operator selection at 8-11 months before. Then permit fee budgeting which varies by season. Also training program design starting 6-8 months before sustained training. Plus gear acquisition or rental decisions at 3-4 months before. Then flight bookings to Mendoza via Buenos Aires or Santiago at 3-6 months before. Finally, gear preparation including bag testing and food selection at 4-6 weeks before. Notably, the planning phase reveals more about the expedition than the climbing itself — climbers who rush planning consistently report less successful climbs.
Operator Selection: The Critical Decision
Specifically, we chose a mid-tier guided expedition through one of the established Argentine operators. Generally, the choice came down to budget versus service quality. Notably, the cheapest options under $4,500 for the standard 17-19 day package report lower summit success rates. The reasons include less experienced guides. Also fewer porter services. Finally, stricter group timelines that can’t accommodate weather delays. Specifically, the premium options ($7,500+) provide better acclimatization flexibility, more experienced guides, better food, and superior camp infrastructure. We chose a mid-tier option ($5,800) — accepting the trade-offs of group dynamics for the cost savings. Then in hindsight, the slight upgrade to premium would have provided meaningful benefits during the harder days.
Training Reality vs. Marketing
Most Aconcagua training plans suggest 6 months of progressive endurance training combined with strength work. Generally, that’s accurate but incomplete. Specifically, the training that actually mattered for us included four categories. First, long-duration low-intensity cardio with 5+ hour hikes carrying weighted packs. Then repetitive uphill training matching peak-specific elevation gain patterns. Also cold exposure training — cold showers and outdoor sleeping in chilled garage. Finally, mental endurance training. Notably, we spent the final 6 weeks doing long monotonous tasks without entertainment to build the tolerance for slow boring progress at altitude. Then we did 12-hour hikes with weighted packs while wearing the actual mountain boots and clothing we’d use on summit day.
The training mistake we made. Generally, we overemphasized cardio capacity at the expense of leg strength. Specifically, summit day required sustained step-up endurance — not aerobic capacity. The 1,062m elevation gain from Camp 3 to summit takes 6-8 hours at altitude with body weight load. Notably, we trained for cardio that we didn’t need (we couldn’t move fast enough for cardio to matter at 6,800m) while underprepared for the muscular endurance the actual climbing required. The proper training emphasis: weighted step-ups, hill repeats with packs, and very long hikes with significant elevation gain — not VO2 max work, not high-intensity intervals.
Days 1-3: Mendoza and the Approach to Horcones
Mendoza, Argentina — the gateway city for Aconcagua expeditions — sits at 760m elevation in a hot, dry valley below the Andes. Generally, climbers spend 1-3 days in Mendoza handling logistics: collecting climbing permits at the Subsecretaría de Turismo office (Av. San Martín 1143), packing mule loads with operators, eating Argentine steak and Malbec, and acclimatizing to the time zone. Notably, what no one mentions is how the Mendoza heat depletes climbers before climbing begins. Specifically, January temperatures in Mendoza regularly hit 32-38°C with dry air at altitude pulling moisture from your body. Then by day 3, even careful climbers experience some level of dehydration starting from sea level.
Day 1: Mendoza Arrival and Permit Process
760m elevation · 32°C · Sea-level acclimatization
We arrived in Mendoza via overnight LATAM flight from Buenos Aires. Generally, the airport-to-hotel transfer takes 20 minutes through the city. Notably, the first afternoon involved meeting with the operator office to verify gear, collect rental items (high-altitude tent and stove), and review the planned itinerary. Specifically, the permit process at the Subsecretaría de Turismo office took approximately 90 minutes — longer than expected because of seasonal climber volume. Then the evening involved a serious operator briefing covering safety protocols, weather monitoring procedures, and team expectations.
Distance
Airport→Hotel
Activities
Permits + gear
Sleep
Hotel Mendoza
Critical task
Permit pickup
Day 2: Drive to Penitentes (2,580m)
2,580m elevation · 18°C · Mountain transition
The drive from Mendoza to Penitentes takes approximately 3.5 hours along Route 7 — the road that connects Argentina to Chile through the Los Libertadores pass. Generally, the drive provides dramatic scenery as the road climbs into the Andes through changing vegetation zones. Notably, Penitentes is a small mountain town at 2,580m elevation — a former ski resort that serves as the staging area for Aconcagua expeditions. Specifically, we spent the afternoon repacking gear into mule loads (30kg per climber limit) and final equipment checks. Then the night at Penitentes provided the first elevation exposure (the body starts adjusting to 2,580m).
Distance
3.5 hour drive
Activities
Mule load prep
Sleep
Hotel/lodge
First altitude
2,580m
Day 3: Horcones to Confluencia (3,390m)
3,390m elevation · 12°C at camp · First hiking day
The expedition properly begins at Laguna Horcones (2,950m) — the trailhead inside Aconcagua Provincial Park. Generally, the morning involves park ranger permit verification, equipment check, and final preparation. Notably, the trek to Confluencia Camp takes approximately 3-4 hours through the lower Horcones Valley. Specifically, the trail follows the Horcones River through arid landscape with occasional river crossings. Then Confluencia sits at 3,390m on a flat valley floor — providing the first base camp experience with operator-provided dome tents, meals, and shared toilet facilities. The view of Aconcagua’s South Face from Confluencia provides the first dramatic encounter with the mountain’s scale.
Distance
14 km hike
Elevation gain
440m
Sleep
Confluencia dome
Camp temp
12°C / 4°C night
What no one tells you about Confluencia. Generally, Confluencia Camp appears in operator marketing as a comfortable basecamp with full amenities. Specifically, the reality includes several factors. First, shared dome tents with 4-6 climbers per tent. Then basic but adequate meals. Also paid hot showers at USD $15-20 per shower. Plus Argentine wine and beer available for purchase. Finally, surprisingly decent Wi-Fi at the operator dining tent. Notably, the night noise level is significant — climbers, mules, generators, and wind create constant background sound. Then earplugs become essential equipment from day one. The temperature drops from afternoon warmth (12-15°C) to overnight cold (2-5°C, occasionally below freezing).
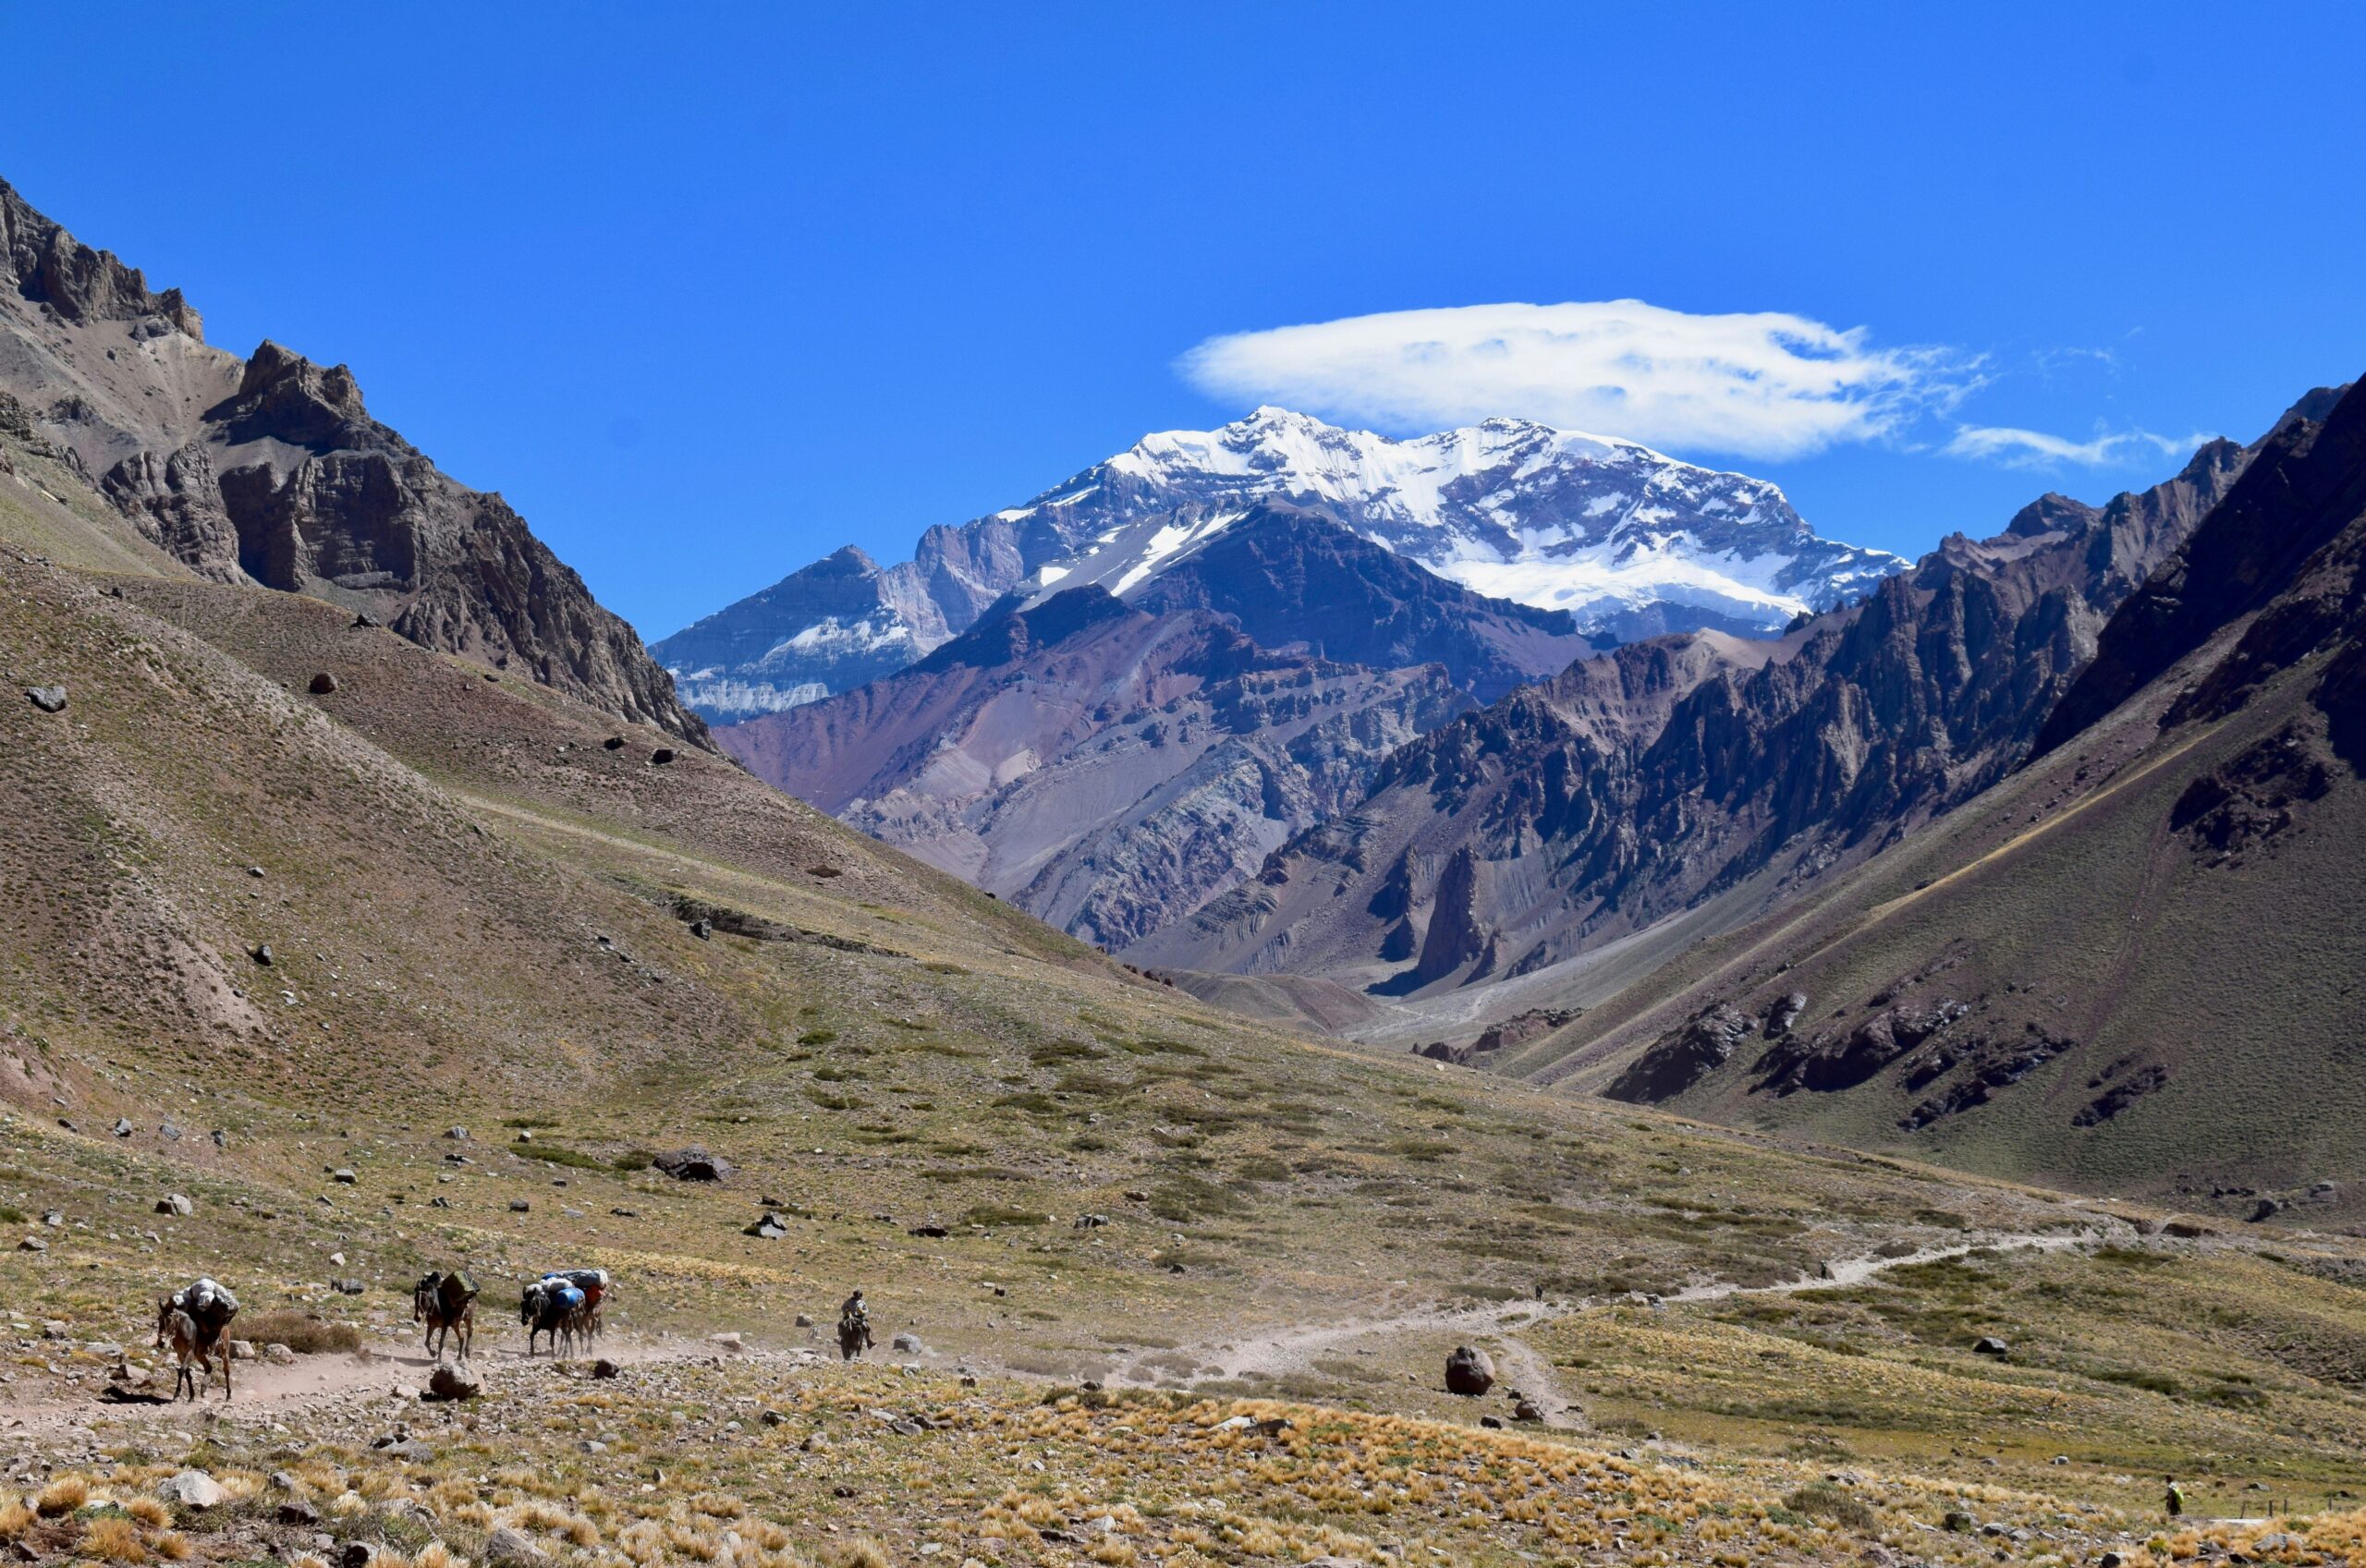
Aconcagua’s iconic profile from the Horcones Valley approach — the mountain’s 6,962m summit (Cumbre Norte, the higher of two summits) towers above the Plaza de Mulas base camp at 4,300m. Generally, the Normal Route ascends from base camp through three high camps to the summit ridge over 7-8 days of progressive acclimatization. Notably, our January 2026 expedition followed the standard 19-day program — providing critical acclimatization time that fast-itinerary climbers skip at the cost of their summit success.
Days 4-7: Approach to Plaza de Mulas Base Camp
The trek from Confluencia to Plaza de Mulas (4,300m) represents the most physically demanding approach phase. Generally, the 18 km trek takes 8-10 hours through the upper Horcones Valley with significant elevation gain (910m). Notably, this single hiking day exhausts most climbers more than expected — the combination of distance, elevation gain, and altitude effects accumulates significantly. Specifically, the trail involves multiple river crossings (some requiring careful footing in cold water), long sections through scree fields, and a final brutal ascent to Plaza de Mulas itself.
Day 4: Acclimatization Day at Confluencia + Plaza Francia
3,390-4,000m · Acclimatization rotation · South Face viewpoint
The standard itinerary spends an extra day at Confluencia for acclimatization. Generally, this involves a day hike to Plaza Francia (4,000m) — the viewpoint of Aconcagua’s dramatic South Face. Notably, the South Face represents one of the most spectacular mountain faces in the Americas with 2,900m of vertical relief. Specifically, the day hike provides essential “climb high, sleep low” acclimatization — going up to 4,000m during the day before returning to Confluencia at 3,390m for the night. The Plaza Francia viewpoint shows the imposing South Face that few climbers ever attempt because of its technical difficulty.
Distance
14 km round trip
Elevation peak
4,000m
Return sleep
Confluencia 3,390m
Type
Acclimatization
Day 5: Confluencia to Plaza de Mulas (4,300m)
4,300m elevation · Base camp arrival · Hardest hiking day
The Confluencia-to-Plaza de Mulas day proves the hardest hiking day of the expedition for most climbers. Generally, the trek takes 8-10 hours through the upper Horcones Valley with progressively higher altitude effects. Specifically, the early sections cross flat valley terrain while the final 3 hours involve significant uphill on loose scree. Notably, climbers often experience their first significant altitude symptoms during this day — headaches, fatigue, and breathing difficulty become noticeable as you climb above 4,000m. The arrival at Plaza de Mulas reveals a surprisingly large basecamp city (200-400 climbers during peak season).
Distance
18 km hike
Elevation gain
910m
Sleep
Plaza de Mulas
Duration
8-10 hours
Plaza de Mulas reality check
Plaza de Mulas at 4,300m is not what marketing photos suggest. Generally, the base camp resembles a permanent rocky village more than a temporary climbing camp. Specifically, the camp covers approximately 1 km² with sections operated by different climbing companies, each maintaining dome tents, dining facilities, communications equipment, and some level of medical support. Notably, the bathroom situation is rough — toilet tents with chemical waste systems, paid hot showers (USD $20-25), and minimal privacy throughout. The food quality varies dramatically between operators — some serve excellent meals (steaks, pastas, salads) while others provide basic mountaineering rations. The Wi-Fi connection (offered by several operators at additional cost) sometimes works but should never be relied upon for trip-critical communications.
Days 6-7: Plaza de Mulas Rest and Acclimatization
4,300m · Rest days · Critical acclimatization phase
The mandatory rest days at Plaza de Mulas serve as the foundation for everything that follows. Generally, climbers use these days for several activities. First, complete physical recovery from the approach trek. Then gear sorting for high-altitude camps. Also basic mountaineering skill training — crampon work, ice axe use, rope team practice. Plus acclimatization hikes to surrounding viewpoints — Mt. Bonete at 5,100m is the standard option. Additionally medical check-ins with the operator doctor at every base camp. Finally, sleep recovery before harder days begin. Notably, climbers who skip rest day activities or push beyond their capability commonly struggle later in the expedition.
Sleep
Plaza de Mulas
Activities
Rest + skills
Acclim hike
Mt. Bonete 5,100m
Critical task
Sleep recovery
What We Wish We’d Known About Plaza de Mulas
Several Plaza de Mulas realities surprised us despite extensive trip research. Generally, the most useful insights would have improved our trip experience considerably. Specifically, here’s what we wish someone had told us. First, bring more cash than you think you need — USD and Argentine peso both work, expect $200-400 in unplanned base camp purchases. Then night temperatures drop colder than expected — Plaza de Mulas can hit -10°C on cold nights even in January. Also the dust is constant and aggressive — everything gets covered in volcanic dust within hours. Additionally mule transport reliability is sometimes problematic — occasionally delayed delivery 1-2 days. Plus food appetite degrades faster than expected — high-protein dense meals become harder to finish. Finally, social dynamics shift considerably — groups bond intensely while conflicts emerge under stress. Notably, the most valuable preparation we’d recommend: bringing instant comfort food (chocolate, gum, candies) for psychological boost during low moments.
Days 8-12: The High-Camp Rotations
The high-camp rotation phase represents the technical core of the expedition. Generally, climbers move through three high camps progressively while building altitude tolerance through “climb high, sleep low” patterns. Specifically, the standard rotation involves multiple phases. First, carrying loads to Camp 1 at Plaza Canada (5,050m). Then returning to Plaza de Mulas for sleep. Then sleeping at Camp 1. Also carrying loads to Camp 2 at Nido de Cóndores (5,550m). Then returning to Camp 1 for sleep. Finally, moving to Camp 3 at Plaza Cólera (5,950m) for the summit push. Notably, this rotation phase exhausts climbers more than expected — each day involves significant elevation changes with heavy loads.
Day 8: Load Carry to Camp 1 (Plaza Canada 5,050m)
4,300→5,050m → return to base · First high-altitude day · Critical acclimatization
The first carry to Camp 1 represents the initial high-altitude test. Generally, the route from Plaza de Mulas to Camp 1 follows a steep trail directly above base camp — 750m of elevation gain in approximately 3.5 hours. Notably, climbers carry essential equipment for the higher camps (tents, sleeping bags, stoves, food caches) while leaving sleeping gear at Plaza de Mulas. Specifically, the carry takes 3-4 hours up with a 30-40kg pack and 1.5-2 hours descent without weight. The first encounter with significant altitude effects (breathing difficulty, headaches, slower pace) happens during this day.
Distance
Up 3.5hr, down 1.5hr
Elevation gain
750m gain + descent
Pack weight
30-40 kg up
Sleep
Plaza de Mulas
Day 9: Rest Day at Plaza de Mulas
4,300m · Recovery from first high-altitude exposure
The rest day after first Camp 1 carry serves vital recovery functions. Generally, the day involves complete physical rest, hydration recovery, equipment maintenance, and psychological preparation for the upcoming move to Camp 1. Notably, climbers report this rest day as essential for processing the altitude experience and building confidence for moving higher. Specifically, the day allows the body to consolidate acclimatization gains from the previous day’s elevation exposure. Then the appetite typically remains decent at 4,300m — climbers should maximize calorie intake during this rest day before higher camps reduce appetite further.
Activities
Rest + hydrate
Sleep
Plaza de Mulas
Calorie target
4,000+ cal
Critical task
Sleep recovery
Day 10: Move to Camp 1 with Full Gear
4,300→5,050m · First high-camp sleep · Acclimatization milestone
The move to Camp 1 with full gear establishes the high-altitude living phase. Generally, the trek follows the same route as Day 8 but with all remaining personal gear (sleeping bag, additional clothing, personal items). Notably, the climb feels harder than Day 8 despite improved acclimatization because climbers carry full loads instead of cache loads. Specifically, Camp 1 (Plaza Canada at 5,050m) sits in a rocky basin with minimal wind protection — tents experience significant wind loading during evening and night hours. Then the first night at 5,050m commonly produces poor sleep (waking frequently with Cheyne-Stokes breathing patterns) and reduced appetite (most climbers can’t finish their dinner).
Distance
3.5-4 hours up
Elevation gain
750m
Sleep
Camp 1 – 5,050m
Camp temp
-10°C night
Camp 1 reality versus expectations. Generally, Camp 1 (Plaza Canada) at 5,050m represents a dramatic environment change from base camp. Specifically, the camp sits in a rocky basin with: no permanent infrastructure (each climbing party sets up their own tents), no toilet facilities (climbers must dig waste pits and pack out used toilet paper), no running water (water must be melted from snow or carried), constant wind (the basin funnels wind through the camp), and significant altitude effects on sleep, appetite, and cognitive function. Notably, climbers who expect base-camp-style amenities at Camp 1 commonly experience psychological shock. The proper preparation: treat Camp 1 as serious mountaineering camp — minimalist, exposed, and unforgiving.
Day 11: Carry to Camp 2 (Nido de Cóndores 5,550m), Return to Camp 1
5,050→5,550m → return · Second altitude milestone
The carry from Camp 1 to Camp 2 (Nido de Cóndores at 5,550m) represents the next major altitude exposure. Generally, the route ascends a steep scree slope for approximately 2-2.5 hours up with 500m of elevation gain. Notably, “Nido de Cóndores” translates to “Nest of the Condors” — referring to the dramatic ridge perch where the camp sits with sweeping views across the upper Aconcagua massif. Specifically, this carry involves the first significant exposure above 5,500m for most climbers. Then the return descent to Camp 1 follows the same route — providing essential “climb high, sleep low” acclimatization pattern.
Distance
Up 2.5hr, down 1hr
Elevation gain
500m gain + descent
Pack weight
25-30 kg up
Sleep
Camp 1
Day 12: Move to Camp 2 with Full Gear
5,050→5,550m · Higher altitude living begins
The move to Camp 2 establishes living at 5,550m — the threshold where most climbers experience meaningful altitude impairment. Generally, the trek takes 2.5-3 hours with full personal gear loads. Notably, the camp at Nido de Cóndores offers significantly more dramatic views than Camp 1 but also less wind protection. Specifically, the night at 5,550m commonly produces poor sleep (climbers wake every 30-60 minutes), reduced appetite (most dinners go partially eaten), and noticeable cognitive impairment (simple tasks like packing become slower). Then the first morning at Camp 2 reveals dramatic sunrise views over the upper Andes as morale boost before harder days.
Distance
2.5-3 hours up
Elevation gain
500m
Sleep
Camp 2 – 5,550m
Camp temp
-15°C night
The upper sections of Aconcagua’s Normal Route — including the Canaleta scree gully (the final 400m below the summit), the Cresta del Viento traverse, and Portezuelo del Viento (the wind-exposed saddle at 6,400m). Generally, summit day involves 1,062m of elevation gain from Camp 3 (5,950m) to summit (6,962m) over 6-8 hours in extreme cold and wind. Notably, the Canaleta represents the psychological breaking point for many climbers — every two steps forward, you slide one step back on loose scree at 6,800m with only 40% sea-level oxygen.
Day 13: Move to Camp 3 (Plaza Cólera 5,950m)
Day 13: Move to High Camp (Plaza Cólera)
5,550→5,950m · Final camp before summit · Critical position
The move to Plaza Cólera at 5,950m positions climbers for summit day. Generally, the trek takes approximately 2-2.5 hours from Camp 2 with significant cumulative fatigue. Notably, the name “Cólera” — meaning “rage” or “fury” in Spanish — reflects the physical and emotional state climbers typically reach by this point. Specifically, climbers pitch tents behind jagged rock spurs that provide minimal wind protection. The camp commonly experiences severe wind events; some climbing parties have lost tents at this elevation during storms. Generally, the night before summit day produces the worst sleep of the expedition — anxiety, altitude impairment, and cold combine to produce near-zero rest.
Distance
2-2.5 hours up
Elevation gain
400m
Sleep
Camp 3 – 5,950m
Camp temp
-20°C night
The night before summit day
The night at Camp 3 is when reality hits hardest. Generally, climbers spend the evening trying to eat (appetite gone), drink (thirst dulled by altitude), pack summit gear (cognitive function impaired), and sleep (impossible). Specifically, our night involved approximately 2 hours of actual sleep — broken into 15-20 minute segments with frequent waking from Cheyne-Stokes breathing patterns. Notably, the operator wake-up call came at midnight for the standard 1:00 AM departure window. The temperature outside our tent read -18°C with mild wind. Then dressing took 45 minutes — moving slowly because of altitude, methodically because mistakes cost limbs. The boots felt cold despite our sleeping bag warming, the gloves slow to don, and the headlamp position critical for the long dark climb ahead.
Day 14: Summit Day — The 16-Hour Reality
Summit day represents the culmination of 13 days of preparation and the hardest single day most climbers experience. Generally, the day involves 1,062m of elevation gain followed by full descent — total elevation change of 2,124m+ across 12-16 hours of climbing. Notably, the day breaks into distinct phases. First, pre-dawn climb to Independencia. Then the Cresta del Viento traverse. Also the brutal Canaleta scree gully. Then summit. Plus descent to Camp 3. Finally, continued descent to base camp if conditions allow. Specifically, each phase has specific dangers and breaking points where climbers commonly turn around.
Day 14, Phase 1: Pre-dawn Climb to Independencia (1:00-4:30 AM)
5,950→6,400m · Cold dark climbing · First major test
The summit day begins at midnight with a hurried breakfast and gear preparation. Generally, the climb starts in complete darkness with headlamps illuminating the immediate scree slope. Notably, the route gains elevation steeply for the first 1.5-2 hours — climbing approximately 300m on switchbacking trails through volcanic rock. Specifically, the goal is reaching the wreckage of the old Independencia refuge (6,400m) by sunrise (approximately 5:00-5:30 AM in January). The Independencia hut ruins serve as a recognizable waypoint and the standard turn-around decision point — climbers feeling marginal at Independencia should descend rather than continue.
Time
1:00-4:30 AM
Elevation gain
450m
Conditions
Dark, -25°C
Decision point
Independencia 6,400m
Day 14, Phase 2: Cresta del Viento Traverse (4:30-7:00 AM)
6,400→6,650m · The wind crest · Major turnaround point
The Cresta del Viento (Wind Crest) traverse represents Aconcagua’s most exposed section. Generally, the route traverses across the upper north face at approximately 6,400-6,650m elevation — exposed to direct wind without shelter. Notably, this section produces the most turnarounds on summit day; climbers who can’t tolerate the wind here descend. Specifically, the traverse spans approximately 1.5 km of mixed terrain — sometimes rocky scrambling, sometimes snow patches requiring crampons, always exposed to wind that can exceed 80-100 km/h. Then by approximately 7:00 AM, climbers typically reach La Cueva (The Cave) at 6,650m — a rocky overhang providing the only sheltered rest stop on summit day.
Time
4:30-7:00 AM
Elevation gain
250m
Wind
60-100 km/h
Rest stop
La Cueva 6,650m
Portezuelo del Viento — where most climbers turn around. Generally, the saddle at approximately 6,400m known as Portezuelo del Viento (the Wind Pass) creates a venturi effect that concentrates wind speeds dramatically. Specifically, even on clear weather days, winds at Portezuelo commonly hit 60-80 km/h, sometimes exceeding 100 km/h. Notably, this is the section that breaks more summit attempts than the Canaleta itself. Climbers who can barely make forward progress against wind at Portezuelo should accept turnaround as the right decision. Pushing through marginal conditions here leads to frostbite, hypothermia, and exhaustion-related accidents on the descent. The mantra: “The summit is optional. The descent is mandatory.”
Day 14, Phase 3: The Canaleta (7:00-10:30 AM)
6,650→6,850m · The scree gully · Mental breaking point
The Canaleta represents Aconcagua’s psychological crux. Generally, the scree gully ascends approximately 400 vertical meters at 30-40° angle through loose volcanic rock and gravel. Notably, the climbing technique requires two specific adaptations: stepping into firm rock where possible, and accepting that every two steps forward produces approximately one step backward through scree slip. Specifically, the Canaleta typically takes 3-4 hours to climb because of the slow progress combined with altitude-impaired pace. The mental experience varies between climbers — some describe meditation-like focus while others describe progressive psychological breakdown. Generally, climbers who maintain composure here succeed; climbers who lose composure typically descend.
Time
7:00-10:30 AM
Elevation gain
200m
Grade
30-40°
Terrain
Loose scree
What the Canaleta feels like
The Canaleta is described by every Aconcagua climber as the worst section of the climb — and that description still understates the reality. Generally, the section feels like climbing infinite stairs that move under your feet while you can’t catch your breath. Specifically, each step requires 3-4 breaths to recover before taking the next step. Notably, the loose scree creates a “two steps up, one step back” rhythm that produces approximately 50-60 vertical meters per hour at this altitude — incredibly slow by normal hiking standards. The mind wanders dangerously during the Canaleta — climbers report intrusive thoughts about quitting, hallucinations, conversations with absent people, and complete loss of time awareness. The technique that worked for us: counting 50 steps before allowing rest, no matter how slow the steps.
Day 14, Phase 4: Cresta del Guanaco to Summit (10:30 AM-12:30 PM)
6,850→6,962m · Final ridge · The summit moment
Above the Canaleta, the route follows the Cresta del Guanaco ridge to the actual summit. Generally, this final 110-130m of elevation involves walking along the ridge with dramatic views down the South Face. Notably, the section technically isn’t difficult — but climbers arriving from the Canaleta are typically physically and mentally depleted. Specifically, the final summit approach takes approximately 1.5-2 hours despite minimal vertical gain. Then the summit itself (6,962m, marked with crosses and prayer flags) provides one of the most dramatic vantage points in the Americas — views extend to the Pacific Ocean on clear days. Most climbers spend 15-30 minutes at the summit before descent begins.
Time
10:30 AM-12:30 PM
Elevation gain
110m
Summit time
15-30 minutes
Final summit
6,962m
Day 14, Phase 5: Descent to Camp 3 (12:30-5:00 PM)
6,962→5,950m · The “real climb” · 65% of accidents happen here
The descent from Aconcagua’s summit causes more accidents than the ascent. Generally, climbers underestimate how dangerous descending becomes after summit exhaustion. Specifically, the Canaleta descent — sliding controlled through loose scree — requires significant attention despite the apparent ease. Notably, twisted ankles, falls, and rockfall injuries commonly occur during the first 2 hours of descent. Then the traverse and lower sections back to Camp 3 require approximately 4-5 hours of focused movement. The arrival back at Camp 3 produces complete exhaustion — many climbers can’t eat dinner or even fully undress before collapsing into sleeping bags.
Time
12:30-5:00 PM
Elevation loss
1,012m
Duration
4-5 hours
Accident risk
Higher than ascent
Days 15-17: Full Descent to Mendoza
Day 15: Camp 3 to Plaza de Mulas
5,950→4,300m · Recovery begins · Long descent day
The descent from Camp 3 to Plaza de Mulas takes approximately 5-7 hours with all remaining gear. Generally, climbers experience dramatic improvement in physical and mental state as elevation decreases. Specifically, the body recovers oxygen capacity quickly below 5,000m — within 2 hours of descending, climbers commonly report increased energy, restored appetite, and improved cognitive function. Notably, the arrival back at Plaza de Mulas produces strong emotional responses — relief, accomplishment, and exhaustion combining unpredictably. Then the base camp provides the first hot shower in 7-10 days, the first proper meal at standard altitude, and the first real sleep on a flat surface.
Distance
5-7 hour descent
Elevation loss
1,650m
Sleep
Plaza de Mulas
Activities
Hot shower!
Day 16: Plaza de Mulas to Horcones to Mendoza
4,300→2,950m → drive to Mendoza · Civilization return
The final descent day combines the long Plaza de Mulas-Horcones trek with the drive back to Mendoza. Generally, the hike out takes approximately 7-8 hours through the Horcones Valley — most gear travels by mule while climbers walk light. Notably, the experience of returning to civilization produces dramatic sensory contrasts. First, green vegetation appears surreal after weeks of brown rock. Then smells of trees and earth overwhelm after weeks of dust. Finally, sounds of birds and water create beautiful complexity after constant wind. Then the drive from Penitentes to Mendoza completes the transition — climbers typically reach Mendoza by evening for hot showers, real beds, and celebration dinners.
Distance
7-8hr hike + 3.5hr drive
Elevation loss
1,350m hiking
Sleep
Mendoza hotel
Celebrate
Steak + Malbec
The view from Aconcagua’s summit at 6,962m looking south across the upper Andes — the Pacific Ocean visible on clear days approximately 160 km to the west. Generally, summit moments combine intense emotional release with physical exhaustion that makes appreciation difficult. Notably, most climbers report that the strongest memories form during the descent and post-climb reflection rather than at the summit itself — the achievement registers fully only after recovery begins.
Lessons Learned — What We’d Do Differently
Hindsight provides clarity that prep work can’t fully achieve. Generally, several aspects of our expedition would benefit from different choices. Specifically, the lessons fall into preparation, gear, on-mountain decisions, and operator selection categories. Notably, we share these not as criticism of our climb but as honest assessment for climbers planning future attempts.
What We’d Do Differently Next Time
Pre-trip nutrition
Build calorie reserves through targeted weight gain. Generally, climbers lose 5-15 lbs during Aconcagua expeditions because of appetite loss combined with intense calorie burn. Specifically, we’d arrive at our climb 4-6 lbs above ideal weight rather than at race weight — providing buffer for the inevitable loss.
Training emphasis
Prioritize step-up endurance over cardio. Specifically, summit day required muscular endurance for slow steps — not aerobic capacity for fast movement. Generally, we’d do significantly more weighted step-ups, lunges, and uphill walks in mountain boots rather than running or cycling.
Sleep system
Bring earplugs of 3+ types and a quality eye mask. Generally, mountain camps produce constant noise — wind, other climbers, equipment, generators. Specifically, sleep quality determines summit success more than most realize. We’d invest in better noise blocking and bring backup options.
Operator level
Upgrade to premium operator tier. Specifically, the difference between $5,800 mid-tier and $7,500+ premium provides better guides, food, camps, weather flexibility, and acclimatization options. Generally, the marginal cost increase produces significant probability gains for summit success.
Acclimatization days
Add extra rest days at Plaza de Mulas (4,300m). Generally, additional rest days at this altitude pay disproportionate dividends. Specifically, we’d add 1-2 extra days at base camp before starting high-camp rotations — using the time for hiking acclimatization peaks like Mt. Bonete (5,100m) or Cerro Toledo (5,400m).
Summit day pacing
Start summit day from Camp 2 with overnight at Camp 3. Specifically, sleeping at Camp 3 the night before summit produces severe sleep deprivation. Generally, climbers who sleep at Camp 2 and only move to Camp 3 for 3-4 hours before summit attempt report better summit-day energy.
Communication tools
Carry our own satellite communicator (Garmin inReach or equivalent). Generally, operator-provided communications work fine for routine updates. Specifically, we wanted family communication independence — being able to send personal messages without operator mediation. The Garmin inReach Mini 2 became essential for psychological reasons.
Documentation
Bring a GoPro Hero 12 plus backup batteries. Specifically, we underestimated how much we’d want documentation of the actual climbing experience. Generally, smartphones drain batteries fast in cold and become unusable above 5,500m. The dedicated camera and external batteries solved this problem.
Common Mistakes — Mistakes We Saw and Made
Throughout our 19 days on Aconcagua, we observed predictable mistake patterns among climbers — many of which we also made. Generally, awareness of these patterns helps future climbers avoid the most common failure modes. Specifically, the mistakes fall into categories: pre-mountain preparation, base camp management, high-camp behavior, and summit day decisions.
Mistake 1: Rushing Mendoza Logistics
Many climbers treat the Mendoza phase as preparation overhead rather than important acclimatization. Generally, climbers who arrive in Mendoza and immediately push toward Penitentes report higher base camp altitude issues. Specifically, we’d recommend minimum 2 nights in Mendoza for several reasons. First, time zone adjustment. Then hydration recovery from international flights. Also basic Argentine cultural exposure — helps relationships with guides. Finally, equipment verification with operator office staff who can solve problems impossible to fix at higher elevation. Notably, climbers who rush this phase miss opportunities to identify and resolve issues.
Mule transport on Aconcagua works reliably but not perfectly. Generally, climbers expect 30kg mule loads to arrive at Plaza de Mulas exactly when planned. Specifically, occasional delays (1-2 days) happen for various reasons: weather, mule availability, route conditions. Notably, climbers who pack their critical gear (sleeping bag, primary jacket, emergency items) into their carry pack rather than mule load handle the occasional delay without expedition impact. The mistake: packing critical gear into mule loads on the assumption of reliable delivery.
Mistake 3: Skipping Acclimatization Peak Hikes
Plaza de Mulas rest days include optional acclimatization hikes to nearby peaks like Mt. Bonete (5,100m) and Cerro Toledo (5,400m). Generally, climbers who feel tired after the approach often skip these hikes. Specifically, the hikes provide critical “climb high, sleep low” acclimatization that improves summit success significantly. Notably, the time investment (3-5 hours total per acclimatization hike) pays dividends through better summit day performance. We saw multiple climbers skip these hikes and later struggle with altitude during high-camp rotations.
Mistake 4: Pushing Through Clear Altitude Sickness Symptoms
Altitude sickness symptoms (persistent headache, nausea, loss of appetite, sleep disruption) appear in most climbers above 5,000m. Generally, the proper response involves either: maintaining current elevation while symptoms resolve, or descending if symptoms persist 24-48 hours. Specifically, the mistake is climbing higher while symptoms persist or worsen. Notably, we saw multiple climbers attempt to push through altitude sickness during Camp 1-Camp 2 rotations — most of these climbers eventually descended with more severe symptoms than if they’d rested earlier. The mantra: “Descent now is faster than rescue later.”
Mistake 5: Summit Day Aggressive Pacing
Some climbers approach summit day like a race — pushing pace to reach summit before others or before weather changes. Generally, this pacing produces dramatic energy crashes on the descent. Specifically, climbers who maintain conservative pace (“rest step” technique, frequent micro-breaks, sustainable breathing patterns) summit and descend safely while aggressive climbers commonly require assistance descending. Notably, the proper summit day approach treats the summit as the halfway point — energy management for descent is more important than ascent speed. The mistake: pushing for summit at the cost of descent capability.
Gear That Mattered — The Reality Check
Aconcagua gear lists from operators and gear guides include comprehensive equipment specifications. Generally, the actual climbing experience reveals which gear items matter most and which prove unnecessary. Specifically, our gear analysis reflects 19 days of testing in actual conditions across the full Aconcagua expedition.
Gear That Saved Our Climb
Gear Item
Why It Mattered
Approximate Cost
True -25°F sleeping bag
Sleep quality at Camp 3 determines summit success. Lesser bags fail at this elevation.
$700-1,200
Quality double boots (La Sportiva Olympus Mons / Scarpa Phantom 8000)
Single boots fail on summit day in cold conditions. Frostbite is a real risk.
Several items in our packs proved unnecessary or actively counterproductive. Generally, the surprise was how much standard gear lists include items that experienced climbers don’t actually use. Specifically, our “left behind” list for next time covers several items. First, heavy approach shoes — mountain boots handle the entire trip. Then oversized expedition backpack — a 50-60L pack works better than the 75L expedition pack we brought. Also unnecessary tech gear — we brought a Kindle that became dead weight after Day 5. Plus expensive technical clothing for base camp — basic clothes work fine. Finally, luxury food items — they became hard to consume at altitude.
2026 Aconcagua Practical Information
Current 2026 climbing season information for Aconcagua. Generally, the data below reflects our climb plus verified current information from major operators. Specifically, costs and procedures change annually — verify current information through operators or the Mendoza tourism office.
Permit and Fee Structure (2026)
Cost Category
High Season
Mid Season
Low Season
Climbing permit (Argentine residents)
USD $200-300
USD $150-225
USD $100-150
Climbing permit (foreign climbers)
USD $1,100-1,300
USD $800-1,000
USD $600-800
Mule transport (30kg each way)
USD $400-600 round trip
USD $400-600
USD $400-600
Mid-tier guided expedition (17-19 days)
USD $5,500-6,500
USD $5,000-6,000
USD $4,500-5,500
Premium guided expedition (17-21 days)
USD $7,500-9,500
USD $6,500-8,500
USD $5,500-7,000
Total expedition (with international flights)
USD $9,000-15,000
USD $8,000-13,000
USD $7,000-11,000
Season Timing for 2026-2027
The Aconcagua climbing season runs from approximately November 15 through March 31 — though most operators concentrate departures between mid-December and early March. Generally, January provides the most stable weather but maximum crowding. Specifically, the season breakdown includes four windows. First, November-early December — early season, fewer climbers, less stable weather, cooler temperatures. Then mid-December through January — peak season, stable weather, maximum crowds. Also February — still stable weather, declining crowds, good options for those wanting smaller groups. Finally, early March — late season, increasing wind frequency, fewer climbers, last reliable summit windows. Notably, climbers wanting smaller groups should target late February rather than January.
Frequently Asked Questions About Climbing Aconcagua
What’s the most surprising thing about climbing Aconcagua?
The most surprising thing about Aconcagua is how much the mountain breaks you mentally before it breaks you physically. Generally, climbers train for months on cardio, strength, and altitude. But no one trains for the psychological reality of spending 16-19 days at altitude. Poor sleep, limited food appetite, and constantly degrading personal hygiene combine differently than training prepares for. The Canaleta scree gully — the final 400m below the summit — breaks more climbers than the altitude itself. Every two steps forward, you slide one step back. Oxygen at 6,800m means each step requires 3-4 breaths. Notably, climbers who consistently train mental endurance through long mono-tasking sessions (reading dense texts for hours, completing repetitive physical activities without entertainment) handle the summit push better than those who only trained physical fitness. The mountain doesn’t care about your VO2 max — it cares whether you can keep moving through misery.
Is January the best month to climb Aconcagua?
January is statistically the most popular month for Aconcagua climbs, but “best” depends on what you optimize for. January falls in the middle of the official climbing season (mid-November through late February or early March) — offering warmer base camp temperatures, longer daylight hours, and more stable weather patterns than season-edge months. Specifically, January summit success rates run approximately 30-40% across the mountain (similar to season averages), but operators report higher success rates among well-acclimatized teams attempting summits during favorable mid-month weather windows. Notably, January means competing for permits, mule slots, base camp space, and summit-day weather windows with the maximum number of other climbers. Then early January often features remaining penitentes ice formations from the December storms — sometimes requiring crampons even on the traverse below the Canaleta. The trade-off: maximum stability versus maximum crowding.
What gear made the biggest difference on Aconcagua?
Three gear categories made the biggest difference on our climb. First, the right sleeping bag — a true -25°F (-32°C) rated bag, not a -20°F bag that becomes inadequate at Camp 3 (5,950m). Climbers underestimate how cold high-camp nights become and arrive with bags rated for warmer conditions. Then high-quality double boots with adequate insulation — La Sportiva Olympus Mons Cube, Scarpa Phantom 8000, or equivalent. Single boots fail on summit day for most climbers in cold conditions; the wet feet plus -25°C summit-day temperatures create real frostbite risk. Finally, a properly fitted insulated down suit or down jacket-pants combination for the summit push — typical alpine layering systems become inadequate when wind chill drops effective temperature below -40°C. Notably, the gear we wished we’d left behind included three categories. First, heavy approach shoes — mountain boots cover the entire approach. Then unnecessary luxury items. Finally, oversized backpacks — Aconcagua mule support means smaller summit packs work better than expedition-style 75L bags.
How important is acclimatization on Aconcagua?
Acclimatization determines summit success more than fitness, gear, or weather on Aconcagua. The standard 17-19 day itinerary builds in 3 acclimatization rotations between base camp and progressively higher camps — this isn’t optional padding, it’s the core of the program. Climbers who push faster timetables (12-14 day expeditions) experience significantly higher altitude sickness rates and lower summit success. Notably, the most effective acclimatization happens through “climb high, sleep low” patterns — climbing to Camp 1 or Camp 2 during the day, then descending to base camp for nights. Then climbers who skip the optional Bonete or Cerro Toledo acclimatization peaks (5,100-5,400m) during base camp rest days commonly struggle more on summit day. Treating acclimatization as the main expedition activity — not a side activity to summit day preparation — produces dramatically better outcomes. The summit is just one day; acclimatization is 12-15 days.
What’s the truth about Aconcagua summit success rates?
Published Aconcagua summit success rates range from 30% to 70%+ depending on the source — and most of those numbers mislead more than they help. The 30-40% overall mountain average reflects all attempts including independent climbers, undertrained climbers, and climbers attempting fast itineraries. Well-acclimatized climbers on quality guided expeditions following 17-19 day itineraries report 60-75% success rates with reputable operators. Notably, individual factors improve summit success in several ways. First, physical fitness above 30% body fat — lean climbers struggle in cold. Then sustained training above 6 months. Also prior altitude experience above 5,000m. Plus climbing with established operators rather than budget options. Finally, avoiding marginal weather windows. The biggest predictor isn’t fitness or experience — it’s whether climbers respect the mountain’s pace. Climbers who try to maintain summit day energy through aggressive caffeine, push through clear altitude sickness warnings, or attempt summit during marginal weather windows fail at higher rates than slower, more conservative climbers.
How much does climbing Aconcagua cost?
Total Aconcagua climbing costs for 2026 range from approximately USD $7,000-15,000 per person depending on choices. The cost breakdown includes several categories. First, climbing permit at $600-1,300 for foreign climbers depending on season. Then guided expedition package at $4,500-9,500 covering 17-21 days with full logistics. Also mule transport for personal gear at $400-600 round trip. Plus international flights at $1,200-2,500 depending on origin. Additionally Mendoza accommodation beyond package nights at $100-300. Then gear purchases or rental at $1,000-3,000 for first-time climbers. Travel insurance with high-altitude coverage runs $300-600 for the trip duration. Finally, personal expenses including food in Mendoza, tips, and souvenirs total $500-1,000. Notably, budget climbers can attempt independent expeditions for approximately $2,500-4,000 total (permit + flights + basic gear + minimal logistics) — though success rates are significantly lower for independent attempts.
Can beginners climb Aconcagua?
Aconcagua isn’t technically difficult but it’s also not appropriate for true beginners. The mountain doesn’t require technical climbing skills — no roped climbing, minimal crampon use, no glacier travel skills needed. However, Aconcagua requires significant prior mountain experience for safety reasons. The recommended prerequisites include several elements. First, at least 2-3 climbs at 5,000m+ altitude — Kilimanjaro at 5,895m is the standard preparation. Then strong multi-day backpacking experience with major elevation gains. Also comfort with extreme cold — multi-day temperatures below 0°C with potential -20°C nights. Plus psychological tolerance for prolonged discomfort and isolation. Finally, physical fitness sustained over 6+ months of progressive training. True beginners (first major mountain attempt) should target progression peaks like Kilimanjaro, Elbrus, or Cotopaxi before attempting Aconcagua. The mountain isn’t impossible for beginners — but the success rate drops dramatically without prior altitude experience.
Which Aconcagua route should I choose?
The two main Aconcagua routes are the Normal Route (Plaza de Mulas approach) and the Polish Traverse Route (Plaza Argentina approach), with similar overall difficulty. The Normal Route accommodates approximately 80% of climbers because it offers the most established infrastructure, easiest logistics, best mule support, and largest operator presence. The Polish Traverse Route offers approximately 17-19 day expeditions with similar difficulty but different scenery — more remote feel, less crowded, more dramatic glacial views, but more complex logistics. Notably, both routes converge above Camp 3 and use the same summit day route through the Canaleta. First-time Aconcagua climbers should choose the Normal Route for maximum infrastructure support. Climbers wanting variety on repeat ascents can target the Polish Traverse Route for different scenery while maintaining similar difficulty.
What about altitude sickness on Aconcagua?
Altitude sickness is a real concern on Aconcagua — the mountain’s 6,962m summit exposes climbers to significant altitude effects. AMS (Acute Mountain Sickness) symptoms commonly appear above 4,500m. The symptoms include persistent headache, nausea or vomiting, loss of appetite, sleep disruption, and fatigue beyond expected. More serious conditions include HACE (High-Altitude Cerebral Edema) and HAPE (High-Altitude Pulmonary Edema) — both potentially fatal if untreated. Prevention strategies include several approaches. First, slow ascent — the standard 17-19 day itinerary builds in proper acclimatization. Then proper hydration at 4-5 liters of water daily. Also avoiding alcohol at altitude. Plus optional Diamox (acetazolamide) consultation with doctors. Finally, descending immediately if serious symptoms appear. Operators carry oxygen and Gamow bags for emergency treatment. The mantra: “Descent treats altitude sickness — descent now is faster than rescue later.”
What’s recovery like after climbing Aconcagua?
Recovery from Aconcagua takes longer than most climbers expect — typically 4-8 weeks for full physical and psychological restoration. The immediate post-climb period (first week) involves significant physical recovery. Most climbers lose 5-15 lbs during the expedition. Sleep patterns remain disrupted. Appetite gradually returns over 1-2 weeks. Joint and muscle soreness commonly persist. Psychological effects emerge over 2-4 weeks: post-expedition mild depression is common, intense memories of the experience continue to surface, and re-integration into normal life can feel surreal. Notably, climbers who maintained pre-expedition exercise routines recover physically faster than those who didn’t. The complete return to baseline fitness typically takes 6-8 weeks. Most climbers report that the psychological impact persists longer than the physical effects — the experience genuinely changes how climbers relate to physical challenge and discomfort.
American Alpine Journal — Annual climbing reports and route conditions
Mountain Trip Expedition Guides — Professional Aconcagua route documentation
Ian Taylor Trekking — Summit Day on Aconcagua detailed analysis
Black Mountaineering — How to Climb Aconcagua training guide 2025
Reinhold Messner — Historical Aconcagua climbing context
Aconcagua Climbing One — Complete roadmap to routes and permits
Brooke Beyond — Solo climbing Aconcagua independent expedition guide
Adventure Pulse — First hand account of an experienced climber on Aconcagua
Last updated: May 25, 2026 (post-2026 January climbing season). Next scheduled update: April 2027 (verify 2027 season conditions, permit fee changes, and operator pricing).
Planning Your Own Aconcagua Climb?
Aconcagua remains one of the most achievable major mountain summits for prepared climbers — non-technical climbing combined with manageable logistics. Generally, the standard 17-19 day itinerary with established operators provides realistic summit opportunities for climbers with prior 5,000m+ altitude experience and 6+ months of dedicated training. Notably, the complete Aconcagua planning guide provides specific operator comparisons, permit information, and detailed preparation timelines.