
Last updated June 3, 2026
Beginner Mountain Safety Basics: The Turnaround Rule, Ten Essentials, and Emergency Response
Not a list of things that might happen — a practical framework for the decisions you’ll actually face. Read this before your first summit. Most of what goes wrong on beginner peaks is preventable, and the decisions that matter most aren’t made on the mountain. They’re made the night before (leaving a trip plan), at the trailhead (setting a turnaround time), and in the first hour (going the right pace).
Beginner mountain safety isn’t complicated, but it is specific — the decisions that matter aren’t made on the mountain, they’re made the night before (leaving a detailed trip plan), at the trailhead (setting a non-negotiable clock turnaround time before leaving), and in the first hour (going the right pace), with approximately 80 percent of serious mountain accidents involving a decision point that was ignored or overridden. Generally, the #1 cause of beginner accidents isn’t terrain — it’s overconfidence and summit fever, the tendency to override pre-set turnaround criteria when close to the top while overestimating ability to push through deteriorating conditions, fatigue, or weather. Specifically, the safety framework rests on six elements: (1) The turnaround rule (specific clock time set before trailhead, agreed by group, honored without negotiation); (2) Three critical weather patterns (Rocky Mountain afternoon thunderstorms peaking 1-4 PM, wind chill on exposed ridges, rapid change above 10,000 feet where storms develop in 20-30 minutes); (3) The Ten Essentials systems framework (navigation, sun, insulation, illumination, first aid, fire, repair tools, nutrition, hydration, emergency shelter); (4) The 5-step injury response protocol (STOP-ASSESS-TREAT-DECIDE-SHELTER); (5) Solo hiking risks and mitigations; (6) Rescue communication (911 with cell, group member without coverage, PLB activation, signaling protocols). Notably, the summit is optional but coming home is not — a failed summit attempt where you made a good turnaround decision is a success, while a summit reached by overriding sound judgment is a risk that didn’t need to be taken regardless of outcome.
Key Takeaways
- The #1 cause of beginner accidents is overconfidence, not terrain — approximately 80% of serious accidents involve an ignored decision point.
- Set turnaround time as a specific clock time before leaving the trailhead. Say it out loud. Honor it without negotiation.
- Three critical weather patterns: Afternoon thunderstorms (Rockies/Southwest, peak 1-4 PM), wind chill on exposed ridges (60°F base can feel like 30°F at summit), rapid change above 10,000 ft (20-30 min storm development).
- Be below treeline and off exposed ridges by noon in the Rockies — no exceptions regardless of how the sky looks at the trailhead.
- The Ten Essentials is a systems list, not a gear list — every item on every beginner peak, every time.
- Injury response is 5 steps in order: STOP, ASSESS, TREAT, DECIDE (self-rescue or call for help), SHELTER.
- Three whistle blasts every 5-10 minutes is the universal distress signal — repeat until rescue arrives.
- Solo hiking is significantly more dangerous in year one — a partner is the most reliable safety system, not a crutch.
- Leave a detailed trip plan with someone at home — trailhead, route, party, return time, vehicle, specific “if I’m not back by X” instructions.
The #1 Cause of Beginner Accidents: Overconfidence and the Summit Trap
The most dangerous thing on a beginner peak isn’t the terrain — it’s the psychological pull of the summit when a climber should turn around. Generally, “summit fever” is the tendency to override pre-set turnaround criteria when you’re close to the top, overestimating your ability to push through deteriorating conditions, fatigue, or weather. Specifically, every year, experienced mountaineers die from decisions a beginner would understand better — because experience breeds familiarity, and familiarity breeds underestimation of risk.
The Turnaround Rule: Set It Before You Start, Make It Non-Negotiable
A turnaround time is a specific clock time — not a distance, not a feeling, not “when I think I should” — at which you turn around and descend regardless of how close to the summit you are. Generally, it’s set before you leave the trailhead, agreed on by every person in your group, and treated as absolute.
Find Hotels, Flights & Trips for the World’s Best Hiking Destinations
The Global Summit Guide Travel Shop on Expedia — curated for outdoor adventurers, mountaineers, and serious hikers. Patagonia to the Alps. Nepal to the Rockies. Curated lodging for every region we cover.
Explore Travel Shop on Expedia →Why a time and not a distance? Specifically, because time is objective. You always know what time it is. You rarely know accurately how far you are from the summit. Notably, the turnaround decision made in advance — when you’re rested, rational, and not emotionally invested — is always better than the one made at mile 4.5 with the summit in sight.
- Check your expected summit time from the trail description or recent trip reports. Add 20% for beginner pace adjustment.
- Set turnaround at half the total available daylight — if sunrise is 5:30 AM and your turnaround concern is afternoon weather, your turnaround window is typically 11 AM-noon for Rocky Mountain peaks.
- Say the time out loud before you start. “Our turnaround time today is 11:30 AM.” This makes it real and shared — harder to quietly ignore when you’re close to the summit.
- Honor it without negotiation. Not “well, we’re so close.” Not “just 15 more minutes.” The time you set in the parking lot was set by a rational person. Trust that person over the summit-hungry person at mile 4.
Weather Basics: 3 Patterns Every Beginner Must Know
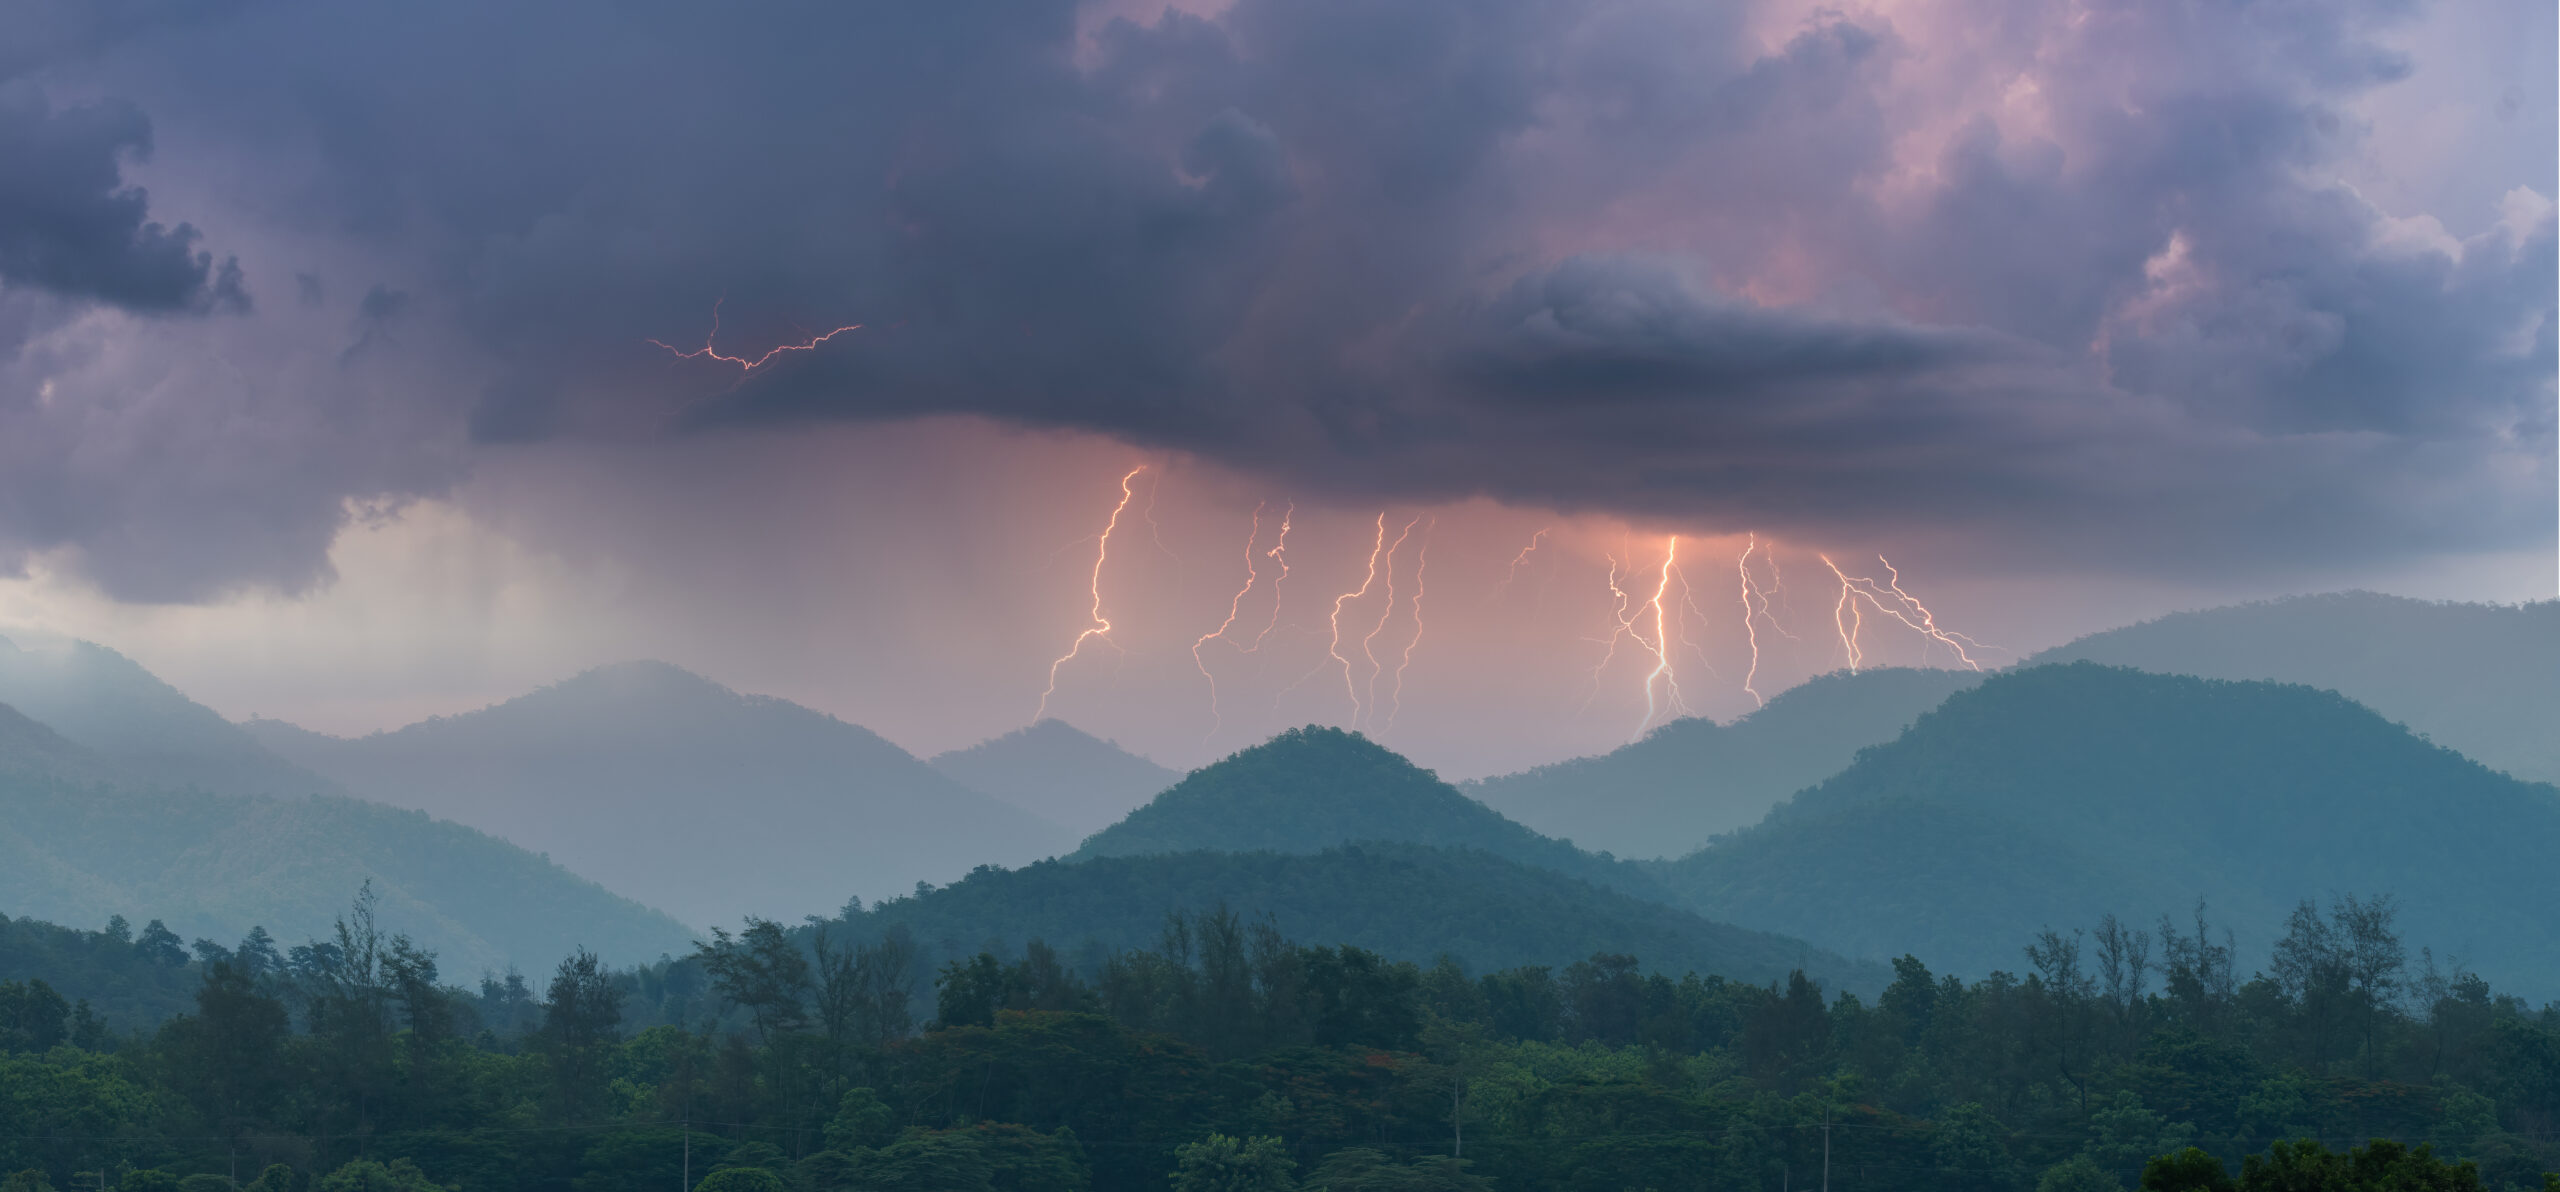
Mountain weather operates on different timescales than city weather. Generally, a forecast that says “partly cloudy” can mean pleasant hiking in the morning and a full electrical storm by 1 PM. Specifically, understanding three specific weather patterns prevents the majority of weather-related beginner emergencies.
Afternoon Thunderstorms
Convective thunderstorms build rapidly over the Rockies and Southwest from late June through August — typically peaking between 1 PM and 4 PM. The process is fast: blue skies at 8 AM can become a full electrical storm by noon. Lightning on exposed ridges is the primary cause of weather-related beginner fatalities.
Wind Chill on Exposed Ridges
A 60°F day at the trailhead can feel like 30°F at the summit with a 20 mph wind. Wind chill is invisible on a forecast and catches beginners entirely off-guard when they stop moving at the exposed summit. Hypothermia risk is real at temperatures that would feel warm in a city.
Rapid Change Above 10,000 ft
Above 10,000 ft, weather systems move faster and with less warning than at lower elevation. A storm that takes 2 hours to build at sea level can develop in 20-30 minutes at altitude. Cloud formations that look dramatic from a distance can be on top of you before you’ve descended to safety.
The best weather tools for beginner peak planning. Mountain-Forecast.com — summit-specific forecasts at your exact elevation. Check wind speed and temperature at the summit, not just the base. NOAA point forecast — enter the trailhead coordinates for a detailed hourly forecast. Windy.com — visual wind layer that shows approaching systems. Check all three the evening before and again the morning of. If they disagree significantly, treat the most conservative forecast as correct.

The Ten Essentials — Explained for First-Timers
The Ten Essentials framework was developed by The Mountaineers in the 1930s and has been updated twice since. Generally, it’s not a gear list — it’s a systems list. Specifically, each essential represents a category of capability you need to handle an emergency or unplanned overnight. Notably, every item on every beginner peak, every time.
Navigation
Phone with downloaded offline map (Gaia GPS or AllTrails Pro) + printed paper map as backup. Know how to use both before you go.
Phone GPS sufficient for Class 1-2Sun Protection
SPF 50+ sunscreen, UV-blocking sunglasses, sun hat. UV exposure increases ~4% per 1,000 ft of elevation — burns happen faster than you expect above 8,000 ft.
Easy to forget, genuinely necessaryInsulation
Extra layers beyond what you’re wearing — mid layer and wind/rain shell minimum. The summit is colder than the trailhead. You stop generating heat the moment you stop moving.
3-layer system — see Gear GuideIllumination
Headlamp with fresh batteries. Not a phone torch — hands-free is critical on descent in the dark. 200+ lumens. Black Diamond Spot or Petzl Actik are proven beginner options.
Even on “day hikes” — non-negotiableFirst Aid
Adventure Medical Kits Ultralight 0.5 covers all realistic beginner scenarios. Know what’s in it. Blister treatment, wound closure, pain relief, SAM splint, emergency foil blanket.
$20-$30 — always carry itFire
Lighter or waterproof matches + fire starter. Primarily for emergency shelter warmth, not campfires. A Bic lighter in a zip-lock bag. Takes 10 seconds to pack and weighs almost nothing.
Emergency use only on beginner peaksRepair Tools & Knife
Small multitool or knife + duct tape wrapped around a water bottle. Fixes broken poles, blisters, torn gear. A blister at mile 3 with no tape is a ruined day.
Multitool or Swiss Army knifeNutrition
Enough food for your planned hike plus one full day emergency ration. High-calorie, non-perishable backup: energy bars, nuts, dried fruit. Emergency food lives at the bottom of your pack untouched until needed.
200-250 cal/hr + 600-cal emergencyHydration
2L minimum carried from the trailhead + water treatment (Sawyer filter or Aquatabs) for refilling from streams on longer objectives. Dehydration is the most preventable cause of beginner turnarounds.
500ml/hr minimum consumptionEmergency Shelter
A mylar space blanket ($4, 50g) reflects 90% of body heat. For longer objectives, a bivy sack (SOL Escape Bivvy, $50) provides genuine overnight capability. Both fit in a shirt pocket.
Space blanket at minimumWhat to Do If Someone in Your Group Gets Injured
On a beginner peak, the most common injuries are sprained ankles, knee pain, blisters severe enough to immobilize, and head injuries from falls. Generally, none of these require medical training to initially manage — but they do require staying calm and following a clear sequence. Specifically, follow the 5-step protocol below in order: STOP, ASSESS, TREAT, DECIDE, SHELTER.
Stop and Secure the Scene
Do not move the injured person until you’ve assessed what happened. Sit everyone down. Take a breath. Panic decisions — trying to carry someone down a steep slope immediately — create second injuries. The first 60 seconds should be assessment, not action.
Assess the Injury Honestly
Can they bear weight? Is there visible deformity (potential fracture)? Is there any head, neck, or back involvement? Is the person alert and oriented? The answers to these questions determine whether they can walk out with assistance or whether you need to call for rescue.
Treat What You Can from the First Aid Kit
Sprain: wrap firmly, use trekking poles as crutches, slow descent. Blister: drain, cover, pad around it. Cut or wound: clean, close, cover. Keep the person warm — shock and inactivity cause rapid heat loss even in summer. Do not give food or water to someone who may need surgery.
Self-Rescue or Call for Help?
If the person can walk out with assistance and it’s safe to move them — do so. Slow, supported descent is usually faster than waiting for rescue on beginner peaks. If they cannot walk, if there is suspected spinal injury, if the weather is deteriorating, or if you’re uncertain — call for rescue and stay put. Do not attempt improvised carries on steep terrain without training.
While Waiting: Shelter, Warmth, Morale
If rescue is coming, your job is to keep the patient warm (space blanket, all available layers), sheltered from wind and rain, hydrated if appropriate, and calm. Mark your GPS coordinates. Stay on the trail if possible — rescue teams follow trails. Use your whistle (three blasts = distress) to guide responders to your location.
Solo Hiking: Risks and Mitigations
Solo hiking on beginner peaks is common and, on the right objectives in the right conditions, manageable. Generally, the risk profile is genuinely different from group hiking — and most beginner hikers underestimate how much the presence of even one other person changes what’s survivable. Specifically, an ankle sprain that’s a minor inconvenience with a partner can become a serious crisis alone.
What Changes Alone
- An ankle sprain that’s a minor inconvenience with a partner becomes a serious crisis alone
- No one to go for help or stay with you if you’re injured or ill
- No check on decision-making — summit fever is harder to resist without accountability
- Medical emergencies (allergic reaction, heart event) are unwitnessed and unresponsive
- Navigation errors are caught much faster by two people than one
- No shared gear or emergency equipment if yours fails
What to Do If You Insist
- Only solo Class 1 peaks with marked trails, cell coverage, and ranger presence
- Leave a detailed trip plan with a specific check-in time and who to call if missed
- Carry a personal locator beacon (PLB) or satellite communicator (Garmin inReach)
- Tell the trailhead ranger or sign the register with your expected return time
- Start early so you’re on a populated trail during peak hours
- Never solo technical terrain or peaks in weather-uncertain conditions
The honest case against solo hiking in year one. Your first season is when you’re learning how your body responds to the mountain — to altitude, to sustained effort, to unexpected conditions. You don’t yet know your personal failure modes. A partner in year one is not a crutch; it’s the most reliable safety system available. Save solo objectives for year two, when you have enough reference experience to assess your own risk honestly.
How to Call for Rescue — When and How
Most beginners either call for rescue too late (pride, minimizing) or too early (panic about normal discomfort). Generally, the decision framework is simple: call if the person cannot safely descend under their own power and conditions are stable, or immediately if conditions are deteriorating and the person is incapacitated.
Call 911
911 connects you to the county sheriff who dispatches search and rescue. Give your name, the number of people in your party, your GPS coordinates (read directly from your phone map), a description of the injury or emergency, and your current conditions. Stay on the line. Do not hang up unless the operator releases you.
Send a Member for Help
If you have two or more people and one can safely hike out, send the strongest hiker down with GPS coordinates, a written description of the emergency and location, and your estimated time of injury. The person going for help should run — speed is a factor. The person staying should keep the patient warm, sheltered, and signal with their whistle every 15 minutes.
Activate and Stay Put
A personal locator beacon (PLB) or Garmin inReach sends your GPS coordinates to rescue services automatically. If you activate a PLB, do not move from that location unless the safety risk of staying outweighs the navigation risk of moving. Rescue teams will come to the coordinates your beacon transmitted.
Distress Signaling
Three whistle blasts every 5-10 minutes is the universal distress signal. A signal mirror visible in daylight can be seen from aircraft up to 10 miles away. A bright-colored piece of clothing spread on an open rock makes aerial spotting significantly easier. Stay on the trail — rescue teams search trails first.
Trip Plan Template: Leave It with Someone Who Will Act
A trip plan is the single most effective safety tool a beginner can use. Generally, it costs nothing, takes 5 minutes, and is the reason search and rescue teams know where to start looking. Specifically, leave it with someone who will actually act on it — not just note it. Notably, the trip plan should include all six elements below before every summit, no exceptions.
1. Trailhead Name & Address
Exact name, GPS coordinates if possible, plus how to reach the trailhead by road.
2. Route Name & Description
Specific trail name and summit route — “North Ridge Trail to Bald Mountain summit.”
3. Party Names & Numbers
Everyone’s full name, phone number, and a description of what you’re wearing.
4. Expected Return Time
Conservative estimate — the time you expect to be back at your car, not the trailhead.
5. Vehicle Description & Plate
Make, model, color, and license plate of the car at the trailhead.
6. What to Do If Not Back By X
Specific instruction: “If I don’t text by 5 PM, call Larimer County Sheriff at 970-498-5100.”
The 8 Common Safety Mistakes Beginners Make
Avoid These Common Beginner Safety Mistakes
- Not setting a turnaround time before leaving the trailhead. The single most common safety failure. Climbers who haven’t set a specific clock time turnaround consistently make worse turnaround decisions on tired legs near the summit. Set the time in the parking lot when you’re rested and rational — that person makes better decisions than the summit-hungry person at mile 4.
- Treating “the sky looks fine” as a weather check. Mountain weather doesn’t look threatening 90 minutes before a thunderstorm. Check Mountain-Forecast.com, NOAA, and Windy.com the night before and morning of. If forecasts disagree, treat the most conservative as correct. Visual sky assessment at the trailhead has no predictive value for afternoon weather at the summit.
- Treating the Ten Essentials as optional based on trip length. “It’s only a day hike” is the most common justification for leaving the headlamp, first aid, or emergency shelter behind. Day hikes that become emergencies are precisely when those items matter. Carry all ten on every beginner peak regardless of expected duration.
- Going solo in year one because “the trail is busy.” A busy trail does not provide reliable rescue services. Strangers may not have first aid, may not know your medical history, may not have the gear to keep you warm overnight. Solo year-one hiking is significantly more dangerous than group hiking on the same trail — find a partner.
- Skipping the trip plan because “I’ll text when I’m back.” The trip plan exists because you might not be able to text when something goes wrong. A trip plan with specific “if I don’t check in by X, call Y” instructions is what rescue services depend on. Five minutes of preparation can save hours of search delay.
- Calling for rescue too late out of pride or minimizing. Climbers who delay rescue calls because “we should be able to handle this” or “I don’t want to bother search and rescue” turn rescuable situations into serious emergencies. If the patient cannot safely descend and conditions are deteriorating, call immediately. Rescue services exist to be used.
- Moving an injured person before assessing the situation. The first 60 seconds of any injury scenario should be assessment, not action. Panic-driven attempts to immediately carry someone down a steep slope create second injuries (broken backs, spinal cord damage, additional fractures). Sit everyone down. Take a breath. Then follow the 5-step protocol.
- Underestimating how fast weather changes above 10,000 feet. The 20-30 minute storm development at altitude is shorter than most beginners think. By the time you can see an anvil-shaped cumulonimbus cloud building, you may have less than an hour to descend to safety. Watch the horizon and cloud tops, not the sky directly above — and treat building anvils as immediate turnaround triggers.
What We Don’t Know
Honest limitations of any beginner safety guide
Safety statistics have significant variation between sources. The “80% of accidents involve a decision point” framing represents a consistent pattern across accident research from the American Alpine Club, National Park Service, and Mountain Rescue Association — but specific percentages vary between studies depending on definitions, scope (technical vs trail accidents, fatal vs non-fatal), and methodology. The general principle holds across all studies: decision-making matters more than terrain difficulty.
Weather rules are regional generalizations. The “below treeline by noon in the Rockies” rule applies broadly to Colorado, Wyoming, and northern New Mexico summer climbing — but specific summit weather patterns vary by latitude, prevailing wind patterns, and current climate conditions. Always check current trip reports and specific summit forecasts; don’t substitute the general rule for local research.
The Ten Essentials list has evolved. The current Mountaineers Ten Essentials (last updated in the 2003 edition of Mountaineering: Freedom of the Hills) represents the current consensus, but earlier and later variations exist with different categorizations. The systems framework matters more than the specific count — you need capability in navigation, sun protection, insulation, illumination, first aid, fire, repair, nutrition, hydration, and emergency shelter regardless of how the list is organized.
Emergency response protocols vary by jurisdiction. The 911-to-county-sheriff-to-search-and-rescue pathway applies generally across the United States, but specific protocols, response times, and capabilities vary by state, county, and ranger district. Some jurisdictions have dedicated mountain rescue teams; others rely on volunteer responders. Know your specific area before going, and prefer well-resourced jurisdictions (national parks, popular state parks) for first-year objectives.
The “summit is optional” principle is universal, but implementation varies. The framework of treating turnaround decisions as non-negotiable applies across all skill levels — but the specific criteria (what counts as “deteriorating weather,” what counts as “fatigue beyond expected”) require judgment that develops with experience. First-year climbers should err strongly toward conservative turnarounds; the cost of an unnecessary turnaround is one fewer summit, while the cost of an unnecessary continuation can be permanent.
Personal locator beacons aren’t a substitute for judgment. PLBs and satellite communicators provide critical rescue communication when traditional methods fail — but they don’t prevent accidents, don’t compensate for inadequate planning, and don’t guarantee rescue in time. Carry one for emergencies, but don’t let its presence justify riskier decisions than you’d make without it. The technology assists rescue; it doesn’t prevent the need for it.
Mountain Safety Basics FAQ
What is the turnaround rule in mountain climbing?
The turnaround rule is the single most important safety decision in mountain climbing: set a specific clock time before leaving the trailhead at which you will turn around and descend regardless of how close to the summit you are. The turnaround time is set as a clock time (not a distance or a feeling) because time is objective — you always know what time it is, but you rarely know accurately how far you are from the summit. The protocol has four steps: check expected summit time and add 20% for beginner pace adjustment, set turnaround at approximately half the total available daylight (typically 11 AM to noon for Rocky Mountain afternoon-weather objectives), say the time out loud to your group before leaving the parking lot, and honor it without negotiation when the time arrives. The turnaround decision made in advance — when you’re rested, rational, and not emotionally invested — is always better than the one made at mile 4.5 with the summit in sight. The summit is optional; coming home is not. A failed summit attempt where you made a good decision to turn around is a success.
What are the Ten Essentials for hiking?
The Ten Essentials framework was developed by The Mountaineers in the 1930s and has been updated twice since. It’s not a gear list — it’s a systems list. Each essential represents a category of capability you need to handle an emergency or unplanned overnight. The ten systems are: (1) Navigation (phone with offline map plus paper map backup); (2) Sun Protection (SPF 50+, sunglasses, sun hat — UV exposure increases approximately 4% per 1,000 feet of elevation); (3) Insulation (mid layer and wind/rain shell minimum beyond what you’re wearing); (4) Illumination (headlamp with fresh batteries, 200+ lumens, not a phone torch); (5) First Aid (Adventure Medical Kits Ultralight 0.5 or equivalent); (6) Fire (lighter or waterproof matches in zip-lock); (7) Repair Tools and Knife (multitool plus duct tape); (8) Nutrition (planned food plus one full day emergency ration); (9) Hydration (2L minimum plus water treatment); (10) Emergency Shelter (mylar space blanket at minimum, bivy sack for longer objectives). Every item on every beginner peak, every time.
Is solo hiking safe for beginners?
Solo hiking on beginner peaks is common and, on the right objectives in the right conditions, manageable — but the risk profile is genuinely different from group hiking. Most beginner hikers underestimate how much the presence of even one other person changes what’s survivable. Real solo risks include: an ankle sprain that’s a minor inconvenience with a partner becomes a serious crisis alone; no one to go for help or stay with you if you’re injured; no check on decision-making (summit fever is harder to resist without accountability); medical emergencies are unwitnessed; navigation errors are caught much faster by two people. If you insist on going solo: only solo Class 1 peaks with marked trails, cell coverage, and ranger presence; leave a detailed trip plan with specific check-in time; carry a personal locator beacon or satellite communicator; tell the trailhead ranger or sign the register; start early; never solo technical terrain. The honest case against solo hiking in year one: your first season is when you’re learning how your body responds to the mountain. A partner in year one is not a crutch — it’s the most reliable safety system available.
What do I do if someone gets hurt on a mountain?
Follow the 5-step injury response protocol: STOP, ASSESS, TREAT, DECIDE, SHELTER. The most common beginner peak injuries are sprained ankles, knee pain, blisters severe enough to immobilize, and head injuries from falls — none require medical training to initially manage, but they do require staying calm and following sequence. STEP 1 STOP: Do not move the injured person until you’ve assessed what happened. Sit everyone down. The first 60 seconds should be assessment, not action. STEP 2 ASSESS: Can they bear weight? Visible deformity (potential fracture)? Any head, neck, or back involvement? Alert and oriented? STEP 3 TREAT: Sprain – wrap firmly, use trekking poles as crutches. Blister – drain, cover, pad. Cut – clean, close, cover. Keep them warm — shock causes rapid heat loss even in summer. STEP 4 DECIDE: If they can walk out with assistance and it’s safe to move them, do so. If they cannot walk, suspected spinal injury, deteriorating weather, or uncertain — call rescue and stay put. STEP 5 SHELTER: Keep patient warm (space blanket), sheltered, hydrated if appropriate, calm. Mark GPS coordinates. Use whistle (three blasts = distress) every 15 minutes.
How do I call for rescue in the mountains?
The decision framework is simple: call if the person cannot safely descend under their own power and conditions are stable, or immediately if conditions are deteriorating and the person is incapacitated. Four scenarios cover most rescue situations: (1) WITH CELL COVERAGE: Call 911 — connects you to the county sheriff who dispatches search and rescue. Give your name, number of people in party, GPS coordinates (read directly from your phone map), description of injury or emergency, and current conditions. Stay on the line until released; (2) NO COVERAGE WITH GROUP: Send the strongest hiker down with GPS coordinates, written description of emergency and location, and estimated time of injury. The person going for help should run — speed matters. Person staying keeps patient warm, sheltered, and signals with whistle every 15 minutes; (3) PLB OR SATELLITE COMMUNICATOR: Sends GPS coordinates to rescue services automatically. Do not move from that location unless safety risk of staying outweighs navigation risk of moving; (4) SIGNAL POSITION: Three whistle blasts every 5-10 minutes is the universal distress signal. Stay on the trail — rescue teams search trails first.
What weather conditions should make me turn around?
Three specific weather patterns prevent the majority of weather-related beginner emergencies when understood. Mountain weather operates on different timescales than city weather — a forecast that says “partly cloudy” can mean pleasant hiking in the morning and a full electrical storm by 1 PM. The three critical patterns are: (1) AFTERNOON THUNDERSTORMS (Rocky Mountains and Southwest, late June through August) — Convective thunderstorms build rapidly, typically peaking 1-4 PM. Blue skies at 8 AM can become a full electrical storm by noon. Lightning on exposed ridges is the primary cause of weather-related beginner fatalities. The rule: be below treeline and off exposed ridges by noon in the Rockies regardless of how the sky looks at the trailhead; (2) WIND CHILL ON EXPOSED RIDGES (all regions, above treeline) — A 60°F day at the trailhead can feel like 30°F at the summit with 20 mph wind. Hypothermia risk is real. The rule: always carry a wind layer regardless of base temperature; (3) RAPID CHANGE ABOVE 10,000 FT — Storm that takes 2 hours to build at sea level can develop in 20-30 minutes at altitude. The rule: watch the horizon and cloud tops. Anvil-shaped cumulonimbus clouds building anywhere are a turnaround trigger. Check Mountain-Forecast.com for summit forecasts, NOAA point forecast, and Windy.com — if they disagree, treat the most conservative as correct.
Sources and Methodology
Numbered Source References
This mountain safety basics guide synthesizes data from mountain rescue statistics, climbing education organizations, federal land management agencies, and accident reporting databases.
- American Alpine Club (AAC). AAC — climbing organization providing annual Accidents in North American Climbing reporting that informs the decision-point statistics and beginner-specific accident patterns.
- The Mountaineers (Pacific Northwest). The Mountaineers — established climbing education organization that developed and maintains the Ten Essentials framework. Mountaineering: The Freedom of the Hills remains the standard reference for beginner safety protocols.
- National Park Service (NPS). NPS — federal land management authority providing search and rescue statistics, trip plan templates, and emergency response protocols across the US national park system.
- National Association for Search and Rescue (NASAR). NASAR — professional organization establishing standards for wilderness search and rescue operations referenced in the rescue communication protocols.
- Mountain Rescue Association (MRA). MRA — coordinating organization for volunteer mountain rescue teams across the United States, providing accident statistics and rescue best practices.
- Mountain-Forecast.com. Mountain-Forecast — specialized forecasting service providing summit-elevation weather data referenced in the weather basics section.
- NOAA Weather Service. NOAA — federal weather authority providing point forecasts at trailhead coordinates, used as primary weather reference.
- Wilderness Medical Society. Professional organization providing evidence-based wilderness medicine protocols referenced in the 5-step injury response framework.
- Internal Global Summit Guide research. Cross-referenced with our Beginner Climbing Guide hub, What to Expect on Summit Day (Guide 07), Mountain Weather for Climbers, and Avalanche Awareness for Climbers.
Methodology note. Quarterly review cycle — next review September 2026 (post-summer climbing season). Safety statistics and protocols reflect typical Class 1-2 summer beginner peaks in the continental US; high-altitude (>10,000ft), technical, or shoulder-season objectives may require additional safety considerations beyond this baseline framework.
What’s Next?
The Summit Is Optional. Coming Home Is Not.
Generally, the decisions that matter most aren’t made on the mountain — they’re made in the kitchen the night before (trip plan), at the trailhead (turnaround time), and in the first hour (the right pace). Specifically, 80% of serious accidents involve a decision point that was ignored or overridden. Notably, a failed summit attempt where you made a good decision to turn around is a success — it’s the foundation of a long climbing career, not a failure.
Review the Turnaround Rule Summit Day Walkthrough →Was this helpful?
🏔Related safety data
🧭Explore & compare
Global Summit Guide is an independent mountaineering resource founded in 2026. The team combines first-hand trekking and climbing experience with in-depth research and professional health and nutrition review to help climbers choose objectives, prepare properly, and stay safe.
Health, altitude, and nutrition content is reviewed by Taylor Ludlow (Registered Nurse) and Brigg Hoopes (Nutritionist).
What We Don't Know Yet
Mountain information changes quickly. This box explains the limits of what this page can responsibly promise.
- Weather, snowpack, avalanche risk, road access, and route conditions can change quickly and may be different on your climbing dates.
- Route conditions, trailhead access, crevasse exposure, stream crossings, and rescue access may vary from published planning guidance.
- Route conditions, snowpack, closures, and weather can change quickly after this page is updated.
- Permit rules, fees, quotas, and reservation windows may change between review cycles.
- Operator availability, pricing, guide ratios, and cancellation terms can change by season.
Verify current conditions with official land managers, guide services, local forecasts, and current route reports before booking or climbing.
Part of this Global Summit Guide cluster
Explore the complete Pick Your Mountain guide for more context, routes, planning links, and related resources.
Mountaineering, rock and ice climbing, glacier travel, and high-altitude activity are inherently dangerous and can result in serious injury or death. The information on Global Summit Guide is provided for general informational and educational purposes only and is not a substitute for professional instruction, qualified guiding, proper equipment, or your own judgment and experience.
Route conditions, weather, snowpack, permits, regulations, and hazards change constantly and may differ from what is described here. Details may be incomplete, out of date, or contain errors. Always verify current information with local authorities, certified guides, and official sources before making any decision in the mountains.
Nothing on this site is medical, legal, or financial advice. Our fitness, acclimatization, altitude, and nutrition content is general in nature; consult a qualified physician before beginning any strenuous exercise program or exposing yourself to high altitude.
You are solely responsible for your own safety and decisions. To the fullest extent permitted by law, Global Summit Guide and its team accept no liability for any loss, injury, damage, or expense arising from use of, or reliance on, this information. By using this site you acknowledge these risks and accept these terms.
Some links on this site may be affiliate links. If you buy through them we may earn a small commission at no extra cost to you; this never affects our recommendations.
Global Summit Guide recommendation path
Next Best Mountain to Research
Use these recommendations to continue the right planning path instead of stopping on one page.
Use current permit, weather, route, and operator information before booking or climbing.