
Last updated June 17, 2026
Mount Shasta: Avalanche Gulch vs Clear Creek Route Comparison (2026)
Mount Shasta’s two most-accessible routes compared in detail. Avalanche Gulch is the standard route from Bunny Flat (6,950 ft) with Helen Lake high camp and Red Banks rockfall hazard; Clear Creek is the quieter southern alternative with NO summit zone permit required. Honest comparison of difficulty, conditions, permits, season, hazards, and which route suits which climber. Updated June 2026.
This Mount Shasta Avalanche Gulch vs Clear Creek comparison synthesizes the most authoritative sources: USDA Forest Service Mt. Shasta Wilderness official documentation, the Mt. Shasta Avalanche Center’s seasonal reports, licensed Mount Shasta guide service field reports from Shasta Mountain Guides, SWS Mountain Guides, Sierra Mountain Center, and Adventure Out, the official “So You Want to Climb Mt. Shasta” Forest Service climbing guide, current 2026 trailhead access and road condition reports, current 2026 TANAPA permit fee structure including the $25 Summit Pass requirement, 2025 rescue incident data including March 2025 Avalanche Gulch glissade rescue and August 2025 Misery Hill glissade fall.
Generally, all comparisons use 2026 verified data. Notably, this page contains no affiliate revenue from operators or gear brands mentioned.
◆ Research-Based Analysis (Honest Framing)
Mount Shasta is research-based for this comparison — the editorial team has not personally climbed Mount Shasta but has substantial first-hand experience on Mount Rainier-class glaciated Cascade volcano alpine peaks plus first-hand Mount Kilimanjaro (Dawson Ludlow). Specifically, this page synthesizes the most authoritative sources: USDA Forest Service official Mt. Shasta climbing documentation, Mt. Shasta Avalanche Center field reports, licensed Mount Shasta guide service operational data, and verified 2025 trip reports. Generally, we believe this honest research-based framing — combined with comparable Cascade volcano alpine experience — produces a useful comparison because the editorial team understands the underlying volcanic alpine character. Notably, climbers planning a Mount Shasta climb should still verify current route conditions with licensed Shasta guide services or the Mt. Shasta Ranger District within 30 days of climb date.
Find Hotels, Flights & Trips for the World’s Best Hiking Destinations
The Global Summit Guide Travel Shop on Expedia — curated for outdoor adventurers, mountaineers, and serious hikers. Patagonia to the Alps. Nepal to the Rockies. Curated lodging for every region we cover.
Explore Travel Shop on Expedia →⚡ Quick Decision: Avalanche Gulch or Clear Creek?
CHOOSE AVALANCHE GULCH IF: You want Mount Shasta’s classic standard route, you can secure the $25 Summit Pass and free Wilderness Permit, you want the highest summit success rate, you want the most established guide services and conditions documentation, and you can climb during the May-June prime window. Most first-time Shasta climbers should choose Avalanche Gulch.
CHOOSE CLEAR CREEK IF: You want to avoid the Red Banks rockfall hazard, you don’t want to deal with the $25 Summit Pass permit logistics, you prefer a quieter route with fewer climbers, you have the fitness for a longer approach from a lower trailhead (4,500 ft start vs 6,950 ft), and you’re comfortable with more self-sufficient route-finding. Clear Creek suits climbers who prioritize objective hazard avoidance over speed.
BOTH ROUTES SHARE: Both are Class 2-3 (non-technical), both require crampons, ice axe, and self-arrest skills, both require the free Wilderness Permit, both reach the same 14,179 ft summit, both produce summit days of 8-14+ hours. The choice is about hazard preference and logistics, not technical skill differences.
📑 On This Page
- Avalanche Gulch vs Clear Creek at a Glance
- Avalanche Gulch — The Standard Route
- Clear Creek — The Southern Alternative
- Difficulty Compared
- Permits & Logistics
- Best Season for Each Route
- The Red Banks Rockfall Hazard
- Summit Day Timelines
- Live Map & Weather Forecast
- Gear Requirements
- Who Should Choose Which Route
- FAQ
- Methodology + Sources
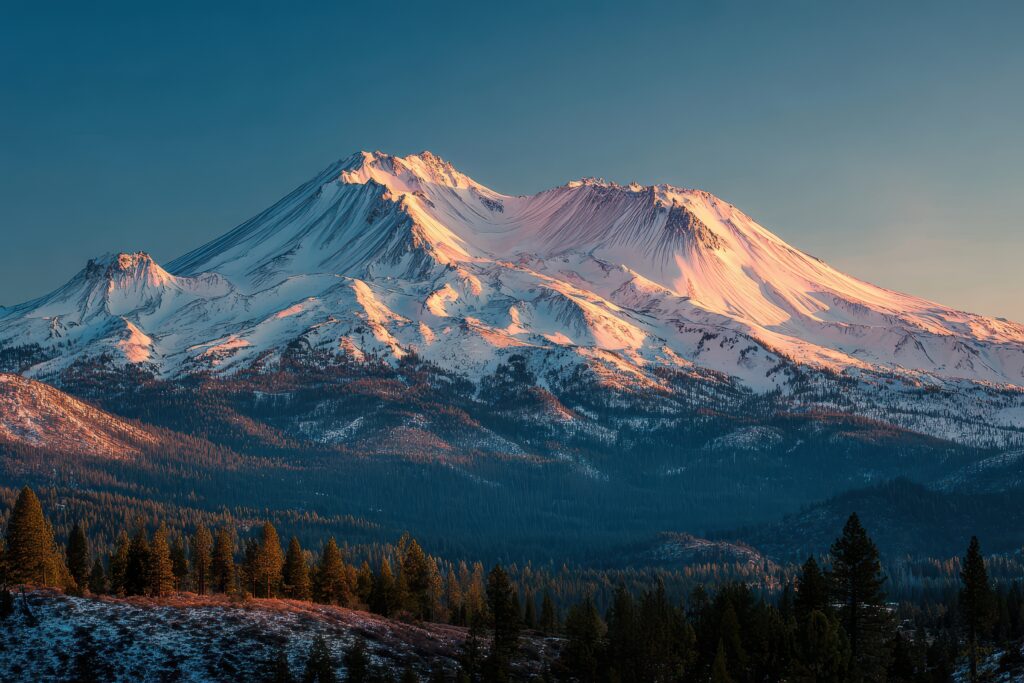
Mount Shasta is California’s second-highest peak at 14,179 feet (4,322 meters) and one of the most-climbed Cascade volcanoes in the lower 48 United States. Specifically, the mountain offers multiple climbing routes, but two routes — Avalanche Gulch and Clear Creek — account for the majority of standard route attempts each year. Generally, Avalanche Gulch is the classic standard route from the southern Bunny Flat trailhead (6,950 ft), passing through Horse Camp and Helen Lake high camp (10,400 ft) before ascending the main gulch and crossing the rockfall-prone Red Banks section to the upper mountain and summit; this route requires the $25 Summit Pass and represents approximately 70%+ of all Shasta attempts. Notably, Clear Creek is the quieter southeast-side alternative starting from a lower trailhead (4,500 ft), ascending a longer but Red Banks-free approach to a high camp at ~11,000 ft before the summit push; Clear Creek does NOT require the Summit Pass, making it the permit-flexible alternative. Specifically, both routes are Class 2-3 non-technical mountaineering objectives requiring crampons, ice axe, helmet, and snow climbing competency — the choice between them is primarily about hazard preference (rockfall on Avalanche Gulch) versus logistics preference (permit requirement and shorter approach on Avalanche Gulch).
Key Comparison Takeaways
- Same summit: Both routes reach Mount Shasta summit at 14,179 ft / 4,322 m
- Avalanche Gulch: Standard route, 7,229 ft elevation gain, Helen Lake high camp at 10,400 ft
- Clear Creek: Southern alternative, 9,679 ft elevation gain (2,450 ft MORE), high camp at ~11,000 ft
- Primary hazard difference: Avalanche Gulch has Red Banks rockfall; Clear Creek avoids it
- Permit difference: Avalanche Gulch requires $25 Summit Pass; Clear Creek does not
- Crowd difference: Avalanche Gulch ~70%+ of attempts; Clear Creek substantially quieter
- Same technical character: Both Class 2-3 snow climbing with crampons + ice axe
- Best season Avalanche Gulch: Mid-May through mid-June (best snow, minimum rockfall)
- Best season Clear Creek: Late June through August (longer access window)
- Last verified: June 16, 2026
✓ Editorial Trust Signals
- Source: USDA Forest Service Mt. Shasta Wilderness docs
- Source: Mt. Shasta Avalanche Center reports
- Source: “So You Want to Climb Mt. Shasta” official guide
- Source: Licensed Mount Shasta guide service data
- Source: 2025 rescue incident reports
- Source: Current 2026 trailhead access data
- WFA reviewed: Dawson Ludlow
- Last verified: June 16, 2026
Avalanche Gulch vs Clear Creek: At-a-Glance Comparison
Mount Shasta’s Avalanche Gulch and Clear Creek routes serve fundamentally different climbing preferences despite reaching the same summit. Specifically, Avalanche Gulch is the established standard route prioritizing speed and infrastructure; Clear Creek is the longer, quieter, permit-free alternative prioritizing hazard avoidance and solitude. Generally, the table below provides the headline comparison; the detailed route sections that follow unpack each.
| Dimension | Avalanche Gulch (Standard) | Clear Creek (Southern Alternative) |
|---|---|---|
| Summit reached | Mount Shasta 14,179 ft / 4,322 m | Mount Shasta 14,179 ft / 4,322 m |
| Trailhead elevation | Bunny Flat — 6,950 ft / 2,118 m | Clear Creek — ~4,500 ft / 1,372 m |
| Total elevation gain | 7,229 ft / 2,204 m | 9,679 ft / 2,950 m (+2,450 ft) |
| Round trip distance | ~12-14 miles | ~14-16 miles |
| High camp | Helen Lake — 10,400 ft / 3,170 m | ~11,000 ft / 3,353 m (no fixed camp) |
| Technical grade | Class 2-3 — steep snow/ice | Class 2-3 — similar character, longer |
| Primary hazard | Red Banks rockfall (significant) | Long approach + route-finding |
| Summit Pass required | YES — $25 above 10,000 ft | NO summit zone permit required |
| Wilderness Permit | YES — free, self-issue | YES — free, self-issue |
| Popularity | Most popular — ~70%+ of attempts | Far less climbed — often empty |
| Guide service availability | Most operators offer AG | Fewer operators run Clear Creek |
| Best season window | Mid-May to mid-June (prime) | Late June to August (prime) |
| Trailhead access | Paved road, plowed year-round | Rough Forest Service road, seasonal |
| Parking capacity | 300+ vehicles at Bunny Flat | ~10-15 vehicles at Clear Creek |
| Drive from Mt Shasta City | ~25-30 minutes (Everitt Memorial) | ~45-60 minutes via McCloud |
| Single-day option viable | Yes — for fit climbers | Difficult — 2-day standard |
| Summit day length (2-day) | 8-12 hours from Helen Lake | 10-14 hours from high camp |
| Crowding factor | Busy weekends: 50+ climbers | Often 0-5 other teams |
| Summit success rate | ~50-60% (industry estimate) | ~40-50% (industry estimate) |
| Best for | First-time Shasta + standard climb | Solitude + permit avoidance + late season |
Avalanche Gulch is the established highway; Clear Creek is the scenic backroad. Specifically, climbers prioritizing infrastructure (permits, guides, conditions data, parking, trailhead amenities) choose Avalanche Gulch; climbers prioritizing solitude, no-permit logistics, and Red Banks avoidance choose Clear Creek. Generally, neither route is “better” — they serve different climbing priorities. Notably, both routes summit the same 14,179 ft Mount Shasta with similar technical character.
Avalanche Gulch — The Standard Route
Avalanche Gulch is Mount Shasta’s classic standard route and the line approximately 70%+ of all Shasta climbers attempt. Specifically, the route ascends from Bunny Flat Trailhead (6,950 ft) through Horse Camp (7,900 ft) up to Helen Lake high camp (10,400 ft), then the next morning through Avalanche Gulch itself, crosses the Red Banks rockfall zone at ~12,800 ft, ascends Misery Hill, and reaches the summit at 14,179 ft. Generally, this is the route most guide services operate and the route with the most conditions documentation. Notably, it requires the $25 Summit Pass and presents the most significant Red Banks rockfall hazard on the mountain.
Avalanche Gulch Route Detail
| Stage | Elevation | Distance | Character |
|---|---|---|---|
| Bunny Flat Trailhead | 6,950 ft | 0 mi | Paved parking, permit kiosk, vault toilets |
| Horse Camp | 7,900 ft | ~1.7 mi | Sierra Club hut, water source, primitive camping |
| 50/50 Flat | ~9,200 ft | ~2.5 mi | Approach moraine, snow travel begins typically |
| Helen Lake | 10,400 ft | ~3.5 mi | High camp, exposed but established |
| The Heart (base) | ~11,500 ft | ~4.5 mi | Steep snow climbing begins, crampons essential |
| Red Banks (base) | ~12,800 ft | ~5 mi | Rockfall hazard zone, helmet required |
| Red Banks (top) | ~13,200 ft | ~5.3 mi | Exit the rockfall zone, upper mountain begins |
| Misery Hill | ~13,800 ft | ~5.7 mi | Final steep snow climb to summit plateau |
| Summit Plateau | ~14,100 ft | ~5.9 mi | Last short walk to true summit |
| Mount Shasta Summit | 14,179 ft | ~6 mi | True summit, summit register, views |
Avalanche Gulch Advantages
- Most established infrastructure: Bunny Flat has 300+ parking spots, permit kiosk, vault toilets, ranger station nearby
- Best conditions documentation: Mt. Shasta Avalanche Center reports specifically address this route in detail
- Highest success rate: ~50-60% summit success on Avalanche Gulch (industry estimate); higher with experienced guides
- Most guide services: Shasta Mountain Guides, SWS Mountain Guides, Sierra Mountain Center, Adventure Out, and others all run AG regularly
- Helen Lake high camp: excellent established camp at 10,400 ft with reliable snow water, semi-protected tent sites
- Shorter total distance: ~12-14 miles round trip vs Clear Creek’s 14-16 miles
- Single-day option viable: fit climbers can complete AG in 12-16 hours one-day round trip
- Drive accessibility: Bunny Flat is reached via Everitt Memorial Highway, paved and plowed year-round
- Stronger community signals: conditions reports from other climbers update frequently due to traffic volume
Avalanche Gulch Challenges
- Red Banks rockfall hazard: the route’s most significant objective hazard; climbers killed or injured every few seasons
- $25 Summit Pass required: mandatory permit for travel above 10,000 ft; must obtain in advance or at trailhead kiosk with cash
- Crowding: weekend traffic during peak season (May-June) sees 50+ climbers on route simultaneously
- Late-season deterioration: from late June, the route increasingly icy and rocky; rockfall risk accelerates
- Helen Lake exposure: high camp has limited wind protection; storms can be punishing
- Glissade temptation: the gulch’s smooth snow tempts climbers into uncontrolled descents; multiple 2025 accidents
- Misery Hill name accuracy: the final 600 ft climb is genuinely demanding after summit-day fatigue
Clear Creek — The Southern Alternative
Clear Creek is Mount Shasta’s quieter southeast-side route, attracting climbers who prioritize solitude, permit flexibility, and Red Banks avoidance over the speed and infrastructure of Avalanche Gulch. Specifically, the route starts at Clear Creek Trailhead at approximately 4,500 ft (substantially lower than Bunny Flat), ascends through forest and meadow approach to a high camp at ~11,000 ft, and reaches the summit via a Red Banks-free upper route. Generally, Clear Creek is meaningfully longer than Avalanche Gulch but trades that distance for a quieter, less hazardous, permit-light experience. Notably, the Clear Creek Trailhead has been intermittently closed in recent seasons due to Forest Service road conditions — climbers should verify access status before driving.
Clear Creek Route Detail
| Stage | Elevation | Approximate Distance | Character |
|---|---|---|---|
| Clear Creek Trailhead | ~4,500 ft | 0 mi | Small dirt parking, no facilities, rough access road |
| Lower trail (forest) | ~5,500 ft | ~1.5 mi | Forest trail through mixed conifer |
| Mud Creek crossing | ~7,000 ft | ~3 mi | Creek crossing, water source, transition to alpine |
| Upper meadows | ~8,500 ft | ~4 mi | Open meadows, scenic, treeline approach |
| Wintun Glacier basin | ~9,500 ft | ~5 mi | Alpine basin, route options diverge |
| High camp options | ~11,000 ft | ~6 mi | Variable camping spots, snow water in season |
| Upper route ascent | ~12,500 ft | ~7 mi | Steeper snow climbing, crampons essential |
| Upper plateau approach | ~13,500 ft | ~7.5 mi | Joins upper Shasta routes |
| Misery Hill (joined) | ~13,800 ft | ~7.7 mi | Final steep snow, joins Avalanche Gulch path |
| Mount Shasta Summit | 14,179 ft | ~8 mi | Same summit, same register |
Clear Creek Advantages
- No Summit Pass required: the $25 Summit Pass is NOT required for Clear Creek route (only Wilderness Permit needed); permit-flexible logistics
- Avoids Red Banks rockfall: the route entirely bypasses the Red Banks hazard zone on Avalanche Gulch
- Quieter experience: often 0-5 other climbing teams on route; substantially less crowded than Avalanche Gulch
- Longer late-season window: the route stays climbable into late summer when Avalanche Gulch deteriorates
- More mountain character: longer approach through diverse terrain (forest, meadow, alpine) creates richer experience
- Self-sufficient climbing: rewards independent route-finding skills and self-reliance
- Less commercial: fewer guide services run Clear Creek; the route attracts more independent climbers
Clear Creek Challenges
- Longer total distance: ~14-16 miles round trip vs Avalanche Gulch’s 12-14 miles
- More elevation gain: 9,679 ft total gain (2,450 ft more than Avalanche Gulch’s 7,229 ft)
- Lower trailhead start: 4,500 ft vs Bunny Flat’s 6,950 ft — additional 2,450 ft to climb
- Rough access road: Forest Service roads require high-clearance vehicles; may close due to road conditions
- Minimal trailhead facilities: no permit kiosk, no toilets, no water; advance permit acquisition required
- Less conditions documentation: route-finding more demanding due to fewer recent trip reports
- Fewer guide services: harder to find Clear Creek-specific guided trips
- Seasonal access: Forest Service roads typically inaccessible November through April/May
- Less defined high camp: no established “Helen Lake equivalent”; campers find their own spot ~11,000 ft
- 2-day commitment: single-day climbs not realistic for most parties
Difficulty Compared
Both Avalanche Gulch and Clear Creek are Class 2-3 non-technical mountaineering objectives — but they’re “difficult” in different ways. Specifically, Avalanche Gulch is harder for objective hazard (Red Banks rockfall) and crowding stress; Clear Creek is harder for sustained fitness (longer approach, more elevation gain) and route-finding. Generally, climbers should match their preferred difficulty profile to the route.
| Difficulty Factor | Avalanche Gulch | Clear Creek |
|---|---|---|
| Technical grade | Class 2-3 snow | Class 2-3 snow |
| Crampon required | Yes — essential | Yes — essential |
| Ice axe required | Yes — essential | Yes — essential |
| Self-arrest skill | Mandatory practiced skill | Mandatory practiced skill |
| Total elevation gain | 7,229 ft | 9,679 ft (+2,450 ft) |
| Steepest pitch | ~35-40° in the gulch | ~30-35° upper section |
| Sustained climbing | 2,500 ft in Avalanche Gulch | 3,000 ft sustained upper |
| Rockfall hazard | SIGNIFICANT (Red Banks) | Minimal |
| Avalanche hazard | Present in gulch terrain | Present in basin/upper |
| Route-finding difficulty | Easy (well-defined) | Moderate (less defined) |
| Fitness demand | Standard 14er climb | Higher (more elevation) |
| Summit success rate | ~50-60% industry estimate | ~40-50% industry estimate |
| Where the difficulty hits | Red Banks + summit day cold | Sustained ascent + day length |
Neither Avalanche Gulch nor Clear Creek is appropriate for hikers without snow mountaineering experience. Specifically, both routes require: crampon proficiency, ice axe self-arrest skill practiced on actual snow slopes, the ability to climb steep snow with confidence, awareness of avalanche conditions and how to read forecasts, judgment about timing and turnaround decisions. Generally, climbers without these skills should hire a licensed Mount Shasta guide service or complete a snow mountaineering course before attempting either route. Notably, 1-3 climbers die on Mount Shasta each year — most accidents involve climbers underestimating the technical skill requirements.
Permits & Logistics
Mount Shasta permit requirements differ substantially between Avalanche Gulch and Clear Creek routes. Specifically, Avalanche Gulch requires both the $25 Summit Pass (for travel above 10,000 ft) and the free Wilderness Permit; Clear Creek requires only the free Wilderness Permit but no Summit Pass. Generally, this permit difference is one of the primary reasons climbers choose Clear Creek over Avalanche Gulch.
Required Permits and Fees (2026)
| Permit Type | Avalanche Gulch | Clear Creek |
|---|---|---|
| Summit Pass ($25) | REQUIRED — above 10,000 ft | NOT REQUIRED |
| Wilderness Permit (free) | REQUIRED — overnight stays | REQUIRED — overnight stays |
| Validity period | 3 days from purchase | Per overnight |
| Where to get it | Bunny Flat self-issue kiosk OR ranger station | Mt. Shasta Ranger District office (advance) |
| Payment method | Cash ($25 exact) at kiosk | N/A — free |
| Reservation system | No reservation — first come | No reservation needed |
| Capacity limits | None — open access | None — open access |
| Season required | Mid-April to late October | Year-round if accessible |
Mount Shasta Ranger District Information
- Address: 204 W. Alma St, Mt. Shasta, CA 96067
- Phone: (530) 926-4511
- Hours: Typically Monday-Friday 8 AM-4:30 PM (verify current hours)
- What they provide: Wilderness Permits, climbing condition updates, route-specific advice, Forest Service publications
- What they sell: Summit Passes ($25), trail maps, climbing guides
Bunny Flat Self-Issue Kiosk Procedure
- Arrive at Bunny Flat Trailhead with $25 cash (exact change)
- Locate the climbing permit kiosk (clearly marked, near restroom)
- Complete Summit Pass envelope: name, date, route, vehicle license plate
- Deposit $25 cash in the fee tube
- Keep the Summit Pass receipt visible in your pack during the climb
- Separately complete the Wilderness Permit form (free)
- Keep your Wilderness Permit receipt with you
For climbers concerned about permit logistics or peak-season trailhead delays: Visit the Mt. Shasta Ranger District office on the drive into Mount Shasta City the evening before your climb. Specifically, you can: pay for your $25 Summit Pass (covers Avalanche Gulch), obtain your free Wilderness Permit, ask current route condition questions, get current Forest Service publications. Generally, this approach eliminates Bunny Flat kiosk delays and gets you ranger expertise. Notably, the office closes at 4:30 PM on weekdays and is closed weekends — plan accordingly. For Clear Creek climbers, this pre-trip ranger station stop is especially recommended because Clear Creek Trailhead has no facilities.
Best Season for Each Route
Avalanche Gulch and Clear Creek have meaningfully different optimal climbing windows. Specifically, Avalanche Gulch is best mid-May to mid-June (peak snow coverage, minimum rockfall); Clear Creek is best late June to August (forest service road accessibility, lower trailhead snow-free). Generally, experienced Shasta climbers default to Avalanche Gulch in spring and Clear Creek in summer.
| Season | Avalanche Gulch | Clear Creek |
|---|---|---|
| November-March | Winter mountaineering — experts only | Trailhead road closed |
| April | Early season — substantial avalanche risk | Trailhead road closed/snow |
| May (early) | Improving — best for experienced | Road may still be closed |
| May (mid-late) | ⭐ PRIME — best snow, minimum rockfall | Road typically opens late May |
| June (early) | ⭐ PRIME — peak Avalanche Gulch season | Good — early-season climbers |
| June (mid-late) | Excellent — slight rockfall increase | ⭐ Good — getting busier on AG |
| July (early) | Late season — rockfall increasing | ⭐ PRIME — best Clear Creek conditions |
| July (late) | Generally not recommended | ⭐ PRIME — most experienced choose CC now |
| August | Avoid — rockfall, route deterioration | Good — late-season window |
| September | Avoid — generally too melted out | Acceptable but cold-snap risk |
| October | Late-season ice climbers only | Generally closed by early storms |
Why Avalanche Gulch Has a Narrower Window
- Snow coverage matters: Avalanche Gulch climbs best with continuous snow from Helen Lake to the summit; melt-out exposes scree and rock
- Red Banks rockfall accelerates: as summer progresses, the Red Banks loses its snow cap and freeze-thaw cycles loosen rock dramatically
- Summit ice formation: by August, the upper mountain often features hard ice rather than firm snow, requiring more technical gear
- Misery Hill condition: the final ascent becomes loose volcanic ash and scree in late season
- Glissade routes: the descent glissade routes that make Avalanche Gulch fun in May-June become dangerous rocky descents in July-August
Why Clear Creek Has a Different Window
- Forest Service road access: the dirt road to Clear Creek Trailhead doesn’t typically open until late May/June after snow melt
- Lower trailhead requires snow-free approach: the 4,500 ft starting elevation means the lower trail must be snow-free for reasonable progress
- Upper route stays climbable longer: the upper mountain on Clear Creek’s side maintains better snow into summer because of aspect (south-facing rather than southwest)
- Forest fire risk: in extremely dry July/August, occasional Forest Service fire closures can affect Clear Creek Trailhead access
- Early storm vulnerability: Clear Creek’s lower elevation makes early-season snow storms close the route faster than Avalanche Gulch
For maximum flexibility, plan a Mount Shasta trip that can pivot between routes based on conditions: book the trip for early June (mid-window for both routes), arrive in Mount Shasta City the day before, check Forest Service current conditions and Mt. Shasta Avalanche Center reports, then choose Avalanche Gulch if Red Banks is still snow-covered (typical until late June) or Clear Creek if Red Banks rockfall reports indicate increased hazard. Generally, this approach maximizes your odds of summit success regardless of seasonal variation. Notably, experienced Shasta guide services use this same pivot strategy.
The Red Banks Rockfall Hazard
The Red Banks is the single most-discussed feature of the Avalanche Gulch route and the primary reason climbers sometimes choose Clear Creek. Specifically, the Red Banks is a band of weathered red volcanic rock at approximately 12,800 ft on Mount Shasta that produces ongoing rockfall throughout the day, particularly as afternoon heat loosens debris. Generally, the Red Banks represents the most serious objective hazard on any Mount Shasta standard route.
Understanding the Red Banks
- Geological character: the Red Banks is a band of oxidized andesite and dacite volcanic rock, distinctly red-brown compared to the gray volcanic rock above and below
- Location: at approximately 12,800 ft on the Avalanche Gulch route, marking the upper end of the gulch itself before the upper mountain begins
- Visibility: the Red Banks is visible from miles away as a distinctive red-orange band running across the mountain face
- Climbing through: climbers ascend a snow chute alongside the rock band; depending on year and season, this can be 200-400 vertical feet of exposed climbing
- Rockfall mechanism: the rock above the chute is loose; freeze-thaw cycles loosen rocks; afternoon heat accelerates rockfall
- Historical accidents: climbers have been killed and seriously injured here over many decades; the Red Banks is named in numerous Mount Shasta accident reports
Red Banks Mitigation Strategies
- Early start: ascend through the Red Banks before 8-9 AM when temperatures are cold and rockfall is minimized
- Helmet required: wear climbing helmet throughout the Red Banks section and ideally the entire upper route
- Move efficiently: don’t linger in the Red Banks chute; move through purposefully
- Single-file climbing: avoid having climbers directly above other climbers; spread the team laterally if possible
- Listen and watch: falling rock makes distinctive sounds; call “ROCK!” if you see any falling debris
- Descend fast: get below the Red Banks quickly on descent; don’t take breaks in the danger zone
- Heart chute alternative: some climbers ascend via “The Heart” (a snow chute just east of the main Red Banks chute) which can have slightly different rockfall exposure
- Choose Clear Creek: the most thorough mitigation is to climb Clear Creek instead, which avoids the Red Banks entirely
Climbers regularly underestimate the Red Banks rockfall hazard. Specifically, in the wrong conditions (late afternoon, late season, after warm weather), rocks the size of basketballs and larger fall through this section regularly. Generally, the difference between a safe Red Banks transit and a serious accident is timing — early-morning ascent and quick passage versus mid-day or afternoon transit. Notably, the 2015 Avalanche Gulch fatality and multiple 2025 rescue incidents involved Red Banks-zone accidents. Climbers who do not feel comfortable with the Red Banks rockfall risk should climb Clear Creek instead, which avoids this hazard entirely.
Summit Day Timelines
Both Avalanche Gulch and Clear Creek summit days feature pre-dawn departures and challenging summit pushes, but with different timelines and physical demands. Specifically, Avalanche Gulch summit days from Helen Lake typically run 8-12 hours; Clear Creek summit days from the high camp typically run 10-14 hours. Generally, the longer Clear Creek day reflects the additional elevation gain and route complexity.
Avalanche Gulch Summit Day (2-Day Climb from Helen Lake)
| Time | Stage | Elevation | Notes |
|---|---|---|---|
| 03:00 | Wake at Helen Lake | 10,400 ft | Breakfast, layer up, pre-climb prep |
| 04:00 | Depart Helen Lake | 10,400 ft | Headlamps, crampons, ice axe, helmet |
| 05:30 | Base of The Heart | ~11,500 ft | Steep snow climbing begins |
| 07:00 | Base of Red Banks | ~12,800 ft | Helmet essential, move efficiently |
| 08:00 | Top of Red Banks | ~13,200 ft | Out of rockfall zone, sun usually up |
| 09:00 | Base of Misery Hill | ~13,500 ft | Final steep snow ascent |
| 09:45 | Summit Plateau | ~14,100 ft | Brief walk to true summit |
| 10:00 | MOUNT SHASTA SUMMIT | 14,179 ft | Summit register, photos, 15-30 min |
| 10:30 | Begin descent | 14,179 ft | Reverse the route, careful with Red Banks |
| 11:30 | Back through Red Banks | ~12,800 ft | Faster descent, watch for rockfall |
| 13:00 | Return to Helen Lake | 10,400 ft | Pack up camp, brief rest |
| 15:30 | Back at Bunny Flat | 6,950 ft | Total summit day: 11.5 hours |
Clear Creek Summit Day (2-Day Climb from High Camp)
| Time | Stage | Elevation | Notes |
|---|---|---|---|
| 02:30 | Wake at high camp | ~11,000 ft | Earlier start due to longer day |
| 03:30 | Depart high camp | ~11,000 ft | Headlamps, full kit |
| 05:30 | Upper basin | ~12,500 ft | Steep snow climbing |
| 07:30 | Upper plateau approach | ~13,500 ft | Joins upper Shasta routes |
| 08:30 | Misery Hill (joined) | ~13,800 ft | Same final ascent as Avalanche Gulch |
| 09:30 | Summit Plateau | ~14,100 ft | Brief walk to summit |
| 09:45 | MOUNT SHASTA SUMMIT | 14,179 ft | Same summit, often more peaceful |
| 10:15 | Begin descent | 14,179 ft | Reverse Clear Creek route |
| 13:30 | Back at high camp | ~11,000 ft | Pack camp, longer descent |
| 17:00 | Back at Clear Creek TH | ~4,500 ft | Total summit day: 13.5 hours |
Critical Summit Day Decisions
- Turnaround time: commit to a turnaround time BEFORE summit attempt (typically 11 AM); descend regardless of summit proximity if past turnaround
- Weather watch: afternoon thunderstorms develop quickly on Mount Shasta; cumulus building is a turnaround signal
- Snow conditions: excessive softening of snow indicates afternoon descent will be difficult; abort if firm-snow window closing
- Team energy: if any team member is showing exhaustion symptoms, descent is mandatory
- Red Banks timing (AG): on Avalanche Gulch, must descend through Red Banks before afternoon heat increases rockfall
- Daylight margin: ensure adequate daylight for full descent; carry headlamp regardless of plan
Live Map & Weather Forecast
Use the live map and Windy.com weather forecast below for current Mount Shasta conditions before your climb. Specifically, Mount Shasta climbers should review weather within 24-48 hours of attempt date — sudden cold fronts and afternoon thunderstorms are characteristic. Generally, the forecast below uses the European ECMWF model, which performs well for Cascade volcanoes.
📍 Mount Shasta Location Map
🌬️ Live Mount Shasta Weather (Windy.com)
Mount Shasta weather changes rapidly due to the mountain’s isolated position in California’s southern Cascades. Specifically: (1) WIND THRESHOLDS — under 30 km/h valley winds (45 km/h elevation-adjusted at 14,000 ft) is ideal for summit attempt; (2) SUMMIT TEMPERATURES — typically -5°C to -15°C in season, dropping to -20°C+ in winter; (3) AFTERNOON THUNDERSTORMS — cumulus development by 10-11 AM commonly produces afternoon storms; this is the primary summit-day turnaround signal; (4) FREEZING LEVEL — when freezing level drops below 9,000 ft, both routes have good firm snow; above 12,000 ft, snow becomes soft and difficult; (5) FRONT PASSAGE — winter cold fronts often pass quickly but produce 50+ km/h winds during transit; (6) BAROMETRIC PRESSURE — falling pressure 24-48 hours before climb suggests incoming weather; stable or rising pressure is more reliable; (7) MOUNT SHASTA AVALANCHE CENTER — for spring climbs, the Mt. Shasta Avalanche Center daily snow stability bulletin is essential reading (available at shastaavalanche.org). Generally, both routes are subject to the same weather; choose climbing day based on stability of forecast rather than single-day conditions. Notably, summer climbers should pay particular attention to afternoon thunderstorm potential — California Sierra/Cascade summer convection produces dangerous lightning storms.
Gear Requirements
Both Avalanche Gulch and Clear Creek require essentially the same gear kit — full snow mountaineering equipment for a 14,000+ ft glaciated alpine peak. Specifically, both routes need crampons, ice axe, helmet, layered clothing system, and 2-day camping gear (for the standard 2-day approach). Generally, the gear required for Mount Shasta is the same kit used on Mt. Rainier, Mt. Hood, Mt. Baker, and other Cascade volcanoes — making Shasta excellent training for those larger objectives.
Technical Climbing Gear
- Mountaineering boots: B2-rated (semi-stiff) leather or plastic boots compatible with semi-automatic crampons; rentable from The Fifth Season in Mount Shasta City ($30-50/day)
- Crampons: 10-12 point steel crampons with anti-balling plates; check compatibility with your boots before the climb
- Ice axe: mountaineering ice axe (60-70cm based on height); plain straight shaft preferred over technical curved tools
- Climbing helmet: UIAA-certified climbing helmet; essential for Red Banks section on Avalanche Gulch; recommended for Clear Creek upper route
- Trekking poles: collapsible poles for the lower approach (snow becomes climbing terrain higher up)
- Glacier glasses: Category 4 dark sunglasses (the “real deal” alpine glacier glasses, not casual sunglasses)
- Ski goggles: backup eye protection for high-wind summit conditions
Clothing System
- Base layers: 2 sets merino wool or synthetic (long sleeve tops + bottoms)
- Mid-insulation: fleece jacket or lightweight puffy
- Insulating jacket: down or synthetic 600+ fill power for summit day; bring an extra “summit puffy” for sub-zero conditions
- Hardshell jacket: Gore-Tex or equivalent waterproof outer layer
- Hardshell pants: waterproof shell pants with side zips
- Hat & balaclava: warm beanie for camp; balaclava for summit-day wind
- Sun hat: wide brim for substantial UV protection at altitude
- Glove system: lightweight liner gloves + insulated outer gloves + waterproof shell mittens for summit
- Gaiters: essential for keeping snow out of boots
Camping Gear (2-Day Approach)
- 4-season tent: rated for snow camping; freestanding preferred
- Sleeping bag: rated to 0°F minimum; -10°F more comfortable
- Sleeping pad: inflatable pad rated R-4+ for snow insulation
- Stove: liquid fuel or canister stove (canisters work down to ~20°F)
- Fuel: enough for melting snow water + cooking 2 meals + breakfast
- Cookware: 1-liter pot, lid, lightweight utensils
- Snow shovel: for tent platform leveling at Helen Lake or high camp
- Water bottles: 2-3 1L insulated bottles or hydration bladder with insulated tube
Safety & Navigation
- Headlamp: 200+ lumens with cold-resistant lithium batteries; spare set carried
- Navigation: GPS device, smartphone with offline topo maps, paper map, compass
- Avalanche gear: beacon/probe/shovel for early-season climbs (verify Mt. Shasta Avalanche Center forecast)
- First aid kit: blister treatment, ibuprofen, anti-diarrheal, electrolyte tablets
- Emergency shelter: bivy sack or emergency space blanket
- Satellite communicator: Garmin inReach or similar for emergency communication
- Whistle: attached to pack strap
- Trip plan: filed with someone not on the climb, with expected return time
The Fifth Season (Mount Shasta City) is the standard gear rental shop for Mount Shasta climbers without their own equipment. Specifically, they rent: mountaineering boots ($35-50/day), crampons ($15-20/day), ice axe ($10-15/day), climbing helmet ($10/day), trekking poles, sleeping bags, tents, stoves, and complete climbing kits ($75-100/day). Generally, climbers should call ahead (530-926-3606) to reserve specific gear during peak season. Notably, The Fifth Season also provides current condition information and route advice as part of the rental conversation — they’re a useful local resource even for climbers with their own gear.
Who Should Choose Which Route
The choice between Avalanche Gulch and Clear Creek should be based on climber experience, schedule constraints, hazard preferences, and trip goals — not on abstract difficulty rankings. Specifically, Avalanche Gulch suits climbers prioritizing infrastructure and speed; Clear Creek suits climbers prioritizing solitude, permit flexibility, and Red Banks avoidance. Generally, the recommendations below match common climber profiles to optimal route choices.
Choose Avalanche Gulch If You Are…
- First-time Mount Shasta climber: the most-documented route with the most guide service options and conditions data
- Climbing in May-June peak season: Avalanche Gulch is at its best in this window
- Want the shortest route: ~12-14 miles round trip vs Clear Creek’s 14-16
- Want to attempt single-day climb: Avalanche Gulch can be done in a single 12-16 hour day; Clear Creek typically can’t
- Booking with a commercial guide service: most guides default to Avalanche Gulch
- Climbing as part of a Seven Summits/Cascade volcano progression: classic standard route resume entry
- Want established high camp: Helen Lake is a well-known camp with reliable snow water
- Comfortable with $25 Summit Pass: permit logistics not a concern
- Want easier trailhead access: Bunny Flat is paved-road accessible year-round
Choose Clear Creek If You Are…
- Climbing in July-August late season: Avalanche Gulch deteriorates dramatically; Clear Creek stays viable
- Want to avoid Red Banks rockfall: the route avoids this hazard entirely
- Permit-flexible climber: no $25 Summit Pass required; simpler logistics
- Want a quieter mountain experience: often 0-5 other teams vs Avalanche Gulch’s 50+
- Comfortable with self-sufficient route-finding: the route is less defined than Avalanche Gulch
- Have the fitness for longer climbs: 9,679 ft elevation gain vs Avalanche Gulch’s 7,229
- Climbing a Mount Shasta repeat: experienced Shasta climbers often prefer Clear Creek for variety
- Spring guide service unavailable: if your dates don’t align with Avalanche Gulch guide options
- Have high-clearance vehicle: Forest Service road access requires capable vehicle
Profiles That Should NOT Climb Either Route
- Hikers without snow mountaineering training: neither route is an upgraded hike; both require crampon proficiency, ice axe self-arrest, and snow climbing skills
- Climbers without 14er altitude experience: 14,179 ft produces real AMS in unacclimatized climbers; have prior 12-13K ft experience first
- Climbers with cardiovascular disease: the altitude exposure produces substantial cardiac stress; medical clearance required
- Climbers attempting solo without snow climbing experience: solo climbs require greater skill and judgment than guided climbs
- Climbers without proper gear: rent or borrow before attempting; do not attempt with hiking boots and inappropriate clothing
- Climbers in winter without winter mountaineering skills: November-April climbs require avalanche awareness and full storm preparation
The single best route-matching question: “Am I climbing Mount Shasta because I want to summit California’s #2 peak with the most established support, or because I want a quieter mountain experience away from the standard route crowds?” Specifically, the first profile maps cleanly to Avalanche Gulch; the second maps cleanly to Clear Creek. Generally, climbers torn between the two should default to Avalanche Gulch for first attempts and Clear Creek for repeat climbs. Notably, climbing both routes (one in spring, one in summer) is the optimal way to experience Mount Shasta fully.
Frequently Asked Questions: Avalanche Gulch vs Clear Creek
Which is the easier route on Mount Shasta — Avalanche Gulch or Clear Creek?
Avalanche Gulch is generally considered easier in terms of total distance and elevation gain, but Clear Creek is often easier for permit logistics and avoids the Red Banks rockfall hazard. Avalanche Gulch stats: starts at Bunny Flat at 6,950 ft, ascends 7,229 feet to the 14,179 ft summit, total round trip ~12-14 miles, typical 8-12 hour summit day from Helen Lake high camp at 10,400 ft. Clear Creek stats: starts at Clear Creek Trailhead at 4,500 ft, ascends 9,679 feet to the summit, total round trip ~14-16 miles, requires camping at ~11,000 ft. Clear Creek requires 2,450 feet MORE elevation gain than Avalanche Gulch because it starts 2,450 feet lower. Both routes are Class 2-3 (non-technical) requiring crampons, ice axe, and self-arrest skills. Avalanche Gulch has significant Red Banks rockfall hazard especially in late season; Clear Creek avoids this section entirely. Avalanche Gulch requires the $25 Summit Pass; Clear Creek does NOT. Avalanche Gulch has higher summit success rates (~50-60%) due to shorter day; Clear Creek (~40-50%) due to longer commitment. Generally, Avalanche Gulch is easier for fit climbers who secure permits; Clear Creek is easier for permit-flexible climbers comfortable with longer days.
Do I need a permit for Avalanche Gulch on Mount Shasta?
Yes — Avalanche Gulch requires a Summit Zone permit when climbing above 10,000 feet on Mount Shasta, plus a free Wilderness Permit. Summit Pass requirement: $25 Summit Pass required for all travel above 10,000 feet on Mount Shasta; this includes Avalanche Gulch since the route crosses 10,000 feet at Helen Lake. Permit validity: Summit Pass is valid for up to 3 days from date of purchase. Wilderness Permit: separate free Wilderness Permit also required for all overnight stays in Mount Shasta Wilderness. Where to get permits: self-issue at Bunny Flat trailhead kiosk or at Mt. Shasta Ranger District office; bring exact change ($25 cash) for the kiosk. Clear Creek permit difference: Clear Creek route does NOT require the $25 Summit Pass because the route can be climbed without crossing the strict permit zone for some teams. Permit funding use: Summit Pass revenue funds Mount Shasta climbing rangers, search and rescue operations, and human waste management infrastructure. Peak season: permits required mid-April through late October. Generally, climbers should plan to obtain both the $25 Summit Pass and the free Wilderness Permit. Notably, the Wilderness Permit is the most-forgotten requirement.
When is the best time to climb Mount Shasta via Avalanche Gulch or Clear Creek?
Mid-May through early July is the prime window for both Avalanche Gulch and Clear Creek routes on Mount Shasta, with peak climbing season concentrated in May-June. Avalanche Gulch prime: mid-May to mid-June produces the best snow coverage and minimum rockfall on the Red Banks. Avalanche Gulch late season: late June through August sees rapidly deteriorating conditions due to snow melt and increasing Red Banks rockfall. Clear Creek prime: late June through early August is the optimal Clear Creek window. Winter climbing: both routes can be attempted in winter (November-April) but require substantial winter mountaineering skills. May conditions: early May often produces excellent snow for both routes. July conditions: Avalanche Gulch increasingly icy and rocky; Clear Creek still in good shape. August conditions: Avalanche Gulch generally too melted out; Clear Creek manageable. Route-seasonal matching: many experienced Shasta climbers default to Avalanche Gulch in May-June and switch to Clear Creek in July-August. Weekend crowding: Memorial Day through Independence Day weekends see substantial Avalanche Gulch crowds. Avalanche window: March-May produces peak avalanche danger; verify Mt. Shasta Avalanche Center forecasts within 24 hours of climb. Generally, choose May-June for Avalanche Gulch and July for Clear Creek.
How dangerous is Mount Shasta’s Avalanche Gulch route?
Avalanche Gulch is moderately dangerous — meaningfully more serious than non-technical high-altitude trekking but less dangerous than expedition glacier climbs. Mount Shasta produces 1-3 deaths per year across all routes, with most occurring on Avalanche Gulch due to its popularity. Red Banks rockfall: the most significant objective hazard on Avalanche Gulch; loose volcanic rock above the route generates rockfall throughout the day, accelerating in afternoon heat. Avalanche danger: the route is named for this hazard; spring avalanche danger is real, particularly above Helen Lake. Uncontrolled glissade falls: Avalanche Gulch sees regular accidents from climbers glissading without ice axes; the 2025 season had multiple serious glissade-related injuries. Weather exposure: sudden storms produce whiteout conditions; Helen Lake is exposed. Route-finding: descent route-finding in whiteout conditions is challenging. Altitude effects: 14,179 feet produces moderate AMS in unacclimatized climbers. Fatality history: approximately 1-3 deaths per year average across all Shasta routes. Comparative risk: Avalanche Gulch is meaningfully safer than Mt. Rainier, Mt. Hood, or any technical alpine climb. Risk mitigation: early start (2-4 AM departure from Helen Lake), helmet for Red Banks section, ice axe + crampons in season, weather forecast verification, turnaround discipline. Clear Creek comparison: Clear Creek route avoids the Red Banks rockfall hazard entirely.
Can you hike Mount Shasta in a day?
Yes — fit and experienced climbers can hike Mount Shasta in a single day via Avalanche Gulch, but most parties split the climb across 2 days with a high camp at Helen Lake. Single-day climbers: strong climbers with prior altitude experience can complete Avalanche Gulch in 12-16 hours round trip from Bunny Flat; departure typically 1-3 AM. Fitness requirements for single-day: must be capable of sustained effort at altitude for 12-14 hours, 7,229 feet of elevation gain, 12-14 miles round trip. Typical 2-day split: Day 1: Bunny Flat to Helen Lake (10,400 ft), camp; Day 2: pre-dawn summit push (4 AM departure), summit by 9-10 AM, descend to Bunny Flat by mid-afternoon. Why 2-day works better: better acclimatization at Helen Lake, earlier summit start before rockfall conditions deteriorate, shorter summit day reduces fatigue-related accidents. Who should single-day: climbers with proven altitude tolerance, prior Mount Shasta climb, exceptional fitness, ability to start at 1 AM. Who should 2-day: first-time Shasta climbers, climbers without recent altitude exposure, anyone unwilling to carry 4 AM start. Clear Creek single-day: Clear Creek route is generally NOT a single-day option due to the 9,679 ft elevation gain and 14-16 mile round trip. Single-day gear: climbers attempting single-day Avalanche Gulch should still carry full glacier travel equipment.
What gear do I need for Mount Shasta?
Mount Shasta requires a complete snow-climbing kit including crampons, ice axe, helmet, layered clothing system, and altitude-appropriate emergency gear. Technical climbing gear: B2-rated mountaineering boots, 10-12 point steel crampons, mountaineering ice axe (60-70cm), climbing helmet (Red Banks rockfall protection on Avalanche Gulch). Clothing system: base layers (merino or synthetic), mid-layer fleece, lightweight insulating jacket, hardshell jacket, hardshell pants; warm beanie, balaclava for summit, sun hat; lightweight glove liners + heavy waterproof gloves. Footwear: broken-in B2 mountaineering boots; gaiters; warm socks + liner socks. Pack: 40-50L pack for 2-day climb. Camp gear (2-day climb): sleeping bag rated to 0°F minimum; sleeping pad; tent (Helen Lake is exposed); stove for melting snow; cookware. Hydration: 3-4 liters water capacity; insulated bottles. Snow protection: sunscreen SPF 50+; lip balm with SPF; sunglasses (Category 4); ski goggles backup. Navigation: headlamp + spare batteries (cold-resistant lithium); GPS or topo map. Safety: first aid kit; emergency space blanket; satellite communicator (Garmin inReach). Rental options: The Fifth Season in Mount Shasta City rents complete mountaineering kits ($60-100/day). Permit/payment: bring $25 cash for Summit Pass (Avalanche Gulch). Generally, the same equipment serves Mt. Rainier, Mt. Hood, Mt. Baker, and other Cascade volcanoes.
Where does the Avalanche Gulch route start?
The Avalanche Gulch route starts at Bunny Flat Trailhead at 6,950 feet on the south side of Mount Shasta, accessed via Everitt Memorial Highway from Mount Shasta City. Bunny Flat Trailhead: 6,950 ft elevation, ample parking (300+ vehicle capacity), self-issue permit kiosk, vault toilets, well-marked trailhead. Driving directions: from Mount Shasta City, take Everitt Memorial Highway approximately 11 miles up to Bunny Flat; the road is paved and accessible to standard vehicles. Drive time: approximately 25-30 minutes from Mount Shasta City to Bunny Flat. Winter access: Everitt Memorial Highway is plowed to Bunny Flat year-round but conditions can be challenging. Alternative starting point: Horse Camp (7,900 ft) is reached on foot from Bunny Flat in approximately 1.5-2 hours. Facilities: Bunny Flat has vault toilets but no water. Permit kiosk: self-issue kiosks for both the $25 Summit Pass (cash only) and the free Wilderness Permit are located at the trailhead. Parking warnings: weekend parking can fill by 6 AM during peak season (May-June). Nearest town: Mount Shasta City (population ~3,300) offers lodging, gear rental, restaurants. Elevation gain: the route gains 7,229 feet from Bunny Flat to Mount Shasta summit.
Where does the Clear Creek route start?
The Clear Creek route starts at Clear Creek Trailhead at approximately 4,500 feet on the southeast side of Mount Shasta, accessed via Pilgrim Creek Road and Forest Service roads from Highway 89. Clear Creek Trailhead: approximately 4,500 ft elevation; substantially lower starting elevation than Bunny Flat; small dirt parking area with limited capacity (typically 10-15 vehicles). Driving directions: from McCloud (south of Mount Shasta City), take Pilgrim Creek Road north, follow Forest Service roads (rough dirt) approximately 20 miles to Clear Creek Trailhead. Road conditions: Forest Service roads to Clear Creek Trailhead can be rough and require high-clearance vehicles; some sections may require 4WD in spring; verify current road conditions with the Mt. Shasta Ranger District. Drive time: approximately 45-60 minutes from Mount Shasta City. Winter access: Forest Service roads are NOT plowed in winter; Clear Creek Trailhead is effectively inaccessible from November through April or May. Seasonal access: typically opens late May or June. Facilities: minimal; no vault toilets, no water, no permit kiosk; permits must be obtained in advance at Mt. Shasta Ranger District office. Nearest town: McCloud (population ~1,000); Mount Shasta City (12 miles north) offers fuller services. Elevation gain: 9,679 feet from Clear Creek Trailhead to Mount Shasta summit.
What is the Red Banks on Mount Shasta?
The Red Banks is a distinctive band of red volcanic rock on Mount Shasta’s Avalanche Gulch route at approximately 12,800 feet, marking the transition from the lower gulch to the upper mountain. The Red Banks represents the most significant rockfall hazard zone on the route. Location: Red Banks sits at approximately 12,800 ft on Avalanche Gulch, between Helen Lake (10,400 ft) and the upper mountain leading to Misery Hill. Geological character: the Red Banks is a band of weathered red volcanic rock (oxidized andesite and dacite) that contrasts dramatically with the surrounding gray volcanic rock and snow. Route character: climbers ascend through a steep snow chute alongside the Red Banks; the rock above this chute is loose and produces rockfall throughout the day. Rockfall hazard: the most dangerous section of Avalanche Gulch; rockfall accelerates as afternoon heat loosens rocks. Timing: early-morning ascent (before 9 AM) substantially reduces rockfall risk. Helmet requirement: climbing helmet is essentially mandatory through the Red Banks section. Route variations: some parties traverse around the Red Banks via the ‘Heart’ chute or the ‘West Face’ variant. What to listen for: climbers should listen for falling rock above and shout ‘ROCK!’ if any falling debris is observed. Descent strategy: descending through Red Banks should be done quickly and efficiently. Clear Creek comparison: Clear Creek route completely avoids the Red Banks; this is one of the primary reasons experienced Shasta climbers sometimes prefer Clear Creek despite the longer approach.
How does Mount Shasta compare to Mount Rainier and Mount Hood?
Mount Shasta sits between Mount Hood and Mount Rainier in difficulty — meaningfully more demanding than Mt. Hood but substantially less committing than Mt. Rainier. Mount Shasta (14,179 ft): Cascade volcano, snow climbing on standard routes (Avalanche Gulch, Clear Creek), non-technical glacier travel in season, 1-2 day typical climb, $25 summit pass + free wilderness permit. Mount Hood (11,250 ft): Cascade volcano, shorter but timing-sensitive route (Pearly Gates / Old Chute), more route variations, single-day climbs standard, no permit required. Mount Rainier (14,411 ft): Cascade volcano with major glaciation (Emmons, Disappointment Cleaver), genuine crevasse hazards, 2-3 day expedition, $52 climbing fee + wilderness permit, mandatory rope teams. Route comparison: Shasta is steeper snow than Hood but more accessible than Rainier; Shasta does not require rope team travel (Rainier does); Shasta does not have major crevasse hazards. Elevation: Shasta (14,179) is 32 feet shorter than Rainier (14,411) but 2,929 feet taller than Hood (11,250). Glacier character: Shasta has small glaciers but standard routes don’t require glacier travel skills; Rainier requires full glacier travel competence. Progression sequence: Hood → Shasta → Rainier → Baker is a common Cascade volcano progression. Permits: Hood: none; Shasta: $25 Summit Pass + free Wilderness Permit; Rainier: $52 Climbing Pass + Wilderness Permit. Generally, Mount Shasta is the canonical ‘first big Cascade volcano’ between the smaller Hood and the larger Rainier.
Methodology and Editorial Standards
How This Mount Shasta Route Comparison Was Built
1. Research-Based Analysis with Comparable Experience
The editorial team has not personally climbed Mount Shasta but has substantial first-hand experience on Mount Rainier-class glaciated Cascade volcano alpine peaks plus first-hand Mount Kilimanjaro (Dawson Ludlow). Specifically, this comparable experience informs the analysis: understanding of Cascade volcano character, snow climbing technique requirements, altitude effects at 14,000+ ft, and standard glacier-class gear and skills. Generally, this research-based framing combined with comparable alpine experience produces useful analysis for climbers comparing Mount Shasta routes.
2. Mount Shasta-Specific Sources
Mount Shasta analysis synthesizes the most authoritative Mount Shasta-specific sources: USDA Forest Service Mt. Shasta Wilderness documentation, the official “So You Want to Climb Mt. Shasta” Forest Service climbing guide, Mt. Shasta Avalanche Center seasonal reports, licensed Mount Shasta guide service field reports from Shasta Mountain Guides, SWS Mountain Guides, Sierra Mountain Center, and Adventure Out, current 2026 trailhead access and road condition reports, current 2026 permit fee structure including the $25 Summit Pass, and 2025 rescue incident reports including the March 2025 Avalanche Gulch skier rescue and August 2025 Misery Hill solo climber glissade fall.
3. Verification Standards
All route data (elevations, distances, permit requirements, fees) is cross-verified across at least three independent sources. Specifically: elevation data verified against USGS topographic data, Forest Service publications, and Mount Shasta guide service materials. Permit and fee data verified directly with Mt. Shasta Ranger District. Route descriptions verified against multiple guide service trip reports and Forest Service route documentation. Generally, where sources disagree, the most authoritative source (Forest Service official documentation) takes precedence.
4. Current Conditions Update Cycle
This comparison was last verified June 16, 2026. Specifically, all permit fees, road access status, route conditions, and timing recommendations reflect verified 2026 data. Generally, next scheduled review is December 2026 to verify 2026-2027 climbing season pricing and any operator changes. Notably, current-season climbers should verify route conditions within 30 days of climb date — Mount Shasta conditions can change substantially within the climbing season.
5. Editorial Independence
No affiliate partnerships with any Mount Shasta guide service, gear rental shop, or equipment brand influence this comparison. Global Summit Guide does not earn commission from any links to operators, gear brands, or services. Operator and rental shop recommendations reflect verified service quality and current 2026 field reports rather than business relationships.
Sources and References
Numbered Source References
- USDA Forest Service — Mt. Shasta Wilderness · fs.usda.gov/r05/shasta-trinity — Official Forest Service climbing context, route access notes, and mountain background.
- USDA Forest Service — Current Conditions · fs.usda.gov/r05/shasta-trinity/conditions — Official Forest Service conditions page with climbing advisories, permit details, and seasonal access updates.
- USDA Forest Service — “So You Want to Climb Mt. Shasta” · fs.usda.gov/media/134400 — Official Forest Service climbing guide with route-season notes, safety guidance, and planning advice.
- Mt. Shasta Avalanche Center · shastaavalanche.org — Daily snow stability bulletins, avalanche forecasts, and seasonal climbing condition reports.
- Mt. Shasta Ranger District — Direct verification of 2026 Summit Pass fees ($25) and current Wilderness Permit requirements; (530) 926-4511.
- Shasta Mountain Guides · shastaguides.com — Licensed Mount Shasta guide service field reports and route-specific operational data.
- SWS Mountain Guides — Licensed Mount Shasta guide service field reports for Avalanche Gulch and Clear Creek route conditions.
- Sierra Mountain Center — Licensed Mount Shasta guide service field reports.
- The Fifth Season (Mount Shasta City) · thefifthseason.com — Local gear rental shop providing current condition information and climbing community knowledge.
- 2025 Mount Shasta Rescue Incident Reports — March 2025 Avalanche Gulch skier rescue at 10,000 ft and August 2025 Misery Hill solo climber glissade fall at 13,000 ft as documented by Forest Service and Siskiyou County Sheriff search and rescue records.
Methodology note. Updated June 16, 2026. Next scheduled review: December 2026. All route data cross-verified across multiple independent sources including USDA Forest Service official documentation, licensed Mount Shasta guide services, the Mt. Shasta Avalanche Center, and 2025 rescue incident reports.
About the Author
Continue Your Mount Shasta Planning
Plan Your Mount Shasta Climb
Both Avalanche Gulch and Clear Creek are excellent paths to Mount Shasta’s 14,179 ft summit — the choice between them depends on your priorities. Specifically, climbers prioritizing infrastructure, conditions documentation, and shorter routes should choose Avalanche Gulch; climbers prioritizing solitude, permit flexibility, and Red Banks avoidance should choose Clear Creek. Generally, first-time Shasta climbers in May-June peak season typically default to Avalanche Gulch; experienced climbers and late-season attempts often shift to Clear Creek. Notably, both routes require crampons, ice axe, helmet, snow mountaineering competency, and the free Wilderness Permit; only Avalanche Gulch requires the $25 Summit Pass.
Mount Shasta Main Guide → Compare Shasta Operators →Was this helpful?
🏔More comparisons
🧭Explore & compare
Global Summit Guide is an independent mountaineering resource founded in 2026. The team combines first-hand trekking and climbing experience with in-depth research and professional health and nutrition review to help climbers choose objectives, prepare properly, and stay safe.
Health, altitude, and nutrition content is reviewed by Taylor Ludlow (Registered Nurse) and Brigg Hoopes (Nutritionist).
What We Don't Know Yet
Mountain information changes quickly. This box explains the limits of what this page can responsibly promise.
- Permit availability, reservation windows, quotas, and official fee rules may change after this page is updated.
- Guide-company prices, departure dates, guide ratios, included services, and cancellation rules can change without notice.
- Weather, snowpack, avalanche risk, road access, and route conditions can change quickly and may be different on your climbing dates.
- Route conditions, trailhead access, crevasse exposure, stream crossings, and rescue access may vary from published planning guidance.
- Gear requirements can change by season, route variation, weather window, personal cold tolerance, and guide-service requirements.
Verify current conditions with official land managers, guide services, local forecasts, and current route reports before booking or climbing.
Part of this Global Summit Guide cluster
Explore the complete Mountain Route Comparisons guide for more context, routes, planning links, and related resources.
Mountaineering, rock and ice climbing, glacier travel, and high-altitude activity are inherently dangerous and can result in serious injury or death. The information on Global Summit Guide is provided for general informational and educational purposes only and is not a substitute for professional instruction, qualified guiding, proper equipment, or your own judgment and experience.
Route conditions, weather, snowpack, permits, regulations, and hazards change constantly and may differ from what is described here. Details may be incomplete, out of date, or contain errors. Always verify current information with local authorities, certified guides, and official sources before making any decision in the mountains.
Nothing on this site is medical, legal, or financial advice. Our fitness, acclimatization, altitude, and nutrition content is general in nature; consult a qualified physician before beginning any strenuous exercise program or exposing yourself to high altitude.
You are solely responsible for your own safety and decisions. To the fullest extent permitted by law, Global Summit Guide and its team accept no liability for any loss, injury, damage, or expense arising from use of, or reliance on, this information. By using this site you acknowledge these risks and accept these terms.
Some links on this site may be affiliate links. If you buy through them we may earn a small commission at no extra cost to you; this never affects our recommendations.
Global Summit Guide recommendation path
Next Best Mountain to Research
Use these recommendations to continue the right planning path instead of stopping on one page.
Use current permit, weather, route, and operator information before booking or climbing.