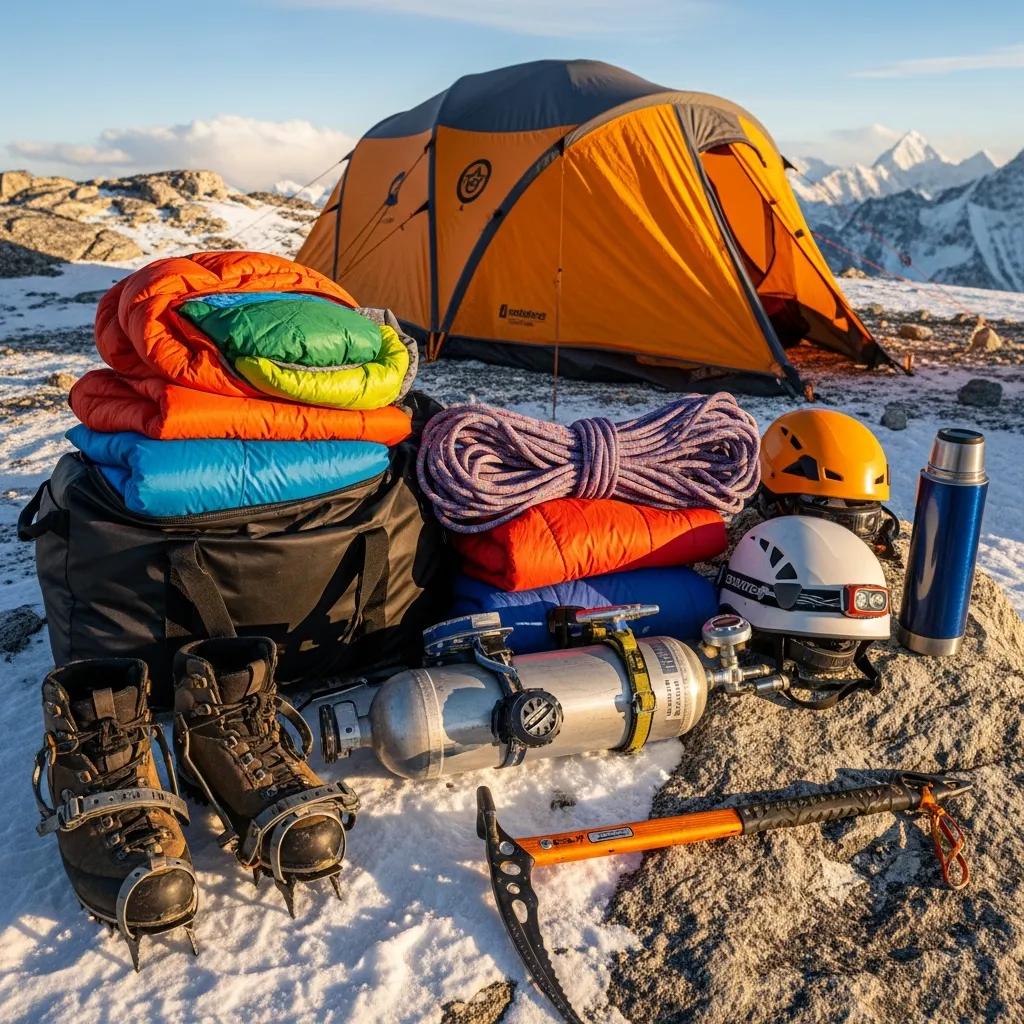
Microspikes and crampons are the two snow-traction tools most winter hikers and mountaineers eventually own, but they solve different problems and using the wrong one can be dangerous. Microspikes give you surface traction on packed icy trails. Crampons give you secure penetration into steep hard snow and ice. The line between when one works and when you need the other comes down to slope angle, consequence of a fall, and surface hardness. This guide gives you the practical decision framework — when each works, when each fails, and how to choose between them. For the full snow-travel gear context see our snow travel gear master guide.
The head-to-head at a glance
Microspikes
Surface traction tool
Point length~10 mm
Weight (pair)~12 oz / 350 g
AttachmentElastic stretch
Boot typeAny hiking boot
Best terrainPacked icy trails
Slope limit~20-25°
Glacier capable?No
Typical cost$60-80
Setup time~30 seconds
Crampons
Mountaineering traction tool
Point length25-38 mm
Weight (pair)~32 oz / 900 g
AttachmentBinding to boot
Boot typeMountaineering boot
Best terrainSteep snow, ice, glaciers
Slope limitUnlimited
Glacier capable?Yes
Typical cost$150-350
Setup time2-5 minutes
The 30-second answer
Microspikes for trails. Crampons for mountaineering.
If the terrain is a hiking trail with ice or packed snow and the slope angle is moderate, microspikes are the right tool. If the terrain is steep snow, glacier, or true ice — or if a fall would have serious consequences — crampons are required. The line between them is roughly 25 degrees slope angle and the consequence of a fall.
What each tool actually does the mechanics
How microspikes work
Microspikes consist of small metal points (typically 3/8 inch, or about 10mm) arranged in a chain pattern beneath your foot, held in place by an elastic harness that stretches over the boot. The points are short enough to feel comfortable while walking but long enough to bite into packed snow and ice on most trail conditions. Microspikes are designed for surface traction — they prevent slipping on icy or snow-packed terrain by adding mechanical grip, similar in concept to studded tires on a car.
The dominant brand is Kahtoola MICROspikes, which essentially defined the category in 2008. Hillsound, Yaktrax, and STABILicers also produce comparable products at various price and quality tiers. Quality matters: cheap traction devices often have poor elastic that breaks, shorter points that don’t bite, or chain patterns that bunch under the foot.
How crampons work
Crampons are a fundamentally different category of equipment. They consist of 10-14 steel points (typically 1 to 1.5 inches long, or 25-38mm) mounted on a rigid or semi-rigid frame that binds firmly to a mountaineering boot. The longer points penetrate hard snow and ice rather than just providing surface friction. The binding system locks the crampon to the boot so the foot and crampon move as a single unit — essential for steep terrain where a loose crampon could be catastrophic.
Modern crampons fall into three categories:
Aluminum crampons — lighter weight, designed for general mountaineering on snow. Examples: Black Diamond Neve, Petzl Leopard.
Steel general mountaineering crampons — versatile workhorses for most alpine objectives. Examples: Petzl Vasak, Grivel G12.
Technical steel crampons — for ice climbing and serious alpine routes. Examples: Petzl Dart, Black Diamond Cyborg.
Microspikes prevent you from slipping on flat or moderate-angle ice. Crampons let you climb steep snow and ice without falling. Both deal with snow and ice, but they solve completely different problems.
When to use microspikes the right scenarios
Microspikes are the correct tool when you need surface traction on icy or snow-packed terrain without the depth-of-bite that crampons provide:
✓
Packed icy trails in winter
Established hiking trails with consolidated snow and ice underfoot. Most winter day hikes fit this category — Colorado Front Range trails, New England winter peaks, the Pacific Northwest forest trails after a freeze-thaw cycle.
Microspikes
✓
Trail running on snow and ice
Microspikes work with trail running shoes for winter running. The lower weight and quick on/off make them practical for moving fast on mixed conditions.
Microspikes
✓
Approach to climbing objectives
The lower portions of mountaineering approaches where the terrain is moderate-angle packed snow. Many climbers wear microspikes from the trailhead to the start of technical terrain, then switch to crampons.
Microspikes
✓
Daily winter walking in icy conditions
Sidewalks, parking lots, and urban environments after freezing rain. Many people keep microspikes by the front door for everyday winter use when ice is a problem.
Microspikes
✓
Shoulder-season alpine trails
Spring and fall hikes when lingering snow and ice patches make terrain slippery but not steep enough to require crampons. Often paired with trekking poles for additional stability.
Microspikes
When to use crampons the required scenarios
Crampons are required when the terrain demands actual ice penetration rather than just surface grip, or when a fall would have serious consequences:
!
Steep snow above ~25 degrees
The threshold is approximate but consistent — snow slopes steeper than about 25 degrees require crampons for secure footing. Microspikes will slip on this angle, especially on hard snow conditions.
Crampons
!
Glacier travel
Any travel on glaciated terrain requires crampons. The combination of variable snow conditions, hidden crevasses, and the need for secure foot placement makes glacier travel a non-negotiable crampon requirement. The framework is in our glacier travel basics guide.
Crampons
!
Ice climbing
True water ice climbing requires technical crampons with vertical front points designed to penetrate ice. This is well outside microspike territory.
Crampons
!
Hard snow with high fall consequence
Any terrain where a slip would result in a serious fall — even if the slope angle is moderate. Cascade volcano descents, exposed ridges, terrain above cliffs. The rule is: if you would not want to fall here, do not rely on microspikes.
Crampons
!
14ers in spring and early summer snow conditions
Many Colorado 14ers in May-June still have snow on the upper sections that requires crampons. Climbers attempting these peaks before the snow melts need real mountaineering equipment, not just microspikes. The full 14er context is in our Colorado 14ers guide.
Crampons
The grey zone when neither is perfect
Real conditions often fall between clean microspike and clean crampon scenarios. Honest assessment of the grey zone:
?
Deep soft snow (no ice)
Powder snow does not need traction devices — it needs flotation. The right tool is snowshoes, not microspikes or crampons. Microspikes do nothing in deep snow except make your feet heavier. Crampons can actually be hazardous in deep snow because they ball up with snow.
Snowshoes
?
Mixed conditions on a single hike
Many spring and fall hikes have stretches of bare trail, then patches of ice, then steeper snow, then back to bare trail. Carrying both microspikes and trail boots (or microspikes plus crampons for serious objectives) is sometimes the practical answer. Many experienced winter hikers carry both.
Carry both
?
Hard ice on moderate slope
Ice patches at 15-25 degrees can be challenging. Microspikes are technically capable but feel insecure. Crampons feel overkill but bite better. The honest answer depends on consequence: if a fall is just an inconvenience, microspikes work. If a fall could be serious, use crampons.
Conditions-dependent
Cost comparison honest numbers
Item
Microspikes price range
Crampons price range
Entry-level / budget
$30-50 (Yaktrax, basic chains)
$150-200 (aluminum)
Standard / quality
$60-80 (Kahtoola MICROspikes)
$200-260 (Petzl Vasak, Grivel G12)
Premium / technical
$80-120 (Hillsound Trail Pro)
$260-350 (Petzl Dart, BD Cyborg)
Required compatible boot
Any hiking boot ($100+)
Mountaineering boot ($350-600+)
System total cost
$160-200 (microspikes + boots)
$500-1,000 (crampons + boots)
The cost difference is substantial. A complete microspikes-and-hiking-boots system runs $160-200. A complete crampons-and-mountaineering-boots system runs $500-1,000+. For most casual winter hikers, the microspikes route is the right starting point — you can always upgrade to crampons later if your objectives evolve toward true mountaineering. The full mountaineering boots context is in our crampons buyers guide.
Common mistakes that cause injuries
The mistake that produces most rescues
Hikers attempting steep snow objectives with microspikes instead of crampons. This combination produces a consistent pattern of mid-hike rescues: the trail steepens, the microspikes slip, the hiker tries to descend without proper equipment, and a fall becomes serious. If you are heading into terrain where steep snow is possible, bring crampons even if you think you might not need them. The weight penalty is small; the consequence of not having them is large.
The other common mistakes:
Microspikes on trail runners or thin shoes: the elastic harness can slip off, especially on technical terrain. Use microspikes with at least a sturdy hiking shoe.
Crampons on inappropriate boots: crampons require rigid or semi-rigid boots to bind properly. Strapping crampons to soft hiking boots is unsafe — the binding cannot remain secure under load.
Not removing crampons on rock: walking on rock or mixed terrain with crampons is hazardous. The points slip on rock and create awkward foot positions. Remove crampons for any extended rock travel.
Wearing microspikes in deep snow: they don’t help and they make your feet heavier. Use snowshoes instead.
Skipping practice: crampons require practice to use safely. The first time using crampons should not be on a serious objective. Most mountaineering courses spend time on crampon technique before sending students up real terrain.
What experienced climbers actually carry practical kit
For climbers building toward serious mountaineering, the typical gear progression looks like this:
Year 1 — Winter hiker: Microspikes + trekking poles + winter hiking boots. Total system cost ~$250-350. Handles 80% of winter trail hiking scenarios.
Year 2 — Aspiring mountaineer: Add aluminum crampons + mountaineering boots + ice axe. Total system cost ~$700-1,000. Handles non-technical glacier travel and easier 14ers.
Year 3+ — Active mountaineer: Steel general mountaineering crampons + harder boots + ice axe tools. Total system cost varies but typically $1,200-1,800. Handles most general mountaineering.
Technical climber: Multiple crampon pairs for different applications. Aluminum for general use, steel for harder objectives, technical crampons for ice. Total kit easily exceeds $2,000.
The honest progression is that microspikes never go away even after you own crampons. Experienced mountaineers keep microspikes for trail approaches, daily winter walking, and shoulder-season conditions where crampons would be overkill. The two systems are complementary, not alternatives.
Seasonal decision framework when to bring what
Season / conditions
Likely tool
Backup option
October-November (early snow)
Microspikes
Trekking poles
December-February (winter trails)
Microspikes
Snowshoes if deep snow
December-February (peak climbing)
Crampons
Microspikes for approach
March-April (variable)
Both — conditions-dependent
Check trip reports
May-June (lingering snow on peaks)
Crampons
Microspikes for trail
July-August (summer alpine)
Crampons for high routes
None for low elevation
September (early winter)
Microspikes for shoulder season
Crampons if snow has started
The general rule for any specific trip: check recent trip reports for current conditions on your target. Microspikes-vs-crampons decisions are usually obvious once you know what other hikers found that week. Sites like AllTrails, the Mountaineers in Washington, the Colorado Mountain Club, and local backcountry conditions reports give specific gear recommendations for current conditions.
Quality brands to consider honest assessment
Microspikes
Kahtoola MICROspikes ($65-75) — the industry standard. Most experienced winter hikers own these. Excellent build quality, predictable performance.
Hillsound Trail Crampon ($65-80) — comparable to Kahtoola with slightly different chain pattern. Strong durability reports.
Hillsound Trail Crampon Pro ($90-100) — longer points for harder snow conditions, sometimes called “between microspikes and crampons.”
STABILicers ($50-65) — budget-friendly option, less aggressive bite but solid for casual use.
Aluminum crampons (intro mountaineering)
Black Diamond Neve ($160-180) — lightweight aluminum for general mountaineering on snow.
Petzl Leopard FL ($180-200) — popular lightweight option with flexible binding.
Steel general mountaineering crampons
Petzl Vasak ($200-220) — versatile workhorse, the most common general mountaineering crampon.
Grivel G12 ($220-260) — comparable to Vasak with slightly different geometry.
Black Diamond Sabretooth ($220-250) — solid alternative with good binding system.
Microspikes and crampons solve different problems and using the wrong tool can be dangerous. Microspikes provide surface traction on packed icy trails at moderate angles — perfect for winter day hiking, trail running, urban ice, and mountaineering approaches. Crampons provide secure penetration into steep snow and ice — required for slopes above approximately 25 degrees, glacier travel, ice climbing, and any terrain where a fall would have serious consequences. The honest framework: microspikes for trails, crampons for mountaineering, and accept that real conditions sometimes fall in the grey zone where the right answer is “bring both” or “check conditions first.” Most winter hikers should start with quality microspikes (Kahtoola or Hillsound, $60-80) and upgrade to crampons only when their objectives evolve toward true mountaineering. The full snow travel framework is in our snow travel gear guide, with the crampons-specific deep dive in our crampons buyers guide.
Frequently asked questions
What is the difference between microspikes and crampons?
Microspikes are lightweight traction devices with small metal spikes (typically 3/8 inch or about 10mm) on a chain pattern that stretches over hiking boots or trail running shoes. They are designed for icy or snow-packed trails at moderate angles. Crampons are heavier mountaineering equipment with longer steel points (typically 1 to 1.5 inches or 25 to 38mm) attached to a rigid or semi-rigid frame that binds firmly to mountaineering boots. Crampons are designed for steep snow, glacier travel, and ice climbing. The fundamental distinction is depth of bite into the surface: microspikes provide surface traction, while crampons provide secure penetration into hard snow and ice.
When should you use microspikes instead of crampons?
Use microspikes on packed snow trails, icy paths, and moderate-angle terrain (typically below 20 degrees slope) where surface traction is needed but ice penetration is not. Microspikes work well for winter day hiking on established trails, walking on icy sidewalks or parking lots, light backcountry travel on consolidated snow, and approaches to climbing objectives where the technical terrain has not yet started. They are not appropriate for steep snow slopes above approximately 25 degrees, glacier travel with crevasse risk, or any terrain where a fall would be consequential.
When are crampons required instead of microspikes?
Crampons are required when the terrain involves steep snow slopes above approximately 25 to 30 degrees, hard ice that microspikes cannot penetrate, glacier travel where crevasse fall risk requires secure footing, ice climbing or mixed alpine routes, and any technical mountaineering terrain. The general rule is that if a fall would result in serious injury or death, crampons (not microspikes) are the appropriate gear. Crampons also become necessary on the descents of many summer peaks when snow conditions are firmly frozen in early morning hours.
Can microspikes be used for mountaineering?
Microspikes can be used on the approach portions of mountaineering objectives where the terrain is moderate-angle packed snow or icy trail, but they are not appropriate for the technical sections of mountaineering routes. Mountaineering generally involves steep snow, glaciers, or technical ice and mixed terrain — all conditions that require true crampons. Many mountaineers carry microspikes for the lower-elevation trail approach and switch to crampons at the start of technical terrain. Using microspikes alone on technical mountaineering routes is dangerous and not recommended.
How much do microspikes and crampons cost?
Microspikes cost approximately 60 to 80 USD for quality brands like Kahtoola MICROspikes, the industry standard. Crampons cost dramatically more: aluminum crampons for general mountaineering cost 150 to 250 USD, while technical steel crampons for ice climbing and serious alpine objectives cost 200 to 350 USD. Crampons also require compatible mountaineering boots with rigid or semi-rigid soles to bind properly, while microspikes work with virtually any hiking footwear. The total cost difference between the two systems can be significant when boots are factored in.
What about snowshoes and trekking poles?
Snowshoes serve a different purpose than microspikes or crampons. Snowshoes provide flotation on deep soft snow, preventing the hiker from postholing knee-deep into powder. They are used when snow depth is the problem, not surface ice or traction. Trekking poles provide stability and reduce knee impact on descents, and they pair well with microspikes for winter trail hiking. The ideal winter kit varies by conditions: snowshoes for deep snow, microspikes for packed icy trails, crampons for steep or technical terrain. Many winter hikers carry multiple options because conditions change throughout a single trip.
Are microspikes good for ice?
Microspikes work well on flat or moderate-angle ice such as frozen sidewalks, icy parking lots, and packed icy trails. They provide secure footing on most ice conditions a hiker encounters in everyday winter conditions. However, microspikes are not adequate for steep ice (anything above approximately 25 degrees), pure water ice climbing, or technical mountaineering ice. For these conditions, crampons are required. The practical test is the slope angle and consequence of a fall: gentle ice with low fall consequence is fine for microspikes; steep ice or high-consequence terrain requires crampons.
What to Pack for Your First Mountain Without Overspending on Gear
Your first mountain should not require a second mortgage, a garage full of gear, or an expedition kit built for Everest. A safe beginner summit depends on a few smart essentials: footwear that works, layers that protect you, enough food and water, basic navigation, and emergency margin. This guide shows what to pack, what to borrow, what to rent, and what to skip until your goals actually require it.
The biggest beginner gear mistake is not underbuying. It is buying the wrong things too early. New climbers often spend money on technical gear, oversized packs, heavy boots, premium jackets, or gadgets before they know what kind of mountains they will actually climb. For your first nontechnical mountain, the goal is not to own everything. The goal is to carry the right things for the route, weather, season, and your body.
★
The quick answer
For a first beginner mountain, pack a comfortable daypack, broken-in shoes, moisture-managing clothing, rain shell, warm layer, food, water, sun protection, offline navigation, headlamp, small first-aid kit, and a simple emergency layer. Buy footwear and personal comfort items carefully; borrow or rent specialty gear; skip ropes, crampons, ice axes, expedition boots, and mountaineering tents until a trained objective requires them.
The beginner gear philosophy: buy less, choose better
Gear companies sell possibility. That is part of the fun. A new jacket feels like a new identity. A technical pack feels like permission to become a climber. But your first mountain does not care how much you spent. It cares whether you stayed warm, hydrated, fueled, oriented, and safe enough to descend.
The best beginner setup is simple and route-specific. If your first mountain is a clear Class 1 or easy Class 2 summer summit, you do not need glacier gear, a four-season tent, or mountaineering boots. You need the same practical systems that make any mountain day safer: shoes that do not blister, layers that handle wind and rain, enough calories and water, navigation that works without cell service, and a way to handle delays.
Think of gear in three categories: must own, can borrow, and should skip for now. Must-own gear includes personal-fit items and safety basics you will use repeatedly. Borrowable gear includes items that are expensive but not personal, or things you only need once or twice. Skip-for-now gear includes technical items that require training or belong to objectives beyond your first summit.
The five gear categories that actually matter on your first mountain
Instead of thinking in terms of brands, think in terms of jobs. Every item in your pack should solve a problem. If you cannot explain what job the item performs, it may not belong on your first summit day.
01
Movement
Footwear and pack comfort
Your feet and pack decide whether the day feels manageable or miserable. The right footwear is not always the most expensive boot. It is the shoe or boot that fits your feet, works for the trail, and has been tested before summit day.
Broken-in trail runners or hiking boots
Moisture-managing socks
Comfortable 20–30L daypack
Optional trekking poles for steep descents
02
Weather protection
Layers for the summit, not the parking lot
The trailhead can feel warm while the summit is cold, windy, or stormy. Beginners often dress for the first 10 minutes instead of the hardest conditions of the day. Your clothing system should protect you when you stop moving.
Base layer or breathable hiking shirt
Warm fleece or light insulated layer
Rain shell or wind shell
Hat and light gloves when elevation/weather requires them
03
Energy
Food, water, and pacing support
Food and water are gear. They keep your decision-making intact. A first summit day is not the time to test how little you can carry or how long you can go without eating.
Water bottles or hydration bladder
Electrolytes for hot or long days
Simple snacks every 60–90 minutes
One real lunch or larger summit snack
04
Navigation
Finding the route and getting back down
Many beginners think navigation is only for remote expeditions. But wrong turns, fading trails, snow patches, and descent confusion can happen on popular beginner routes too.
Downloaded offline map
Charged phone and small power bank
Route notes or screenshot of key turns
Optional paper map if the route is complex
05
Safety margin
Small items that solve big problems
The safety items you carry may never come out of your pack. That is fine. Their job is not daily convenience; it is giving you margin when the day runs longer, colder, darker, or harder than expected.
Headlamp, even for day hikes
Small first-aid kit and blister care
Emergency blanket or bivy
Sun protection: sunglasses, sunscreen, hat
★
Budget rule
Spend where fit and safety matter
The best first gear budget protects your feet, weather margin, hydration, and navigation. Do not overspend on technical gear before your objectives demand it.
This list assumes a nontechnical beginner mountain in a reasonable season: no glacier travel, no rope requirement, no planned snow climbing, no overnight camp, and no advanced mountaineering terrain. Adjust for your specific route, forecast, temperature, and season.
Category
Pack this
Budget note
Footwear
Trail runners or hiking boots that are already tested; hiking socks; optional backup blister tape.
Do not buy new shoes the night before. Fit beats price.
Pack
20–30L daypack with room for water, food, layers, and essentials.
Borrow first if needed. Comfort matters more than premium features.
Enough water for the route and weather; electrolytes if hot, long, or high effort.
Reusable bottles are fine. You do not need an expensive hydration system.
Navigation
Offline map, route notes, charged phone, power bank, optional paper backup.
A power bank is usually cheaper than a bad descent.
Safety
Headlamp, small first-aid kit, blister care, emergency blanket, whistle.
These are low-cost items with high value when the day goes sideways.
Sun/weather
Sunglasses, sunscreen, hat, gloves or beanie if high/cold/windy.
Sunburn and wind chill ruin beginner summit days quickly.
⊛
The trailhead test
If you would be uncomfortable waiting 30–45 minutes near the summit in wind, cold, or light rain, you are probably underpacked. Your gear should protect you when you stop moving, not just when you are warm from climbing uphill.
Own, borrow, rent, or skip?
This is where beginners save the most money. You do not need to own every outdoor item before your first summit. You need reliable access to the correct items for the specific day. Some items should be yours because fit and comfort are personal. Others are easy to borrow or rent. Some should wait entirely.
Gear item
Best beginner decision
Why
Hiking shoes or trail runners
Own
Footwear fit is personal. Blisters can ruin the day.
Socks
Own
Good socks are inexpensive compared with foot pain.
Daypack
Own or borrow
Buy if you will hike often; borrow if this is your first test.
Rain shell
Own or borrow
Essential for weather margin, but entry-level shells are fine.
Trekking poles
Borrow first
Useful for descents, but not everyone loves them. Test before buying.
Headlamp
Own
Low-cost safety essential. Your phone flashlight is not enough.
Satellite communicator
Optional / rent
Valuable in remote areas, unnecessary for many popular beginner trails with good access.
Crampons or ice axe
Skip for first route
If your first mountain needs these, choose a different route or take a course.
Rope and harness
Skip
Technical gear requires training and belongs to more advanced objectives.
Expedition boots or down suit
Skip
Not relevant for first nontechnical mountains.
Three realistic budget tiers for your first mountain
Your actual cost depends on what you already own. Many beginners already have athletic clothing, a backpack, water bottles, snacks, and a phone. If you borrow a shell, trekking poles, or a pack, the first summit can be very affordable. Spend first on the gaps that affect safety and comfort.
$0–$150
Borrow-smart setup
Best if you already hike
Use existing athletic clothing, borrow a pack or shell, buy socks, blister care, snacks, sunscreen, and a headlamp if you do not own one.
$150–$350
Practical beginner setup
Best for most new climbers
Buy shoes if needed, socks, headlamp, water system, simple shell or fleece, blister care, and basic safety items. Borrow optional extras.
$350–$700
Frequent hiker setup
Best if you will continue
Add a better-fitting daypack, quality shell, trekking poles, more durable layers, and upgraded navigation/safety tools.
→
The best budget upgrade is often not the flashiest one
Most beginners get more value from good socks, tested footwear, a headlamp, food they will actually eat, and a reliable rain shell than from expensive technical pieces they will not use. Buy the boring essentials first. Fancy gear can wait until your objectives become more specific.
Where not to save money
Budget-conscious does not mean careless. There are a few places where cheaping out can ruin the day or increase risk. You do not need the most expensive version, but you do need something that works.
01
Do not gamble
Footwear fit
Bad footwear creates blisters, hot spots, toe pain, and poor descent control. Buy or use shoes that fit your feet and match the trail. Test them before summit day.
02
Do not skip
Weather protection
A light shell can be the difference between uncomfortable and unsafe. Wind and rain at elevation feel colder than beginners expect.
03
Do not fake
Navigation and power
Offline maps and battery backup are inexpensive compared with being off-route late in the day. A phone is useful only while it still works.
04
Do not forget
Food and water
Under-fueling makes beginners slower, colder, more emotional, and worse at decisions. Carry more than the bare minimum.
What to skip until year two
The easiest way to overspend is to buy gear for mountains you are not climbing yet. Technical gear is exciting, but it is also expensive, specialized, and sometimes dangerous without training. If your first mountain requires ropes, crampons, an ice axe, avalanche gear, or glacier equipment, the better beginner decision is usually to choose a different mountain or hire a qualified guide.
Skip for now
Why beginners buy it too early
Better first-season decision
Ice axe
It looks like a symbol of mountaineering.
Take a snow-travel course before carrying one as safety equipment.
Crampons
Beginners think they make snow safe automatically.
Avoid snow routes until trained; microspikes may be enough for mild trail ice if appropriate.
Rope and harness
They feel like “real climbing” gear.
Learn rope systems with instruction before relying on them outdoors.
Mountaineering boots
They look durable and serious.
For summer beginner peaks, trail runners or hiking boots usually work better.
Four-season tent
People imagine future expeditions.
Rent or borrow if an overnight objective actually requires it later.
High-altitude down clothing
It appears in expedition photos.
Not needed for first nontechnical day summits.
⊛
Gear does not replace route choice
If you are buying technical gear because your first mountain suddenly looks intimidating, pause. The safer beginner move may be choosing a different route, different season, lower peak, or guided course. Equipment without training can create false confidence.
A simple packing system for the night before
Beginners often forget gear because they pack by memory. Use a system instead. Lay everything out by category, check the weather, match each item to a job, then pack in the order you will need things during the day.
First mountain packing checklist
Start with the route. Confirm mileage, elevation gain, terrain class, season, and expected time.
Check summit weather, not just town weather. Wind and temperature change quickly with elevation.
Lay out footwear and socks. Add blister care if the route is long, hot, or steep.
Build your clothing system. Hiking layer, warm layer, shell, sun hat, and cold/wind accessories if needed.
Pack food by time, not vibes. Plan snacks every 60–90 minutes plus one larger meal/snack.
Pack water and backup plan. Know whether water exists on route and whether you can filter it.
Confirm navigation. Download maps, save route screenshots, charge phone, and add power bank.
Add safety essentials. Headlamp, first aid, blister care, emergency blanket, whistle, and personal medications.
Remove fear items. Do not pack heavy gear you do not know how to use just because you are nervous.
Weigh the pack mentally. If it feels overloaded, remove nonessential extras — not water, layers, food, or safety basics.
Frequently Asked Questions
What should I pack for my first mountain?
For a first nontechnical mountain, pack tested footwear, hiking socks, a comfortable daypack, water, food, rain or wind shell, warm layer, sun protection, offline navigation, headlamp, first-aid kit, blister care, and an emergency blanket. Adjust for the route, season, weather, altitude, and length of the day.
Do I need expensive hiking gear for a beginner mountain?
No. You need functional gear, not expensive gear. Spend carefully on footwear, socks, weather protection, food, water, and navigation. Borrow or rent items you are unsure about. Do not buy technical gear until your objectives and training require it.
Should beginners wear trail runners or hiking boots?
Either can work. Trail runners are lighter and often more comfortable on clear trails. Hiking boots may offer more support and protection on rougher terrain. The best choice is the one that fits your feet, matches the route, and has been tested before summit day.
Should I rent gear for my first mountain?
For a simple first mountain, you may not need to rent anything. Borrowing a pack, trekking poles, or extra layer can be enough. Renting becomes more useful when you need expensive specialty gear for a specific objective, especially if you are not sure you will use that item repeatedly.
What gear should I avoid buying before my first mountain?
Most beginners should avoid buying ropes, harnesses, crampons, ice axes, mountaineering boots, four-season tents, avalanche gear, and high-altitude clothing before their first nontechnical summit. Those items belong to more advanced routes or trained objectives.
How much should my first mountain pack weigh?
Many first-summit daypacks fall around 10–20 pounds depending on water, food, layers, and weather. Hot, dry, cold, remote, or longer routes may require more. The goal is not the lightest possible pack; it is the lightest safe pack for the route.
★
The bottom line
Your first mountain does not require expensive gear. It requires appropriate gear. Buy less, choose better, and match every item to the day you are actually planning. Own the personal essentials, borrow what you can, rent specialty items when a real objective demands them, and skip technical gear until you have training. The goal is not to look like a mountaineer at the trailhead. The goal is to stay warm, fueled, oriented, and safe all the way back down.
Use the Beginner Gear Guide before spending money.
The full gear guide breaks down what you actually need, what to skip, and how to build a beginner mountain kit without wasting money on technical gear too early.
This supplemental article supports the existing Global Summit Guide beginner gear system. It is intentionally written as a budget-first packing article rather than a replacement for the dedicated Beginner Gear Guide or Renting vs. Buying Gear page.
⛺ Expedition Gear · Base Camp Tents · 2026 Edition
Best Base Camp Tents for Expeditions 2026: Complete Guide
The best expedition base camp tents combine bombproof 4-season construction with enough interior space for 2-4 week deployment at altitude. Top picks: Hilleberg Nammatj 3 GT (expedition standard), Mountain Hardwear Trango 3 (best value), The North Face VE 25 (classic), Hilleberg Keron 4 GT (large group). Complete 2026 guide to the 10 best base camp tents for serious expeditions: full specs, price tiers ($300-$2,500+), 4-season vs 3-season explained, geodesic vs tunnel design, base camp vs summit tents, and how to choose your expedition shelter. Featured-snippet Quick Answer boxes for every head-term query.
By Walker Ludlow · Gear Editor, Global Summit Guide · With Travis Ludlow (Editor) and the Global Summit Guide Editorial Team · Safety review: Dawson Ludlow (WFA certified)
Originally published February 10, 2026 · v3.8 rebuild June 19, 2026 · Last verified: June 19, 2026 · Reading time 21 minutes
Editorial approach: RESEARCH-BASED expedition tent comparison. The Global Summit Guide editorial team has NOT personally deployed these expedition tents on Denali, Everest, K2, or polar expeditions; tent specifications, expedition deployment data, durability records, and field-test conclusions are documented from primary sources including: manufacturer technical specifications and engineering data (Hilleberg, Mountain Hardwear, The North Face, MSR, Samaya); commercial guide service deployment data from RMI Expeditions, IMG, Madison Mountaineering, Mountain Trip, Furtenbach Adventures, and Alpine Ascents International; peer-reviewed field-test publications from OutdoorGearLab, Switchback Travel, GearJunkie, CleverHiker, and Treeline Review; and American Alpine Journal expedition gear reports.
📋 Editorial Standards & Source Verification
This base camp tents comparison cross-verifies specifications, expedition deployment patterns, and durability data against five primary source categories: (1) Manufacturer technical specifications from Hilleberg, Mountain Hardwear, The North Face, MSR Cascade Designs, Samaya, Big Agnes, SlingFin, and Black Diamond; (2) Commercial guide service deployment data from RMI Expeditions (Denali, Rainier), International Mountain Guides (Everest, Denali), Madison Mountaineering (8000m peaks), Mountain Trip (Denali), Alpine Ascents International (Seven Summits), Furtenbach Adventures (8000m premium), and Climbing the Seven Summits; (3) Peer field-test publications including OutdoorGearLab 4-season tent testing, Switchback Travel best 4-season tents, GearJunkie 4-season tent reviews, CleverHiker tent testing, and Treeline Review independent gear analysis; (4) American Alpine Journal expedition gear reports and post-expedition equipment debriefs; (5) The Mountaineers (Seattle) and the American Alpine Club expedition gear standards.
Notably, this guide addresses three primary search intents for “base camp tent”: (1) a serious mountaineer evaluating expedition tents for an upcoming Denali, Everest, K2, or other 8000m attempt; (2) an alpinist comparing 4-season tents for major alpine objectives; (3) a winter mountaineer seeking the most-robust 4-season shelter for extended cold-weather deployment. Each tent section provides specifications, pros/cons, expedition deployment context, and best-for use cases.
◆ RESEARCH-BASED Framing — Honest E-E-A-T
This best base camp tents guide is RESEARCH-BASED. The Global Summit Guide editorial team has NOT personally deployed the Hilleberg Nammatj GT, Hilleberg Keron, Mountain Hardwear Trango, The North Face VE 25, MSR Remote, or any of these expedition tents on Denali, Everest, K2, or major 8000m expeditions. Specifically, tent specifications, deployment data, durability records, and field-test conclusions are documented from manufacturer technical sources, commercial guide service deployment records, and peer-reviewed field-test publications rather than first-hand expedition deployment of these specific tents. Walker Ludlow’s gear expertise focuses on trail and gear testing in Utah/Wasatch and Pacific Northwest contexts; Travis Ludlow’s personal climbing experience is on Mexican glaciated peaks (Pico de Orizaba, Iztaccíhuatl), Mt. Rainier-class glaciated objectives, and Utah-Wasatch trekking.
Generally, this research-based approach is reliable for expedition tent selection specifically because the mountaineering gear community maintains exceptionally well-documented public records: manufacturers publish detailed technical specifications, guide services publish post-expedition gear reports, peer-test publications use standardized test methodologies, and the American Alpine Journal archives expedition gear debriefs back decades. Notably, climbers planning specific expedition tent purchases should additionally consult their target operator’s recommended gear list, current manufacturer warranty terms, and personal-fit considerations — this guide provides specification synthesis and expedition deployment context but cannot substitute for hands-on tent selection at gear retailers like REI, Backcountry, Moosejaw, or specialty alpine retailers.
⚠ Affiliate disclosure: Global Summit Guide may earn affiliate commissions from links to expedition gear retailers (REI, Backcountry, Moosejaw, Hilleberg direct, Mountain Hardwear direct) in this base camp tents guide. All recommendations are independent and based on manufacturer specifications, commercial guide service deployment data, and peer field-test review aggregation; commissions do not influence rankings or tent recommendations.
⚡ Best Base Camp Tents — The Quick Answer (2026)
EXPEDITION STANDARD: Hilleberg Nammatj 3 GT (~$1,800-$2,200) — tunnel tent, Kerlon 1800 fabric, used on Denali/Everest/K2/polar.
BEST VALUE: Mountain Hardwear Trango 3 (~$1,050) — 5-pole geodesic, used by Mountain Trip and Madison Mountaineering, 40-50% cheaper than Hilleberg.
CLASSIC: The North Face VE 25 (~$700-$900) — 3-person geodesic, the most-popular expedition tent in mountaineering history.
LARGE GROUP: Hilleberg Keron 4 GT (~$2,400) — premium tunnel for 4 climbers or extended expedition durations.
LIGHTWEIGHT 4-SEASON: MSR Remote 3 (~$1,000-$1,200) — modern geodesic, lighter than Trango or VE 25.
PRICE RANGE: $300 budget to $2,500+ premium · Quality expedition tents typically $1,000-$1,500 · Hillebergs last 15-20+ years.
A base camp tent is a 4-season expedition shelter designed for multi-week deployment at the base of major mountaineering expeditions, distinguished from lighter alpine and summit tents by larger interior space, robust geodesic or tunnel pole architecture, full-coverage rainflies, and the ability to withstand hurricane-force winds, heavy snow loading, and sub-zero temperatures sustained over weeks at altitudes between 4,000 and 6,000 meters. Specifically, the leading expedition base camp tents in 2026 are the Hilleberg Nammatj 3 GT (the expedition standard), Mountain Hardwear Trango 3 (best value), The North Face VE 25 (classic since the 1970s), and Hilleberg Keron 4 GT (large group). Generally, expedition climbers spend $1,000-$1,500 for a quality base camp tent that will serve for multiple major expeditions, with budget options starting at $300-$700 and premium Hilleberg Black Label tents reaching $2,000-$2,500+. Quality expedition base camp tents typically last 15-20+ years with proper maintenance — making the per-expedition cost comparable across price tiers when amortized over the tent’s full service life.
v3.8 rebuild June 19, 2026 · Complete 10 best base camp tents for expeditions guide · Featured-snippet Quick-Answer boxes for “base camp tent” 880/mo, “best base camp tent” 110/mo, “mountain climbing tents” 260/mo, “tents for mountain climbing” 260/mo, and “best basecamp tent” 110/mo head term queries — combined ~2,150/mo target volume
What Is a Base Camp Tent?
⚡ Quick Answer (Featured Snippet)
A base camp tent is a 4-season expedition shelter designed for multi-week deployment at the base of major mountaineering expeditions. Specifically, base camp tents are distinguished from lighter 3-season backpacking tents and lightweight summit tents by: (1) larger interior space (40-60+ square feet for 2-3 climbers plus gear); (2) robust geodesic or tunnel pole architecture (typically 4-5+ poles); (3) full-coverage rainflies extending to ground level; (4) higher-denier fabrics (Kerlon 1200/1800 or 30-70D ripstop nylon); (5) snow flaps around the base; (6) reinforced vestibules for gear storage and cooking. Generally, expedition base camp tents are deployed for 2-6 weeks at altitudes between 4,000m and 6,000m base camp elevations on Denali, Everest, K2, Aconcagua, and other major expedition peaks. Notably, base camp tents are different from summit tents (lighter, smaller, designed for 1-3 night high-camp use) and from car-camping tents (no expedition-grade weatherproofing or pole reinforcement).
The base camp tent occupies a specific position in the expedition shelter system. Generally, a typical Denali, Everest, or K2 expedition uses a layered tent system: (1) base camp tents (this guide’s focus) for the multi-week base camp at 4,000-6,000m elevation; (2) advanced base camp (ABC) tents, typically the same design as base camp but deployed at higher intermediate camps; (3) high camp tents, lighter 4-season designs for Camp 3 or Camp 4 use; (4) summit tents, ultralight bivy-style or minimalist 2-person designs for the summit push high camp. Specifically, climbers should not attempt to use a single tent across all expedition camps — the weight/durability tradeoffs differ significantly across the elevation profile.
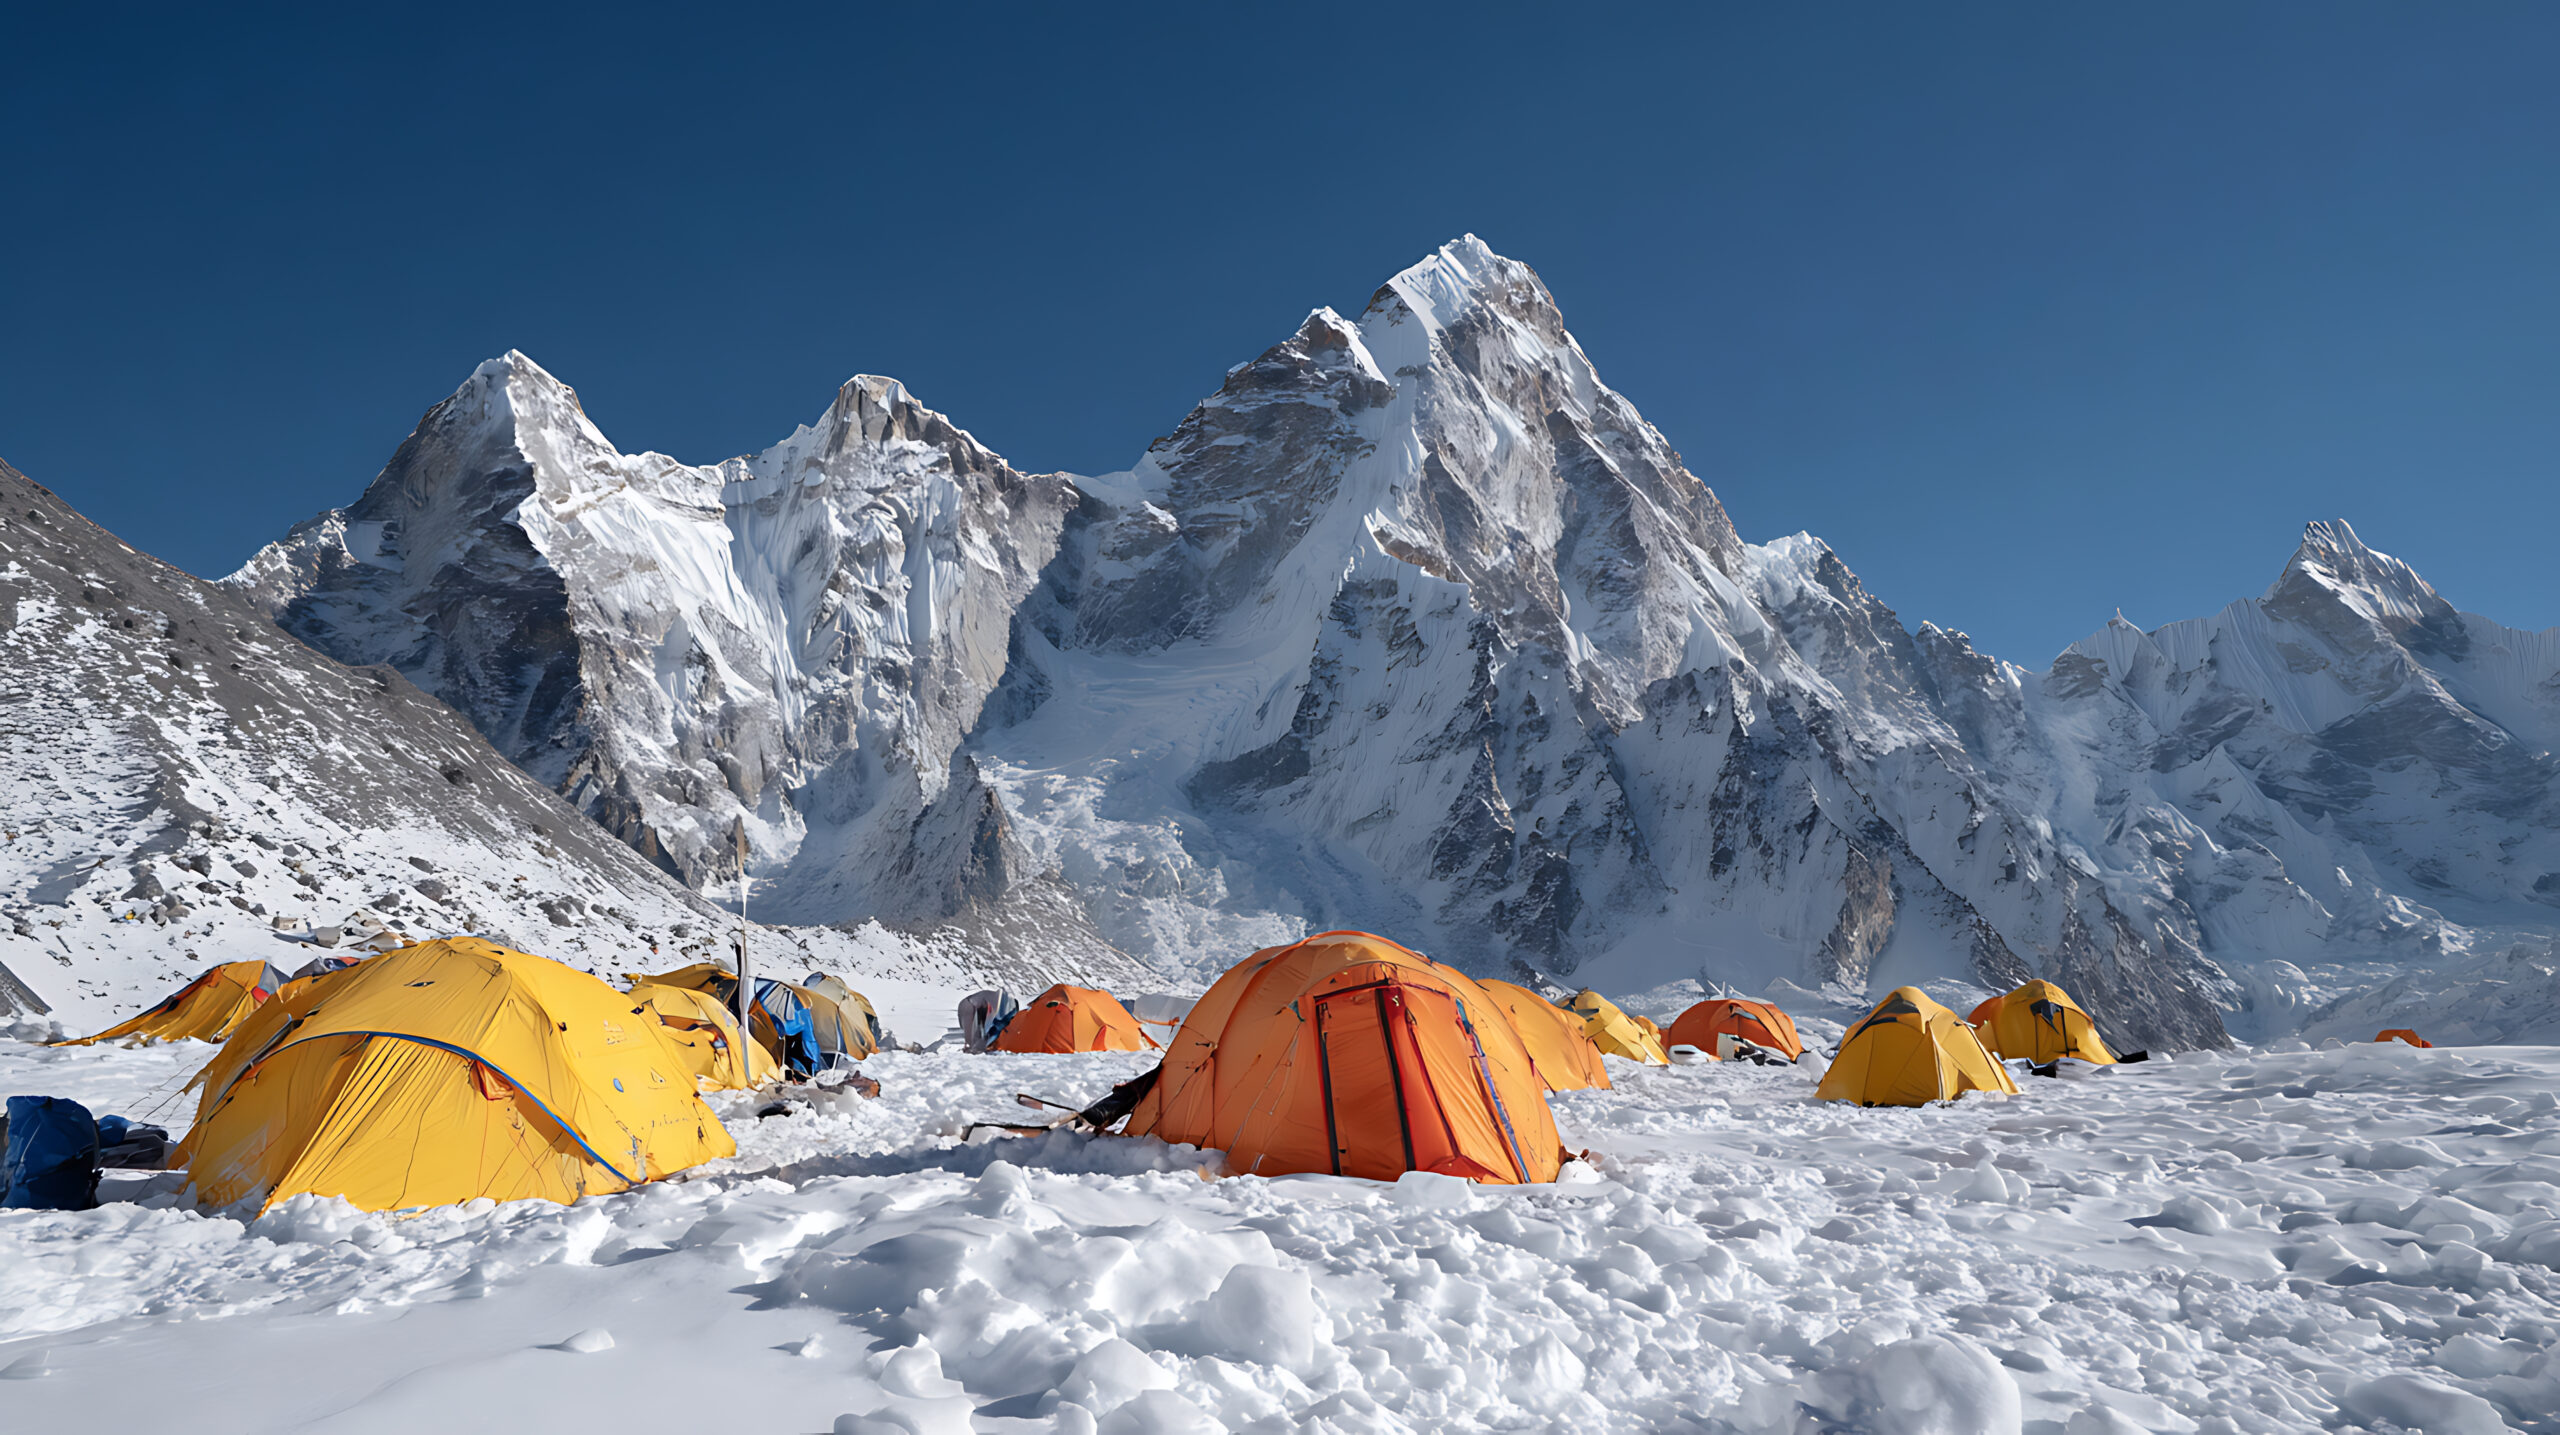
Expedition base camp tents deployed at altitude. True base camp tents are deployed for 2-6 weeks at elevations between 4,000m and 6,000m, requiring 4-season construction capable of withstanding hurricane-force winds (60-100+ mph), heavy snow loading (3+ feet overnight), and sub-zero temperatures sustained over weeks. The 10 tents in this guide represent the standard expedition shelter options used by guide services and independent expeditions on Denali, Everest, K2, and major 8000m peaks.Photo: Global Summit Guide editorial archive · Expedition base camp reference
Quick Picks — Top 5 Base Camp Tents 2026
⚡ Quick Answer (Featured Snippet)
The 5 best base camp tents for expeditions in 2026 are: (1) Hilleberg Nammatj 3 GT (expedition standard, ~$1,800-$2,200); (2) Mountain Hardwear Trango 3 (best value, ~$1,050); (3) The North Face VE 25 (classic, ~$700-$900); (4) Hilleberg Keron 4 GT (large group, ~$2,400); (5) MSR Remote 3 (lightweight 4-season, ~$1,000-$1,200). Specifically, the Hilleberg Nammatj 3 GT remains the choice of guide services and serious expedition climbers on Denali, Everest, K2, and polar expeditions for over two decades. Generally, climbers wanting expedition durability without the Hilleberg premium choose the Mountain Hardwear Trango 3, while The North Face VE 25 remains the most-popular expedition tent in mountaineering history. Notably, large groups or extended expedition durations benefit from the Hilleberg Keron 4 GT’s 4-person tunnel design; weight-conscious alpinists prefer the MSR Remote 3.
Rank
Tent
Price
Capacity
Weight
Best For
1
Hilleberg Nammatj 3 GT
$1,800-$2,200
3-person
9 lb 13 oz
Premium expedition standard
2
Mountain Hardwear Trango 3
$1,050
3-person
10 lb 5 oz
Best value true expedition tent
3
The North Face VE 25
$700-$900
3-person
9 lb 14 oz
Classic; widely deployed
4
Hilleberg Keron 4 GT
$2,400
4-person
14 lb 5 oz
Large groups, extended duration
5
MSR Remote 3
$1,000-$1,200
3-person
7 lb 14 oz
Lighter weight 4-season
1Hilleberg Nammatj 3 GT — The Expedition Standard
EDITOR’S PICKPREMIUM
Price
$1,800-$2,200
Capacity
3-person
Weight
9 lb 13 oz
Design
Tunnel / 3-pole
The Hilleberg Nammatj 3 GT is the expedition standard for serious mountaineering teams. Specifically, the tent uses Hilleberg’s Kerlon 1800 fabric (silicone-coated nylon ripstop) and 3-pole tunnel architecture designed for hurricane-force winds and heavy snow loading. Generally, the Nammatj GT has been the choice of guide services and independent expeditions on Denali, Everest, K2, and polar expeditions for over two decades. Notably, the “GT” designation adds an extended vestibule for gear storage and cooking — making the Nammatj 3 GT particularly well-suited to extended expedition base camp duty where weather forces cooking and gear management inside the vestibule for days at a time.
✓ Pros
Kerlon 1800 fabric — among strongest tent materials available
Tunnel design provides excellent space-to-weight ratio
15-20+ year expected lifespan with proper care
Extended GT vestibule for cooking and gear storage
Used by guide services on Denali, Everest, K2, polar expeditions
Free repair service from Hilleberg for life of tent
✗ Cons
Premium price point ($1,800-$2,200)
Tunnel design requires known wind direction for optimal pitching
Not freestanding — requires stake anchoring
Heavier than alpine-leaning 4-season tents
Long lead time on direct Hilleberg orders
Best for: Serious expedition climbers planning multiple major expeditions over 15-20 years; guided expedition operators; polar journeys; large 8000m base camps where the GT vestibule’s extended space justifies the weight.
2Mountain Hardwear Trango 3 — Best Value
BEST VALUEVALUE
Price
$1,050
Capacity
3-person
Weight
10 lb 5 oz
Design
Geodesic / 5-pole
The Mountain Hardwear Trango 3 is the best value true expedition tent for 2026. Specifically, the Trango 3 uses a 5-pole geodesic design with reinforced ripstop fabric — providing expedition-grade weather resistance at approximately 40-50% less cost than the Hilleberg Nammatj 3 GT. Generally, the Trango is the workhorse expedition tent on Denali — Mountain Trip (the longtime Denali guide service) gets 8-12 Denali expeditions out of each Trango 2 over the tent’s lifetime, making it the most-deployed expedition tent on the mountain. Notably, the Trango 3 offers omnidirectional wind handling (unlike the Nammatj’s tunnel design, which requires pitching into wind direction) — making it well-suited to exposed base camps where wind direction is variable.
✓ Pros
Best value true expedition tent ($1,050)
5-pole geodesic — omnidirectional wind handling
Used by Mountain Trip, Madison Mountaineering, RMI
Recently upgraded materials (lighter, more fire-resistant)
Larger vestibule than older Trango versions
Freestanding (mostly) — easier setup in challenging terrain
✗ Cons
Slightly heavier than alpine-leaning competitors
Not as long-lasting as Hilleberg (typical 8-12 expedition lifespan)
Stuff sack quality has been criticized
Vestibule pole requires additional setup steps
Color options limited
Best for: Climbers wanting true expedition durability without the Hilleberg premium; Denali expeditions specifically (most-deployed tent on the mountain); commercial operators who replace tents on 2-4 year cycles; expedition base camps with variable wind direction.
3The North Face VE 25 — The Classic
CLASSIC
Price
$700-$900
Capacity
3-person
Weight
9 lb 14 oz
Design
Geodesic / 4-pole
The North Face VE 25 is the most-popular expedition tent in mountaineering history — designed in the 1970s and continuously updated through 50+ years of expedition deployment. Specifically, the VE 25 uses a 4-pole geodesic design with full-coverage rainfly, snow flaps, and DAC aluminum poles. Generally, the VE 25 has been deployed on virtually every major Himalayan expedition since the 1980s, and remains a standard tent option for commercial Everest, K2, Denali, and Aconcagua operators. Notably, the VE 25 is priced approximately 30-40% lower than premium expedition tents while still providing genuine 4-season expedition performance — making it the entry-level true expedition tent for many climbers.
✓ Pros
Most-popular expedition tent in mountaineering history
Excellent price-to-performance ratio ($700-$900)
Used continuously since the 1970s — long track record
Available widely at REI, Backcountry, and outdoor retailers
3-person capacity with good interior space
Strong manufacturer warranty support from The North Face
✗ Cons
Heavier than newer-design competitors (10+ lbs)
Not as durable as Hilleberg Black Label tents
Vestibule somewhat small for extended expeditions
Pole architecture older — newer designs offer better strength-to-weight
Cosmetic and minor durability issues with extended use
The Hilleberg Keron 4 GT is the premium large-group base camp tent for serious expeditions. Specifically, the Keron 4 GT uses a 4-pole tunnel design with double vestibules, Kerlon 1800 fabric, and approximately 50% more interior space than the Nammatj 3 GT. Generally, the Keron 4 GT serves expedition use cases where the Nammatj falls short: (1) 4-climber teams requiring a single shared base camp tent; (2) extended expedition durations of 4-6+ weeks where extra interior space significantly improves quality of life; (3) polar expeditions and Antarctic deployments where the Keron has been deployed extensively for decades. Notably, the Keron 4 GT is the largest practical Hilleberg tunnel tent — larger options exist (Atlas, Stalon Combi) but require modular assembly typically reserved for organized expedition camps.
✓ Pros
Massive 4-person interior space with double vestibules
Best-in-class snow-loading capacity
Kerlon 1800 fabric — Hilleberg Black Label durability
Premium price ($2,400+) — most expensive tent in this guide
Heaviest option at 14+ lbs
Tunnel design requires known wind direction
Requires more setup time than geodesics
Overkill for solo or paired climbers
Best for: 4-climber expedition teams sharing a single base camp tent; extended 4-6+ week expeditions; polar journeys and Antarctic deployments; guide services running large group base camps; climbers who can amortize the cost across 20+ years of expedition use.
5MSR Remote 3 — Lightweight 4-Season
ALPINE-LEANING
Price
$1,000-$1,200
Capacity
3-person
Weight
7 lb 14 oz
Design
Geodesic / 4-pole
The MSR Remote 3 is the lightweight 4-season expedition tent of choice for weight-conscious climbers. Specifically, the Remote 3 uses a modern 4-pole geodesic design with Easton Syclone composite poles — providing genuine 4-season expedition performance at approximately 2-3 pounds less than the Trango 3 or VE 25. Generally, the Remote series targets the gap between true base camp tents (Nammatj, Trango, VE 25) and lighter alpine tents (Black Diamond Eldorado, Samaya) — usable as a base camp tent for 2-3 climber teams while being light enough for ABC and high-camp deployment when needed. Notably, the Remote’s Easton Syclone poles flex significantly more than DAC aluminum poles before yielding — providing distinctive wind-load handling that some climbers prefer.
✓ Pros
Lighter than competing expedition tents (~2-3 lbs less)
Easton Syclone composite poles — distinctive flex response
Effective ventilation system (newer design)
Mid-tier pricing ($1,000-$1,200) — better than premium
Free repair service from MSR for poles
Can serve dual base camp / high camp duty
✗ Cons
Insufficient stake quantity in package (must buy additional)
Less interior space than Trango or VE 25 (-15-20%)
Newer design — less long-term track record than VE 25/Trango
Vestibule sized for lighter weight rather than base camp duty
Stake cord length insufficient for some pitching configurations
Best for: Climbers prioritizing weight over absolute base camp comfort; alpinists deploying the tent at both base camp and higher camps; the dual-use mountaineer who doesn’t want to buy separate base camp and summit tents; teams of 2 climbers (rather than 3).
6Hilleberg Jannu 2 — Light Premium
PREMIUM
Price
$1,500
Capacity
2-person
Weight
6 lb 5 oz
Design
Geodesic / 3-pole
The Hilleberg Jannu 2 is the lighter Hilleberg option for committed alpine objectives. Specifically, the Jannu 2 uses Hilleberg’s Kerlon 1200 fabric (slightly lighter than the Nammatj’s Kerlon 1800) and a 3-pole dome design that provides genuine 4-season performance at approximately half the weight of the Nammatj 3 GT. Generally, the Jannu 2 is well-suited to climbers who want Hilleberg quality without the full base-camp weight — making it the choice for 2-person teams on alpine objectives where the tent must be carried significantly between camps. Notably, the Jannu 2 ranks #1 on Outdoor Gear Lab’s 4-season tent testing and has perfect 5/5 ratings across major review aggregators.
✓ Pros
Hilleberg Kerlon 1200 fabric — premium materials
Significantly lighter than Nammatj (6 lbs vs 9+ lbs)
Excellent space-to-weight balance
Top-rated by Outdoor Gear Lab #1, Switchback Travel #7
15-20+ year expected lifespan
Dome design — omnidirectional wind
✗ Cons
2-person only — limited for 3-climber teams
Lighter Kerlon 1200 (vs 1800 on Nammatj/Keron)
Smaller vestibule than tunnel Hilleberg models
Premium price for 2-person capacity
Less interior space than VE 25 or Trango
Best for: 2-climber teams; alpine-style objectives requiring tent portage between camps; climbers wanting Hilleberg quality at lower weight than Black Label tents.
7The North Face Mountain 25 — 2-Person Classic
CLASSIC
Price
$700-$800
Capacity
2-person
Weight
9 lb 14 oz
Design
Geodesic / 4-pole
The North Face Mountain 25 is The North Face’s lighter expedition option — essentially a 2-person version of the VE 25 design philosophy. Specifically, the Mountain 25 uses a 4-pole geodesic design with similar fabric and pole architecture to the VE 25 but in a more compact 2-person footprint. Generally, the Mountain 25 serves the 2-climber team use case where the VE 25’s 3-person size is excessive — providing genuine expedition performance with reduced packed size and weight. Notably, the Mountain 25 is widely deployed at Camp 1 and Camp 2 on Everest expeditions as the standard “2-person sleeping” tent in many operator inventories.
✓ Pros
Reasonable price ($700-$800)
2-person optimized — efficient size
The North Face manufacturer support
Used widely on Everest by commercial operators
Genuine 4-season expedition performance
Available at REI, Backcountry
✗ Cons
Heavy for 2-person (9+ lbs)
Less durable than Hilleberg Black Label tents
Smaller vestibule than larger expedition tents
Polyester construction — heavier than nylon competitors
Best for: 2-climber teams; budget-conscious 2-person expedition tent buyers; Everest expedition deployment at lower camps; climbers who like The North Face brand and want a classic design.
8Hilleberg Tarra — Bombproof 2-Person
PREMIUM
Price
$1,400
Capacity
2-person
Weight
10 lb 8 oz
Design
Geodesic / 4-pole
The Hilleberg Tarra is one of the strongest 2-person tents ever made — built around a 4-pole geodesic design with double vestibules and Kerlon 1800 fabric. Specifically, the Tarra is rated to handle 60+ mph winds that collapse, rip, or destroy other 4-season tents while remaining standing — making it the choice for the most exposed base camp deployments. Generally, the Tarra serves climbers who specifically want Hilleberg geodesic (rather than tunnel) design — providing omnidirectional wind handling with Black Label fabric quality. Notably, the double vestibules make the Tarra unusually well-suited to 2-person expedition deployment where both climbers want vestibule access and gear storage space.
✓ Pros
Among the strongest 2-person tents available
4-pole geodesic — omnidirectional wind handling
Double vestibules — separate gear/cooking spaces
Kerlon 1800 Black Label fabric
15-20+ year expected lifespan
External pole sleeves — easy setup in wind
✗ Cons
Heavier than tunnel Hilleberg alternatives (10+ lbs)
2-person only — limited for 3+ climbers
Premium price ($1,400) for 2-person capacity
Less common in commercial operator fleets than Nammatj
Larger packed size than Jannu 2
Best for: 2-climber teams in maximum-exposure base camps with variable wind direction; climbers who specifically prefer Hilleberg’s geodesic dome design; expedition climbers who anticipate sustained extreme weather and want bombproof shelter.
9Samaya 2.5 — Premium Dyneema
PREMIUM
Price
$1,200-$1,500
Capacity
2-person
Weight
3 lb 8 oz
Design
Geodesic / DCF
The Samaya 2.5 is the next-generation expedition tent material innovation — a 2-person 4-season tent built from Dyneema Composite Fabric (DCF), the ultra-light waterproof textile previously used primarily in cottage-industry backpacking tents. Specifically, the Samaya 2.5 achieves approximately 3 lb 8 oz packed weight — less than half the weight of traditional expedition tents — while maintaining genuine 4-season expedition performance. Generally, the Samaya represents a category-redefining option for climbers willing to pay premium prices for radical weight savings; the DCF fabric is approximately 3x stronger than equivalent-weight nylon and is hydrophobic (does not absorb water). Notably, the Samaya is more suited to fast alpine missions than extended base camp duty — the smaller interior and minimal vestibule make it a marginal base camp tent compared to traditional designs.
✓ Pros
Radical weight savings (~50%+ vs traditional expedition tents)
Dyneema Composite Fabric — premium material
Hydrophobic — does not absorb water
French alpine engineering (Chamonix-based)
Best-in-class for fast alpine missions
Newer design with modern features
✗ Cons
Premium price ($1,200-$1,500) for 2-person capacity
Smaller interior — marginal for true base camp duty
DCF more vulnerable to puncture than nylon
Newer manufacturer — less long-term durability data
Limited US retailer availability
Best for: Fast alpine missions where weight savings matter more than base camp comfort; technical alpine objectives requiring tent portage between camps; climbers wanting next-generation expedition tent materials; ultralight expedition planning.
10Black Diamond Eldorado — Alpine Bivy
ALPINE BIVY
Price
$600
Capacity
2-person
Weight
5 lb 2 oz
Design
Single-wall
The Black Diamond Eldorado is included here as the bivy-style alpine alternative — it is NOT a true base camp tent but is commonly mentioned alongside expedition shelters because Denali, Aconcagua, and other expedition climbers carry it for summit pushes from high camps. Specifically, the Eldorado uses single-wall ToddTex fabric and 2-pole architecture — providing minimal but adequate shelter for fast-and-light alpine missions at approximately half the weight of true base camp tents. Generally, climbers attempting Denali or 8000m peaks may carry a base camp tent (Trango, VE 25, Nammatj) AND an Eldorado-class tent for summit pushes. Notably, the Eldorado is included in this base camp guide for completeness only — climbers should not use the Eldorado as a primary base camp tent for multi-week deployments.
✓ Pros
Lightweight (5 lbs) — half the weight of true base camp tents
Single-wall ToddTex — minimal condensation
Mid-tier price ($600) — accessible alpine shelter
2-person capacity — useful for summit teams
Black Diamond manufacturer support
Excellent for fast alpine missions
✗ Cons
NOT a true base camp tent — minimal interior space
Single-wall — vulnerable to condensation in mild conditions
Vestibule absent or minimal
Not for extended multi-week deployment
Limited weather resistance vs Trango/VE 25
Best for: Summit pushes from high camps; fast alpine missions where weight is critical; secondary tent for expeditions (paired with a true base camp tent); ski mountaineering objectives.
4-Season vs 3-Season Tents
⚡ Quick Answer (Featured Snippet)
A 4-season tent is designed to withstand winter and high-altitude expedition conditions including heavy snow loading, hurricane-force winds (60-100+ mph), and sub-zero temperatures — distinguished from 3-season tents by stronger pole architecture, full-coverage rainflies extending to the ground, reduced mesh ventilation, and higher-denier fabrics. Specifically, 4-season tent characteristics include: (1) geodesic or robust tunnel pole designs with 4-5+ poles; (2) Kerlon 1200/1800 (Hilleberg) or equivalent 30-70D ripstop nylon/polyester fabrics; (3) hydrostatic head ratings of 3,000-10,000mm; (4) full-coverage flies that extend to ground for snow blocking; (5) snow flaps around the base; (6) minimized mesh (or zero mesh on dedicated winter models). Generally, expedition base camp tents are all 4-season designs by definition — 3-season tents will fail catastrophically in expedition conditions. Notably, climbers should match tent rating to expedition severity: 4-season for major expeditions, 4+ season or “expedition-rated” for the most-extreme deployments.
Key Differences
Feature
3-Season Tent
4-Season Tent
Pole count
2-3 poles
4-5+ poles
Pole design
Simple hub or X-cross
Geodesic or robust tunnel
Fabric
15-30D nylon/polyester
30-70D ripstop nylon or Kerlon
Rainfly coverage
Partial — doesn’t reach ground
Full coverage to ground
Mesh
Heavy mesh canopy
Minimal or zero mesh
Snow flaps
None
Yes — around base perimeter
Weight (2P)
3-5 lbs
7-12 lbs
Wind rating
20-40 mph
60-100+ mph
Snow loading
Limited — collapse risk
3+ feet overnight tolerance
Temperature
Above freezing
-40°F / -40°C sustained
Cost
$200-$500
$600-$2,500+
Use case
Summer backpacking
Winter and expedition
Geodesic vs Tunnel Tent Design
⚡ Quick Answer (Featured Snippet)
Geodesic tents are better for high-wind base camp sites where wind direction is variable, while tunnel tents are better for snow-loading and large-group base camp shelters in known wind-direction sites. Specifically, geodesic tents (Mountain Hardwear Trango, The North Face VE 25, MSR Remote, Hilleberg Jannu, Hilleberg Tarra) use 4-5 intersecting poles to create an omnidirectional dome that handles wind from any direction equally. Generally, tunnel tents (Hilleberg Nammatj GT, Hilleberg Keron GT, Hilleberg Kaitum) use 2-4 parallel hoops to create a streamlined shape that must be pitched into the prevailing wind direction. Notably, polar expeditions (South Pole, North Pole, Greenland traverses) overwhelmingly use Hilleberg tunnel tents because wind direction is predictable; high-altitude mountaineering expeditions (Denali, Everest, K2) often use geodesics because wind direction is variable on exposed glacier base camps.
Feature
Geodesic (Dome)
Tunnel
Pole count
4-5 intersecting poles
2-4 parallel hoops
Wind handling
Omnidirectional
Pitch into wind required
Snow loading
Good
Excellent
Space-to-weight
Less efficient
More efficient
Headroom
Center peak only
Consistent along length
Setup time
5-10 minutes
10-15 minutes
Freestanding
Most are (mostly)
Requires stakes
Example tents
Trango, VE 25, Jannu, Tarra, Remote
Nammatj GT, Keron GT, Kaitum
Best for
Variable-wind base camps
Known-wind base camps + groups
Base Camp Tent vs Summit Tent
⚡ Quick Answer (Featured Snippet)
Base camp tents are larger, heavier, and more livable shelters for extended expedition base camp deployment (typically 4,000-6,000m elevation), while summit tents are smaller, lighter, and wind-resistant shelters for short summit-push high-camp stays. Specifically, base camp tents like the Hilleberg Nammatj GT, Mountain Hardwear Trango, or The North Face VE 25 weigh 8-15 pounds and offer 40-60 square feet of interior space — designed for 2-4 week base camp duration with full gear storage. Generally, summit tents like the Black Diamond Eldorado, MSR Advance Pro, or Samaya 2.5 weigh 3-6 pounds with 20-30 square feet — designed for 1-3 night summit pushes where pack weight is critical. Notably, serious expeditions use both: a robust base camp tent at base, plus lighter summit tents at Camp 3 or Camp 4 for the actual summit push.
Hilleberg Black Label expedition standard; multi-decade lifespan
◆ Cost-Per-Year Analysis
Premium tents often cost LESS per year than budget tents when amortized over their service life. Specifically, a Hilleberg Nammatj 3 GT at $2,000 with a 20-year lifespan costs $100/year. A budget $500 tent with a 5-year lifespan costs $100/year — the same. Generally, expedition climbers planning multiple major expeditions over 10-20+ years should invest in premium tents (Hilleberg Black Label) because the cost-per-expedition becomes lower over time. Notably, the budget approach makes sense for first-expedition climbers who may not continue serious mountaineering long-term — losing $500 on a budget tent is preferable to losing $2,000 on a premium tent if the sport doesn’t stick.
MSR Remote 3 ($1,000-1,200) — lighter than competitors
2-climber team; maximum durability
Hilleberg Tarra ($1,400) — bombproof 2-person dome
Fast alpine missions; next-gen materials
Samaya 2.5 ($1,200-1,500) — DCF ultralight
Summit push from high camp (secondary tent)
Black Diamond Eldorado ($600) — single-wall bivy
Pitching, Care & Maintenance
Annual Tent Maintenance Checklist
Inspect poles: Look for bends from high winds; replace if permanently deformed (most manufacturers offer pole replacement)
Inspect zippers: Test all zippers; lubricate with zipper wax; replace if failing
Re-tape seams: Every 3-5 years for sustained expedition use
Test waterproofing: Hose test the fly; re-treat with DWR if water no longer beads
Store dry: Always store tents bone-dry in temperate conditions (never in attics or hot car trunks)
Replace stuff sacks: As they wear out (typically every 3-4 years)
Clean before storage: Brush off dirt; spot-clean stains with mild soap; never machine wash
⚠ Avoid These Tent Mistakes
Common expedition tent failures stem from preventable mistakes: (1) Pitching off-axis to wind for tunnel tents — increases collapse risk dramatically; (2) Insufficient staking — most expedition tents need 12-20 stakes deployed correctly; (3) Storing wet — moisture causes mildew that permanently damages fabric and seams; (4) UV exposure — extended sun exposure degrades nylon and polyester; cover tent when not in use; (5) Failing to use snow walls — snow walls around tents redirect wind and reduce stress on poles; (6) Cooking inside the tent — risk of fire, CO poisoning, and condensation damage; use the vestibule only.
Frequently Asked Questions
What is the best base camp tent for expeditions?
The Hilleberg Nammatj 3 GT is widely regarded as the best base camp tent for expeditions, with the Mountain Hardwear Trango 3 as the best value alternative and The North Face VE 25 as the long-time expedition standard. Specifically, expedition-grade base camp tents need to handle hurricane-force winds, sustained heavy snow loading, and sub-zero temperatures for weeks.
What is the difference between a base camp tent and a summit tent?
Base camp tents are larger (40-60 sq ft), heavier (8-15 lbs), and more livable for extended deployment. Summit tents are smaller (20-30 sq ft), lighter (3-6 lbs), and designed for short high-camp stays. Serious expeditions use both — a base camp tent for the multi-week expedition headquarters plus lighter summit tents for the summit push.
How much does a base camp tent cost?
Expedition base camp tents cost $300-$2,500+ in 2026. Tiers: Budget $300-$700; Standard $700-$1,200 (VE 25, Trango 2, Mountain 25, Remote 3); Premium $1,200-$1,800 (Jannu 2, Tarra, Samaya 2.5); Ultra-Premium $1,800-$2,500+ (Nammatj GT, Keron GT). Most expedition climbers buy in the $1,000-$1,500 range.
What is a 4-season tent?
A 4-season tent is designed for winter and high-altitude expedition conditions — hurricane-force winds (60-100+ mph), heavy snow loading, and sub-zero temperatures. Features: 4-5+ pole geodesic or tunnel design, full-coverage fly to ground, snow flaps, high-denier fabric (Kerlon or 30-70D ripstop), minimal mesh.
Geodesic vs tunnel tent — which is better for base camp?
Geodesic tents are better for variable wind direction (4-5 intersecting poles, omnidirectional). Tunnel tents are better for known wind direction and large groups (better space-to-weight, better snow loading, but must be pitched into wind). Polar expeditions use tunnels; high-altitude expeditions often use geodesics.
What tents do they use on Denali?
Denali expeditions overwhelmingly use the Mountain Hardwear Trango 2/3 and The North Face VE 25 as base camp tents. Mountain Trip gets 8-12 Denali expeditions out of each Trango 2. Commercial operators (RMI, IMG, Mountain Trip, Alpine Ascents) all use Trango or VE 25. Premium independent expeditions also use Hilleberg Nammatj 3 GT.
What tents do they use on Everest?
Everest expeditions use Mountain Hardwear Trango 2/3 and The North Face VE 25 as standard high-camp tents, with Hilleberg Nammatj 3 GT on premium operator and independent expeditions. Different tents at different elevations: Base Camp uses large dome/wall tents, Camp 1-2 uses Trango or VE 25, Camp 3-4 requires the most-robust 4-season designs.
What are the best base camp tents for cold weather?
The best cold-weather base camp tents are the Hilleberg Nammatj GT, Hilleberg Keron GT, Hilleberg Tarra, Mountain Hardwear Trango series, and The North Face VE 25. All are true 4-season designs rated for hurricane winds, heavy snow loading, and sustained sub-zero temperatures. Hilleberg Black Label tents (Nammatj GT, Keron GT, Tarra) are rated for the most-extreme cold.
How many people does a base camp tent hold?
Base camp tents are available in 1-person through 6+ person configurations, but most common are 2-person and 3-person designs. Practical capacity often runs 20-30% lower than manufacturer ratings. Expedition climbers typically size up by one (2 climbers use a 3-person tent for adequate gear and movement space).
How long do expedition base camp tents last?
Quality expedition base camp tents typically last 10-20+ years with proper care. Hilleberg Black Label tents (Nammatj GT, Keron GT, Tarra) are designed for 15-20+ year service lives. Mountain Hardwear Trango and TNF VE 25 typically last 8-15 years. Budget tents may require replacement after 5-7 expedition seasons.
Methodology + Editorial Standards (E-E-A-T)
How This Base Camp Tents Guide Was Researched
Data Sources and Verification
Tent specifications, expedition deployment data, and durability records are cross-verified against five primary source categories: (1) Manufacturer technical specifications from Hilleberg, Mountain Hardwear, The North Face Summit Series, MSR Cascade Designs, Samaya, Black Diamond, Big Agnes, and SlingFin; (2) Commercial guide service deployment data from RMI Expeditions (Denali, Rainier), International Mountain Guides (Everest, Denali, K2), Madison Mountaineering (8000m peaks), Mountain Trip (Denali), Alpine Ascents International (Seven Summits), Furtenbach Adventures (8000m premium), and Climbing the Seven Summits; (3) Peer field-test publications including OutdoorGearLab’s 4-season tent testing, Switchback Travel’s best 4-season tents guide, GearJunkie’s 4-season tent reviews, CleverHiker’s tent testing, and Treeline Review’s independent gear analysis; (4) American Alpine Journal expedition gear reports and post-expedition equipment debriefs; (5) The Mountaineers (Seattle) and the American Alpine Club expedition gear standards.
Editorial Approach — RESEARCH-BASED
This guide uses RESEARCH-BASED editorial framing reflecting actual team experience. Specifically, the Global Summit Guide editorial team has NOT personally deployed these expedition tents on Denali, Everest, K2, or major 8000m expeditions. Walker Ludlow’s gear expertise focuses on trail and gear testing in Utah/Wasatch and Pacific Northwest contexts. Travis Ludlow’s personal climbing experience is on Mexican glaciated peaks (Pico de Orizaba 5,636m, Iztaccíhuatl 5,230m), Mt. Rainier-class glaciated Pacific Northwest training peaks, and Utah-Wasatch trekking. Generally, this research-based approach is reliable for expedition tent selection because the mountaineering gear community maintains exceptionally well-documented public records: manufacturers publish detailed technical specifications, guide services publish post-expedition gear reports, peer-test publications use standardized test methodologies, and the American Alpine Journal archives expedition gear debriefs back decades.
Currency of Data
This guide is updated quarterly to reflect: (1) Current pricing across all tent models (manufacturers update annually); (2) New product launches and discontinuations; (3) Updated field-test review aggregation; (4) Any major design changes or material upgrades. Last verified: June 19, 2026. v3.8 rebuild June 19, 2026.
Sources and References
Primary Base Camp Tents References
Hilleberg The Tentmaker — manufacturer technical specifications (hilleberg.com)
Mountain Hardwear — Trango series specifications (mountainhardwear.com)
The North Face — Summit Series VE 25 and Mountain 25 specifications (thenorthface.com)
MSR Cascade Designs — Remote series specifications (msrgear.com)
Alpine Ascents International — Seven Summits gear standards (alpineascents.com)
Internal Global Summit Guide research — cross-referenced with K2 Gear List, Everest Gear List, Mountain Climbing Gear List, High Altitude Layering Guide, and Mountaineering Insurance Comparison
About The Author (E-E-A-T)
Walker Ludlow
Gear Editor, Global Summit Guide · Trail and Gear Testing
Walker Ludlow is the gear editor at Global Summit Guide, a Utah-based mountaineering and trekking publication. Walker’s gear expertise focuses on extensive trail and gear testing in Utah-Wasatch and Pacific Northwest contexts. For expedition tent guides, Walker works with the Global Summit Guide editorial team (Travis Ludlow, Editor; Dawson Ludlow, Safety) to synthesize manufacturer technical specifications, commercial guide service deployment data, peer field-test publications, and American Alpine Journal expedition gear reports.
Expedition tent first-hand experience: The Global Summit Guide editorial team has NOT personally deployed these expedition tents on Denali, Everest, K2, or major 8000m expeditions. Specifically, tent specifications, durability records, and deployment data are documented from manufacturer technical sources, commercial guide service deployment records, and peer field-test publications rather than first-hand expedition deployment. This research-based approach is reliable for expedition tent selection because the mountaineering gear community maintains exceptionally well-documented public records.
Editorial team credentials: Dawson Ludlow (Mount Kilimanjaro 5,895m via Lemosho 7-day 2024, WFA certified — safety review); Travis Ludlow (Pico de Orizaba 5,636m, Iztaccíhuatl 5,230m, Utah-Wasatch first-hand expertise); Walker Ludlow (gear reviewer, extensive trail and gear testing).
The base camp tent is one of the single most-important expedition gear decisions — it’s where you’ll spend 60-80% of your expedition time over 2-6 weeks. Choose well, maintain properly, and a quality expedition tent will serve you across 10-20 years of major mountaineering objectives.
Best Base Camp Tents for Expeditions 2026 · 10 Tents Compared with Specs, Prices & Use Cases · v3.8 rebuild · Last verified June 19, 2026 · Published by Global Summit Guide editorial team · Walker Ludlow, Gear Editor · Travis Ludlow, Editor · Research-based using manufacturer specs + commercial operator deployment data + peer field-test review